Blistering Roof: What Causes It and How to Prevent and Repair
RNC Roofing and Construction GroupApril 6, 2023
Blistering Roof: What Causes it And How To Prevent And Repair
Your roof is a crucial component of your home’s protection against the weather. It shields your living space from the elements, ensuring comfort and safety. Nevertheless, roofs are susceptible to damage and wear over time. One prevalent problem that homeowners encounter is a blistering roof. Blistering occurs due to various reasons, and if not addressed, it can lead to more severe issues. In this blog post, we will explain the causes and prevention measures of blistering roofs, along with effective repair methods.
What is a Blistering Roof?
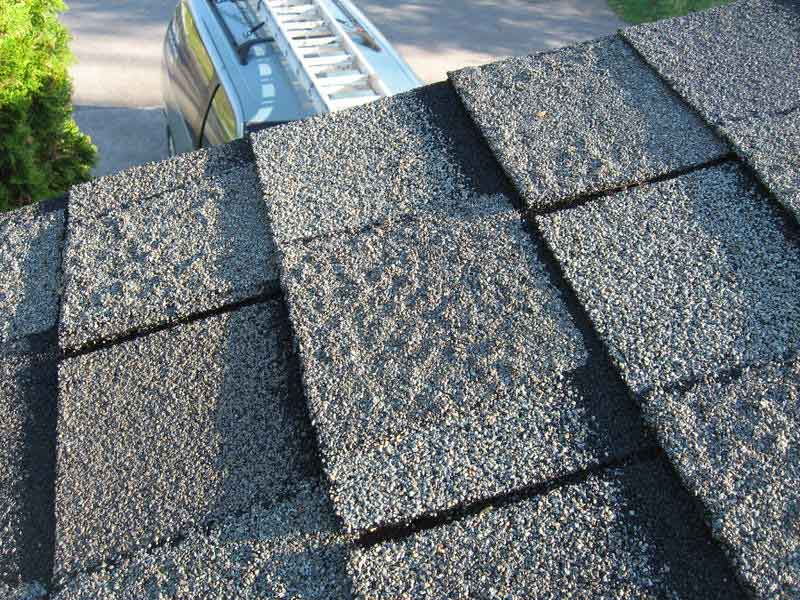
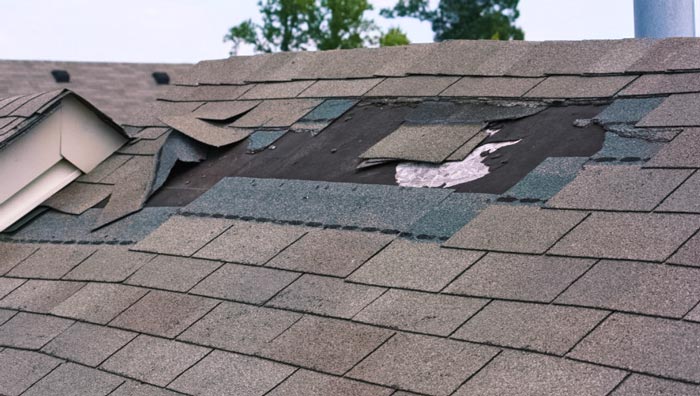
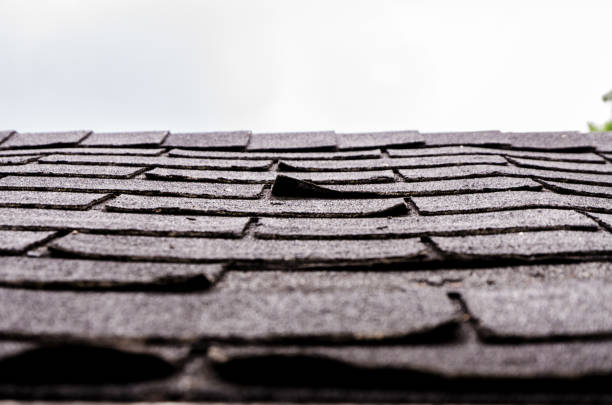
A blistering roof is when bubbles or bumps form on the surface of the roof. These blisters can be small or large, and they can form in clusters or spread out across the entire roof. While blistering may seem like a minor issue, it can lead to bigger problems if left unchecked. Water can seep into the blisters and cause the roofing material to deteriorate, which can lead to leaks and other issues.
What Causes Blistering?
Blistering can be caused by a variety of factors, including:
Poor Ventilation
Poor ventilation in the attic can cause heat to build up, which can lead to blistering. The heat causes the roofing material to expand and contract, which can lead to blisters forming.
Moisture
Excessive moisture can also cause blistering. Water can seep into the roofing material and cause it to expand, which can lead to blisters forming.
Low-Quality Materials
Low-quality roofing materials can also cause blistering. If the roofing material is not designed to withstand the elements, it can deteriorate and blister over time.
Age
As a roof ages, it becomes more susceptible to damage. Over time, the roofing material can deteriorate and lead to blistering.
Signs of a Blistering Roof
The most obvious sign of a blistering roof is the presence of bubbles or bumps on the surface of the roof. However, there are other signs to look out for, including:
Cracking
As the blisters grow and spread, they can cause the roofing material to crack. This can lead to leaks and other issues.
Peeling Paint
If the blisters are large enough, they can cause the paint on the roof to peel.
Water Stains
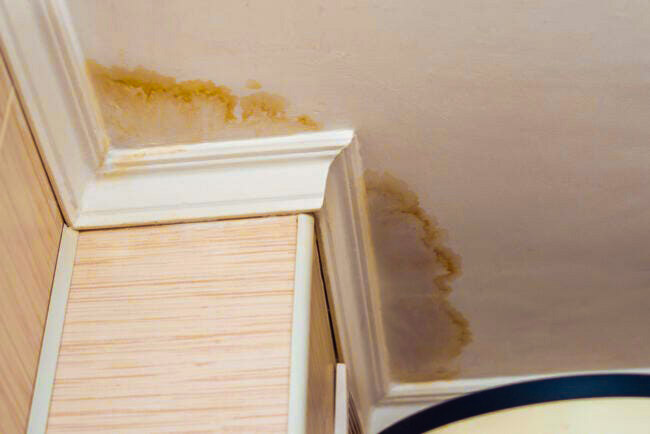
If the blisters have caused leaks, you may notice water stains on the ceiling or walls inside your home.
Preventing Blistering on Your Roof
The best way to prevent blistering on your roof is to ensure that it is properly ventilated. Good ventilation allows heat to escape and prevents moisture from building up in the attic. Other ways to prevent blistering include choosing high-quality roofing materials and hiring a professional roofing contractor to install or repair your roof.Another way to prevent blistering is to apply a reflective roof coating. This type of coating reflects sunlight and heat away from the roof, which can help to prevent overheating and blistering. Additionally, keeping your roof clean and free of debris can help to prevent moisture buildup, which is a common cause of blistering.Regular roof inspections and maintenance are also important for preventing blistering. By catching and addressing any issues early on, you can avoid costly repairs down the line.
Contact a Professional Today
Blistering on your roof can be a frustrating and costly issue to deal with. It can compromise the integrity of your roof and lead to more serious problems if left untreated. By identifying the cause, removing damaged material, and repairing the affected area, you can effectively address blistering on your roof. Taking preventative measures such as proper ventilation, using high-quality materials, and regular maintenance can also help to prevent blistering from occurring in the first place.Remember, addressing blistering on your roof should be done promptly and by a professional to ensure that the job is done correctly and effectively. With proper care and attention, you can keep your roof in good condition and avoid issues like blistering.Read More About Roof Replacement Here
More Informative Post
Free, No Obligation
Request Your Free Estimate & Inspection
Tell us about your roof and we’ll come take a look — no pressure,
no cost. Or call us right now on
(571) 269-8153.
Blistering Shingles- Here’s What You Need to Know!
RNC Roofing and Construction GroupMarch 31, 2023
How to Deal with Blistering Shingles: A Comprehensive Guide for Roofing
At RNC Roofing and Construction, we know that a well-maintained roof is crucial for the safety and security of your home. If you are a homeowner, it is vital to keep an eye out for potential issues that could damage your roof’s integrity. One of these issues is blistering shingles. In this article, we will explore what blistering shingles are, what causes them, and what steps you can take to prevent and fix them.
What are Blistering Shingles?
Blistering shingles are a common roofing problem that occurs when bubbles or blisters form on the surface of your shingles. These blisters can range in size and can appear on individual shingles or in larger patches. Although blistering shingles may not seem serious, they can damage your roof’s integrity and lead to more significant issues if left unaddressed.Asphalt shingles are the most common type of shingle used on residential roofs in North America. They are made of a base material (either organic or fiberglass) coated with asphalt and topped with a layer of ceramic granules. When the asphalt in the shingles is exposed to high temperatures, it can soften and expand, causing the shingles to blister.
What Causes Blistering Shingles?
Several factors can cause blistering shingles. One common cause is excessive heat. When shingles are exposed to high temperatures for extended periods, they can begin to blister and bubble. This is particularly true for roofs that are poorly ventilated or located in areas with intense sunlight.Moisture is another common cause of blistering . When water gets trapped between the layers of your shingles, it can cause them to bubble and blister. That’s why it is essential to ensure that your roof is correctly waterproofed, and any leaks are repaired promptly.
Why Are My Roof Shingles Blistering?
Blistering Shingles is a common issue with asphalt shingles. There are two main reasons for blistering on shingles
Trapped Moisture
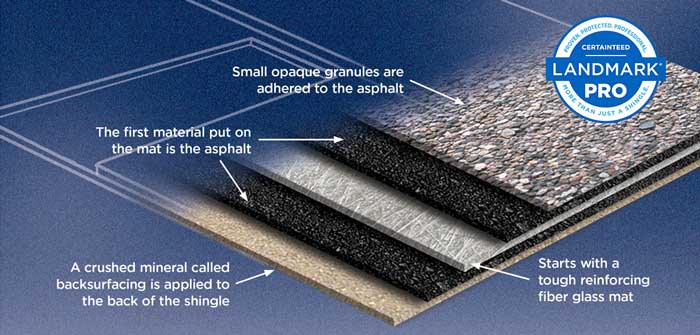
The first cause of blistering on shingles is due to manufacturing errors that allow moisture to get trapped between the layers that comprise the shingle. Most asphalt roof shingles consist of three layers:
-The backing, composed of paper or fiberglass
-The asphalt
The granules
When the moisture stuck between these layers heats up from sun exposure or attic heat, it expands or turns to vapor, forming blisters.
Poor Ventilation
Blistering on shingles may develop or worsen if your roof is poorly ventilated. A poorly ventilated roof allows heat and moisture to build up in the attic, leading to shingle deterioration and damage.
Preventing Blistering Shingles:
The best way to prevent blistering is to ensure that your roof is correctly ventilated and waterproofed. Regular inspections and maintenance by a professional roofing contractor can achieve this. Additionally, it’s important to keep your gutters clear of debris and to remove any overhanging tree limbs that could damage your roof.
Proper Roof Ventilation
Ventilation is crucial in preventing blistering shingles. Attic vents allow for the release of warm, moist air that can build up in your attic. This, in turn, prevents the shingles from overheating and blistering. Proper attic ventilation also helps reduce energy costs by allowing hot air to escape, making it easier to cool your home.
Waterproofing
Waterproofing your roof is another critical step in preventing blistering shingles. Ensure that your roof is properly waterproofed by having a professional Roofing contractor install the right underlayment and ice and water shield. These materials help prevent moisture from getting trapped between the layers of your shingles and causing blisters. It’s essential to choose the right underlayment and ice and water shield for your roof type and climate, as different materials are designed to withstand different weather conditions.
Regular Inspections and Maintenance
Regular inspections and maintenance are critical in preventing shingles blistering. A professional roofing contractor can identify potential issues before they become significant problems and recommend the necessary repairs or replacements. It’s recommended to have your roof inspected at least once a year, especially after severe weather events.
Fixing Blistering Shingles:
If you notice blistering on your shingles, it’s essential to address the issue promptly to prevent further damage. Here are some steps to follow
Call a Professional
Fixing shingles blistering can be a complex and dangerous job, and it’s essential to call a professional roofing contractor to do the work. They have the necessary skills, equipment, and experience to fix the problem safely and effectively.
Identify the Cause
The first step is to identify the cause of the problem. If the issue is due to poor ventilation, it’s essential to improve your attic ventilation. If it’s due to trapped moisture, you’ll need to replace the affected shingles.
Replace Damaged Shingles
If the blistering is limited to a few shingles, it’s possible to replace them individually. However, if the problem is more widespread, it may be necessary to replace the entire roof.
Contact a Professional Today
Shingles Blistering may seem like a minor issue, but they can cause significant damage to your roof if left unaddressed. By understanding the causes of blistering and taking the necessary steps to prevent and fix them, you can ensure that your roof remains in excellent condition and protect your home and family from the elements.
View More of Our Informative Post Here
Free, No Obligation
Request Your Free Estimate & Inspection
Tell us about your roof and we’ll come take a look — no pressure,
no cost. Or call us right now on
(571) 269-8153.
Roof replacement costs can vary significantly depending on a number of factors, but in Maryland, you can expect to pay anywhere from $5,000 to $30,000 or more for a full roof replacement. According to a 2023 cost vs. value report by Fixr.com the average cost to replace a 25-year shingle roof in Baltimore is around $24,700. While this may seem like a steep price tag, it’s important to understand what factors go into estimating the cost of a roof replacement in Maryland.
Factors That Affect The Cost Of a New Roof In Maryland
When it comes to estimating the cost of a roof replacement in Maryland, there are several factors that can influence the price. Here are some of the most important factors to consider:
The Size of Your Roof:
The size of your roof is one of the most significant factors that will impact the cost of your roof replacement. Most roofing companies charge by the square foot, so the larger your roof, the more you can expect to pay. Additionally, larger roofs require more labor, which can also increase the overall cost.
Materials:
The materials you choose for your roof replacement can also have a significant impact on the cost. While most roofing contractors offer a range of materials at different price points, it’s important to remember that higher-quality materials will generally be more expensive. However, they may also last longer and require fewer repairs in the long run.View Our Selections of High Quality Materials Here
Labor:
Labor costs are another important consideration when estimating the cost of a roof replacement in Maryland. While labor costs can vary from contractor to contractor, working with an efficient and experienced roofing company can help you get the most value for your money.
Steepness
The steepness of your roof can also impact the overall cost of your roof replacement. Steeper roofs can be more difficult to work on, which can slow down the labor process and require additional equipment. Additionally, steep roofs can be more dangerous for roofers, which can lead to increased insurance costs for the contractor.
Unforeseen Damage
In some cases, additional damage may be discovered during the roof replacement process. This can include damage to the plywood underlayment or water damage in the attic. If additional damage is discovered, it can add to the overall cost of your roof replacement.
Extra Features on the Roof
If your roof features skylights, a chimney, or other additional features, it may require extra work and materials to replace damaged flashing and properly seal the roof during the replacement process. Alternatively, these features may need to be replaced entirely if they cannot be successfully repaired during the roof replacement.
Ventilation Replacements
Your roof is home to many of your home’s ventilation systems, including roof vents. During the roof replacement process, these vents may need to be replaced if they are damaged or if local building codes require it.
Gutter Replacement
If your gutters are damaged, it may be a good idea to replace them at the same time as your roof to save on additional labor costs down the line.
Waste Removal
When your old roof is torn off, the materials must be disposed of. This can add to the overall cost of a roof replacement. Dumpsters have to be brought on-site, and time has to be dedicated to disposing of the materials from your old roof. However, some roofing contractors may offer to include waste removal as part of their services, so it’s always a good idea to ask about it when you’re getting estimates.
Choosing The Right Contractor
When it comes to getting a roof replacement in Maryland, choosing the right contractor can make all the difference in terms of the cost and the quality of the work. Before hiring a roofing contractor, it’s important to do your research and ask the right questions. Here are some tips to help you choose the right contractor:
Get Referrals
Ask friends, family, and neighbors for referrals. If someone you know had a good experience with a roofing contractor, it’s a good sign that they do good work.
Check Credentials
Make sure the contractor you choose is licensed and insured. This will protect you in case something goes wrong during the project.
Ask For References
Ask the contractor for references from previous clients. If they’re hesitant to provide references, that could be a red flag.
Get Multiple Estimates
Always get multiple estimates from different contractors before making a decision. This will give you a better idea of what a fair price is for your project.
Read Reviews
Look for reviews of the contractor online. Sites like Yelp, Google, and Angie’s List can be great resources for finding reviews from previous clients.
Why Should You Know This?
A roof replacement can be a costly investment, but it’s also an important one. Your roof is what protects your home and everything inside it from the elements. If you’re in Maryland and need a roof replacement, make sure to do your research and choose a qualified, professional contractor. By understanding the factors that go into the cost of a roof replacement, you can make an informed decision about what type of roof to choose and how much you’re willing to spend.
Roofing Repairs Near Me: Comprehensive Guide to Roof Repair
RNC Roofing and Construction GroupMarch 13, 2023
A sturdy roof is essential to the safety and comfort of your home. However, even the most well-built roofs can experience damage over time due to exposure to weather elements. That’s where roofing repairs come in. But before you start searching for “roofing repairs near me,” it’s essential to understand the basics of roof repair.
In this comprehensive guide, we’ll cover everything you need to know about roofing repairs, including common issues and concerns, the importance of timely repairs, how to find the right roofing contractor near you, and more.
Common Issues and Concerns:
Roofs are exposed to weather elements like rain, snow, hail, wind, and sun, which can cause wear and tear over time. Here are some common roofing issues and concerns that you should be aware of:
Leaks: Leaks are a common problem that occurs when the roof’s protective layer is compromised. Water can seep through and cause damage to the interior of your home, including walls, ceilings, and floors.
Shingle Damage: Shingles can become damaged due to harsh weather conditions, leading to missing or broken shingles. This can compromise the roof’s ability to protect your home from weather elements.
Aging Roof: Roofs have a lifespan, and over time they can become less effective in protecting your home. An aging roof is more susceptible to leaks and damage from weather elements.
Timely repairs are essential when it comes to roofing issues. Waiting too long to address a problem can lead to more extensive damage, resulting in higher repair costs. Here are some reasons why timely repairs are crucial:
Poor Installation: If your roof was not installed correctly, it can lead to various problems down the line, including leaks and shingle damage.
Debris Accumulation: Debris like leaves, branches, and other materials can accumulate on your roof and cause damage if left unattended.
Importance of Timely Repairs:
Prevent Further Damage: Timely repairs can prevent further damage to your roof and your home’s interior.
Save Money: Repairing a small issue in a timely manner is much cheaper than waiting for it to become a bigger problem.
Extend Roof’s Lifespan: Regular maintenance and timely repairs can help extend your roof’s lifespan, saving you money in the long run.
Finding the Right Roofing Contractor Near You:
When searching for “roofing repairs near me,” it’s essential to find the right roofing contractor. Here are some tips for finding the right contractor near you:
Research: Do your research to find reputable contractors in your area. Check reviews and ratings to ensure you’re working with a reliable contractor.
Get Estimates: Ask for estimates from multiple contractors to compare prices and services.
Check for Licensing and Insurance: Ensure that the contractor you choose is licensed and insured to protect yourself and your property.
Ask for References: Ask for references from past customers to get an idea of the contractor’s work quality.
FAQ’S
Q: How long does a roof repair take?
A: The length of time for a roof repair can vary depending on the extent of the damage. A minor repair can take a few hours, while a more extensive repair can take several days.
Q: How often should I have my roof inspected?
A: It’s recommended to have your roof inspected once a year to ensure that it’s in good condition and to catch any potential issues before they become more significant problems.
Q: How often should I have my roof inspected?
A: It’s recommended to have your roof inspected at least once a year, preferably in the spring or fall. However, if you’ve experienced severe weather conditions such as hailstorms or high winds, it’s best to have your roof inspected immediately after the storm has passed.
Q: Can I repair my roof myself?
A: While there are some minor repairs that you can do yourself, it’s generally not recommended to try to repair your roof without professional assistance. Climbing on your roof can be dangerous, and without proper training and equipment, you could cause more harm than good. Additionally, if you attempt a repair and it doesn’t fix the problem, you may end up causing more damage to your roof and increasing the repair costs.
Q: How long do roof repairs typically take?
A: The length of time it takes to complete a roof repair can vary depending on the extent of the damage and the type of repair needed. Minor repairs such as replacing a few shingles can typically be completed in a few hours, while more extensive repairs such as replacing a large section of the roof may take several days.
Q: How much does a roof repair cost?
A: The cost of a roof repair can vary widely depending on the extent of the damage, the materials needed, and the location of your home. Minor repairs may cost a few hundred dollars, while more extensive repairs can cost thousands of dollars. It’s best to get a written estimate from a professional roofing contractor before agreeing to any repair work.Click Here to Learn More About Roof Repair Cost
Conclusion:
If you’re in need of roofing repairs near you, it’s important to do your research and find a reputable roofing contractor. Look for a contractor who has experience with the type of roofing material on your home and who is licensed, insured, and bonded. Don’t be afraid to ask for references and read online reviews to ensure that you’re hiring a contractor who will provide quality work at a fair price.
By being proactive and having your roof inspected regularly, you can catch small problems before they turn into larger, more expensive issues. And if you do need a roof repair, it’s important to act quickly to prevent further damage to your home. With the right contractor on your side, you can rest assured that your roof repair will be completed safely and efficiently, allowing you to enjoy a safe and comfortable home for years to come
Free, No Obligation
Request Your Free Estimate & Inspection
Tell us about your roof and we’ll come take a look — no pressure,
no cost. Or call us right now on
(571) 269-8153.
Your roof is a crucial component of your home’s structure. It protects you and your family from the elements and keeps your home safe and secure. However, over time, your roof will start to wear down and may need to be replaced. Replacing your roof can be a daunting task, but it’s essential to ensure the safety and longevity of your home. In this article, we’ll go over everything you need to know about replacement of your roof
When to Replace Your Roof?:
Determining when to replace your roof can be tricky.The lifespan of a roof is around 20-25 years, but several factors can impact its lifespan. These factors include the quality of the installation, the type of material used, and the climate of your area. If you’re unsure when to replace your roof, you can consult with a roofing professional who can assess the condition of your roof and give you recommendations.
Age– If your roof is over 20 years old, it’s likely time for a replacement.
Curling or Buckling Shingles – If your shingles are curling or buckling, it’s a sign that your roof is nearing the end of its lifespan.
Missing Shingles – Missing shingles can leave your roof vulnerable to leaks and water damage.
Water Damage – If you notice water stains on your ceiling or walls, it’s a sign that your roof is leaking.
Granule Loss – If you notice granules from your shingles in your gutters, it’s a sign that your roof is deteriorating.
Choosing the Right Roofing Material:
When it comes to replacing your roof, you have several roofing materials to choose from. Each material has its pros and cons, and the one you choose will depend on your budget, climate, and aesthetic preferences View Our Resources For More Information Some of the most common roofing materials include:
Asphalt Shingles – These are the most popular roofing material due to their affordability and ease of installation.
Metal – Metal roofing is durable and long-lasting, making it an excellent choice for areas with severe weather.
Clay or Concrete Tiles – These roofing materials are durable and can give your home a unique look, but they can be expensive and heavy.
Wood Shingles or Shakes – These roofing materials can give your home a rustic look, but they require more maintenance than other materials.
Slate – Slate roofing is one of the most expensive roofing materials, but it’s also one of the most durable and long-lasting.
When choosing a roofing material, it’s essential to consider factors such as cost, durability, and maintenance requirements.
The Roofing Replacement Process:
Replacing your roof can be a complex process that requires several steps. Here’s what you can expect during the roofing replacement process:
Inspection – Before replacing your roof, a roofing professional will inspect your current roof to determine the extent of the damage and assess if a replacement is necessary.
Removal of Old Roofing Materials – Once it’s determined that a replacement is necessary, the old roofing materials will be removed to prepare for the new roof.
Installation of Underlayment – An underlayment will be installed to provide a barrier between the roof deck and the shingles.
Installation of New Roofing Materials – The new roofing materials will be installed according to the manufacturer’s instructions.
Cleanup – Once the installation is complete, the roofing contractor will clean up the job site and dispose of the old roofing materials.
How Long Does Roof Replacement Take?:
The time it takes to replace a roof varies depending on the factors mentioned above. In general, a roof replacement project can take anywhere from a few days to several weeks. A small roof with a simple design can take two to three days to replace, while a larger, more complex roof may take up to two weeks.
Factors That Affect Roof Replacement Timeline:
Several factors can affect how long it takes to replace a roof. These factors include:
Size of the roof: The larger the roof, the longer it will take to replace. A smaller roof may take only a few days, while a larger one may take a week or more.
Roof type: Different types of roofs have different installation requirements, which can affect the timeline. For instance, a flat roof may be quicker to install than a pitched roof.
Weather conditions: Inclement weather such as rain or high winds can delay roof replacement. It’s best to plan the project during a season with favorable weather conditions to minimize delays.
Accessibility: The ease of accessing the roof can also affect how long it takes to replace. If the roof is difficult to access, it may take longer to remove and install the new roof.
Complexity of the job: Some roofs are more complicated to replace than others. A roof with many angles, valleys, or skylights may require more time to install.
Tips for Successful Roof Replacement:
Here are some tips to help you stay within budget while still getting a high-quality replacement of roof:
Plan ahead: Start planning for your roof replacement early to give yourself enough time to research and compare options, as well as to save up for the cost.
Hire a professional: A professional roofing contractor has the expertise, tools, and experience needed to get the job done right. Hire a reputable contractor to avoid mistakes that could lead to costly repairs.
Choose a cost-effective roofing material: While there are many options available, some roofing materials are more cost-effective than others. Asphalt shingles are a popular and affordable choice for many homeowners.
Consider energy-efficient options: Energy-efficient roofing materials can help you save money on energy bills by reducing the amount of heat that enters your home during the summer months.
Get multiple quotes: Before hiring a contractor, get multiple quotes from different providers to compare prices and ensure you get the best value for your money.
Factors That Effect The Cost of Replacing Your Roof:
The total cost of a roof replacement project depends on various factors such as the size and pitch of the roof, the type and quality of roofing material, the labor charges, and the complexity of the job. Typically, a complete roof replacement can cost anywhere from $5,000 to $15,000 or more, depending on these factors. To avoid any surprises, it’s recommended to get a detailed estimate from a reputable roofing contractor that includes all the costs involved in the project.
Roof size: The larger the roof, the more materials and labor required, which can increase the cost.
Roof pitch: A steeper roof pitch requires more safety equipment and can be more difficult to work on, which can increase the cost.
Roofing materials: Different types of roofing materials have different costs, with some materials being more expensive than others.
Roofing accessories: Additional items such as flashing, ventilation systems, and skylights can add to the cost.
Removal of the old roof: The cost of removing the old roof and disposing of the debris can vary depending on the size of the roof and the amount of damage.
Repairs: If there is damage to the underlying structure or decking, repairs will need to be made, which can increase the cost.
Permit fees: Some areas require permits for roof replacement, which can add to the cost.
Labor costs: The amount of time and labor required for the project can affect the overall cost, with more complex jobs requiring more time and labor.
FAQ’s:
Q: Can I replace my roof without hiring a contractor? A: While it’s possible to replace your roof on your own, it’s not recommended. Roof replacement is a complex and dangerous process that requires specialized knowledge and equipment.
Q: How long does a roof replacement take? A: The length of time required for a roof replacement can vary depending on the size and complexity of your roof. On average, a roof replacement can take between a few days and a few weeks.
Q: Is it possible to replace my roof while staying within budget? A: While it’s possible to replace your roof yourself, it’s not recommended. Replacing a roof can be dangerous and requires specialized tools and knowledge. It’s best to hire a professional roofing contractor to ensure the job is done correctly and safely.
Q: How often should I replace my roof? A: The lifespan of a roof depends on several factors, such as the type of material, the quality of installation, and the weather conditions in your area. However, most roofs last between 15 and 25 years. If your roof is approaching this age or showing signs of wear and tear, it may be time for a replacement.
Q: What happens if I don’t replace my roof? A: If you don’t replace your roof when it’s necessary, you risk serious damage to your home’s interior and structure. Leaks can cause water damage, mold growth, and even compromise the structural integrity of your home.
Q: How do I know if I need a roof replacement or repair? A: The decision to repair or replace your roof depends on the extent of the damage. In general, if your roof has significant damage, such as missing shingles or severe leaks, it may be time for a replacement. However, minor damage can often be repaired without the need for a full replacement.
Q: Can I choose any roofing material for my replacement roof? A: While you can choose any roofing material for your replacement roof, it’s important to consider factors such as cost, durability, and the weather conditions in your area. A professional roofing contractor can help you select the best material for your specific needs.
Q: Will replacing my roof increase the value of my home? A: Yes, replacing your roof can increase the value of your home. A new roof can improve the curb appeal of your home and provide added protection against weather damage, which can be attractive to potential buyers.
Q: Do I need to obtain permits for a roof replacement? A: Permit requirements for roof replacement vary depending on your location and the extent of the work being done. A professional roofing contractor can help you determine what permits are necessary for your specific project.
Q: Can I live in my home while the roof is being replaced? A: While it’s possible to live in your home during a roof replacement, it can be noisy and disruptive. It’s best to plan ahead and make arrangements to stay somewhere else if possible.
Q: What should I look for in a roofing contractor? A: When choosing a roofing contractor, it’s important to look for a licensed and insured professional with experience in roof replacement. It’s also a good idea to ask for references and to read online reviews before making a decision.
Free, No Obligation
Request Your Free Estimate & Inspection
Tell us about your roof and we’ll come take a look — no pressure,
no cost. Or call us right now on
(571) 269-8153.
RNC Roofing and Construction GroupFebruary 10, 2023
Signs You Need to Call a Roofing Contractor
When it comes to maintaining or repairing your roof, hiring a professional roofing contractor is essential. These skilled experts possess the knowledge, experience, and tools necessary to handle various roofing issues efficiently and safely. From inspections to repairs and replacements, roofing contractors are trained to assess the condition of your roof and provide the appropriate solutions.
Visible Roof Damage
Recognizing missing or damaged shingles
One of the clear signs you need to call a roofing contractor is the presence of missing or damaged shingles. During a visual inspection of your roof, keep an eye out for any areas where shingles are completely absent or visibly cracked, broken, or deteriorated. These issues can leave your roof vulnerable to water infiltration, leading to leaks and potential structural damage. Addressing missing or damaged shingles promptly is crucial to prevent further deterioration and ensure the overall stability of your roof.
Identifying curling or buckling shingles
Another visible sign that warrants the expertise of a roofing contractor is the presence of curling or buckling shingles. Over time, exposure to weather elements can cause shingles to warp, resulting in a curled or buckled appearance. This distortion compromises their ability to effectively protect your roof. Curling or buckling shingles are often an indication of underlying moisture issues or inadequate ventilation, which can accelerate the deterioration of your roof if not addressed promptly.
Noticing cracked or blistered shingles
Cracked or blistered shingles are red flags indicating potential roof problems. Cracks may result from aging, extreme weather conditions, or improper installation. Similarly, blistering can occur when moisture becomes trapped underneath the shingle’s surface. These conditions weaken the shingles and compromise their ability to shield your roof from the elements. If you spot cracked or blistered shingles during your inspection, it’s crucial to involve a roofing contractor to evaluate the extent of the damage and recommend suitable repair or replacement options.
Detecting loose or detached flashing
Flashing refers to the metal strips or sheets used to seal roof transitions and prevent water from penetrating vulnerable areas, such as chimney joints, vents, or skylights. If you notice loose or detached flashing, it’s a sign that your roof’s protective barrier has been compromised. Damaged or improperly installed flashing can lead to water leaks and potential structural damage. Engaging a roofing contractor to assess the flashing and make the necessary repairs or replacements is crucial to maintain the integrity of your roof.
Leaks and Water Intrusion
Identifying water stains on the ceiling or walls
Water stains on your ceiling or walls are clear indicators that you need to call a roofing contractor. These stains often result from roof leaks, which can be caused by damaged or deteriorated roofing materials. Look for brown or yellowish discoloration, peeling paint, or bubbling wallpaper on your ceilings or walls. These signs suggest that water is penetrating your roof and making its way into your home’s interior. Addressing these leaks promptly is crucial to prevent further damage, such as weakened structural integrity or mold growth.
Observing wet spots or mold growth in the attic
When inspecting your attic, be on the lookout for wet spots or signs of mold growth. If you notice damp areas or visible mold patches on the attic ceiling or walls, it’s a sign that water is entering your attic space. This could be due to roofing issues such as damaged shingles, faulty flashing, or inadequate ventilation. Mold growth poses health risks and can spread to other areas of your home if left untreated. Contacting a roofing contractor is necessary to identify the source of the water intrusion and resolve the underlying roofing problem.
Noticing water pooling on the roof surface
Water pooling on your roof surface after rain or storms is another sign that you need professional assistance. Flat or low-slope roofs are particularly prone to water pooling, and it can lead to roof damage and leaks. Pooling water indicates that the roof’s drainage system is not functioning properly, possibly due to clogged gutters, sagging areas, or inadequate slope. A roofing contractor can evaluate the roof’s drainage system, identify potential issues, and recommend appropriate solutions to prevent water damage and prolong your roof’s lifespan.
Understanding the significance of consistent roof leaks
Consistent roof leaks, even if they seem minor, should not be ignored. Persistent leaks indicate an ongoing problem that requires the attention of a roofing contractor. Such leaks can lead to significant water damage, compromised structural integrity, and increased energy costs. Ignoring consistent roof leaks can result in more extensive and costly repairs down the line. It’s essential to have a roofing professional assess the situation, identify the root cause, and provide the necessary repairs or replacements to prevent further water intrusion and protect your home.
Age and Wear
Recognizing the typical lifespan of different roofing materials
Knowing the typical lifespan of different roofing materials is essential in determining when to call a roofing contractor. Asphalt shingles, for example, have an average lifespan of 20 to 30 years, while metal roofs can last 40 to 70 years. By understanding the age of your roof and the material it’s made of, you can better assess its condition and determine if it’s time to seek professional help. Keep in mind that harsh weather conditions, poor maintenance, and other factors can impact the lifespan of your roof.
Understanding the effects of weathering and deterioration
Over time, exposure to the elements takes a toll on your roof, causing weathering and deterioration. UV rays, rain, snow, hail, and fluctuating temperatures can all contribute to the degradation of roofing materials. Signs of weathering and deterioration include faded or discolored shingles, cracked tiles, rusted metal, and brittle or curling materials. These visible signs indicate that your roof is no longer providing adequate protection and may require the attention of a roofing contractor.
Identifying signs of aging, such as granule loss or sagging
As roofs age, they exhibit specific signs that indicate the need for professional intervention. One common sign of an aging roof is granule loss on asphalt shingles. These granules protect the shingles from UV rays and provide fire resistance. When they start to wear off and accumulate in gutters or downspouts, it’s a clear indication that your roof is nearing the end of its lifespan. Additionally, sagging areas or a visibly uneven roof surface are signs of structural issues that should be addressed promptly.
Importance of professional assessment for an aging roof
When your roof reaches a certain age or shows signs of wear, it’s crucial to have it professionally assessed by a roofing contractor. While you may observe some visible signs of aging, a roofing professional can provide a comprehensive evaluation of your roof’s condition. They have the expertise to identify hidden damage or underlying issues that may not be apparent to an untrained eye. This assessment will help determine the best course of action, whether it’s repair, maintenance, or roof replacement, to ensure the safety and longevity of your home.
Storm or Weather Damage
Assessing the impact of severe weather conditions
Severe weather conditions can wreak havoc on your roof, making it essential to know the signs that indicate you need to call a roofing contractor. Storms, high winds, heavy rain, and extreme temperature fluctuations can cause significant damage to your roof’s integrity. It’s crucial to assess the impact of these weather events on your roof. Look for visible signs of damage, such as missing or displaced shingles, damaged gutters, or debris scattered on your roof. Even if the damage appears minor, it’s wise to have a professional inspection to identify any underlying issues.
Identifying signs of wind damage, such as lifted shingles or fallen debris
Strong winds during a storm can cause considerable damage to your roof. Signs of wind damage include lifted or curled shingles, missing shingles, or shingles that have been torn or cracked. Additionally, fallen tree branches or debris on your roof are indicators of wind-related issues. If you notice any of these signs, it’s crucial to contact a roofing contractor promptly. They can assess the extent of the damage and provide the necessary repairs or replacements to restore the integrity of your roof.
Recognizing hail damage, including dents and pockmarks
Hailstorms can leave behind significant damage to your roof. When inspecting your roof after a hailstorm, look for dents, pockmarks, or bruised areas on your shingles or other roofing materials. Hail damage weakens the protective layers of your roof, making it more susceptible to leaks and other issues. If you observe any signs of hail damage, it’s vital to call a roofing contractor for a thorough inspection. They can evaluate the extent of the damage and recommend the appropriate repairs or replacements to ensure the longevity of your roof.
Understanding the importance of prompt repairs after a storm
After experiencing severe weather conditions, it’s crucial to prioritize prompt repairs for your roof. Delaying repairs can worsen existing damage and lead to more extensive problems, such as leaks or structural issues. Water intrusion resulting from storm damage can cause mold growth, rotting of underlying structures, or compromised insulation. By calling a roofing contractor without delay, you can mitigate the risk of further damage and protect the overall integrity of your home.
Energy Efficiency Concerns
Understanding the role of the roof in energy conservation
When it comes to energy efficiency, your roof plays a crucial role in keeping your home well-insulated. It acts as a protective barrier against heat transfer, helping to maintain a comfortable indoor temperature while reducing the need for excessive heating or cooling. Proper insulation and ventilation are essential for maximizing energy efficiency. A well-maintained roof with adequate insulation can prevent heat loss during the colder months and minimize heat gain during the hotter months, resulting in lower energy consumption and reduced utility costs.
Identifying signs of poor insulation or ventilation
Signs of poor insulation or ventilation can indicate the need to call a roofing contractor for assistance. Uneven indoor temperatures, drafts, and high energy bills are common indicators of inadequate insulation or ventilation. Additionally, if you notice excessive condensation or moisture buildup in your attic or around vents, it may suggest a ventilation problem. A professional roofing contractor can assess your roof’s insulation and ventilation systems, identifying any areas that require improvement to enhance energy efficiency and overall comfort.
Recognizing the impact of a damaged roof on energy bills
A damaged roof can have a significant impact on your energy bills. Leaks, gaps, or cracks in your roof can allow air infiltration, causing your heating and cooling systems to work harder to maintain a comfortable temperature. This results in increased energy consumption and higher utility costs. If you’ve noticed a sudden spike in your energy bills without a clear explanation, it’s important to consider the condition of your roof. Calling a roofing contractor to inspect and address any issues can help restore your roof’s integrity and improve energy efficiency.
How a roofing contractor can help improve energy efficiency
A professional roofing contractor can provide valuable assistance in improving your roof’s energy efficiency. They have the expertise to assess your roof’s insulation, ventilation, and overall condition. They can recommend and implement solutions such as adding insulation, sealing air leaks, installing proper ventilation systems, or replacing damaged roofing materials. These measures not only enhance energy efficiency but also contribute to the longevity and durability of your roof. By collaborating with a roofing contractor, you can create a more energy-efficient home and enjoy long-term savings on your energy bills.
View More Articles
Free, No Obligation
Request Your Free Estimate & Inspection
Tell us about your roof and we’ll come take a look — no pressure,
no cost. Or call us right now on
(571) 269-8153.
Replacing Your Roof in Spring: Enhancing Value and Protection
RNC Roofing and Construction GroupNovember 9, 2022
Replacing Your Roof in Spring: Enhancing Value and Protection
Maintaining a structurally sound roof is vital to safeguard your home from various weather conditions, such as rain, snow, wind, and extreme temperatures. Over time, roofs can deteriorate due to aging, wear and tear, and exposure to the elements. Regular inspections and necessary repairs are essential to ensure your roof remains in optimal condition. However, in some cases, roof replacement becomes necessary to guarantee maximum protection.
Understanding the Optimal Timing for Roof Replacement
The Significance of Timing and Weather Conditions
When it comes to replacing your roof, timing is crucial. The weather conditions during the installation process can greatly impact the outcome and durability of your new roof. Spring, with its mild and predictable weather patterns, emerges as an ideal season for roof replacement. The moderate temperatures and reduced chances of extreme weather events allow for a smoother and more efficient installation process.
Spring: An Ideal Season for Roof Replacement
Spring brings a host of advantages that make it the optimal time to replace your roof. First, the mild temperatures of spring provide a favorable working environment for roofing contractors. Extreme heat or cold can impede the proper sealing of roofing materials, making it challenging to achieve a reliable and long-lasting installation. By choosing spring, you ensure that the materials bond effectively, resulting in a structurally sound roof.
Effects of Winter on Roofs and the Need for Spring Repairs
Winter can be harsh on roofs, exposing them to freezing temperatures, heavy snow, ice dams, and moisture infiltration. These factors can cause damage to shingles, compromise the integrity of the roof’s structure, and increase the risk of leaks. Therefore, it is essential to inspect your roof after the winter season and address any existing issues promptly.Replacing your roof in spring allows you to tackle the damage caused by winter effectively. It ensures that any vulnerabilities or weaknesses are addressed before the more intense weather conditions of summer arrive. By being proactive in spring, you can prevent further deterioration and extend the lifespan of your roof.
Taking Advantage of Milder Weather Conditions
Explaining the Impact of Weather on the Roof Replacement Process
Weather plays a significant role in the roof replacement process. Extreme temperatures, high humidity, or inclement weather can pose challenges and affect the quality of the installation. Optimal weather conditions are crucial to ensure that the roofing materials adhere correctly and that the overall process proceeds smoothly.
Detailing How Spring Offers Favorable Conditions for Efficient Roof Installation
Spring, with its milder weather conditions, provides an excellent opportunity for efficient roof replacement. The moderate temperatures allow for better flexibility of roofing materials, making them easier to handle and install. Additionally, the reduced moisture levels in the air during spring help ensure proper bonding of shingles, preventing issues such as lifting or warping that can occur in more humid conditions. Furthermore, spring offers longer daylight hours, providing contractors with ample time to complete the installation without feeling rushed. The extended daylight allows for better visibility and facilitates the roofing team’s ability to inspect and address any potential issues that may arise during the installation process.
Benefits of Avoiding Extreme Temperatures and Inclement Weather during the Replacement
By choosing to replace your roof in spring, you can avoid the challenges associated with extreme temperatures. High temperatures can cause materials to expand and become more pliable, making them susceptible to damage during installation. On the other hand, freezing temperatures can hinder the proper sealing and adhesion of roofing components, leading to potential leaks or premature deterioration.
Addressing Winter Damage and Wear
Highlighting the Potential Damage Caused by Winter Elements to Roofs
Winter can take a toll on roofs, subjecting them to various damaging elements. Snow, ice, freezing temperatures, and fluctuating weather conditions can lead to significant wear and tear over time. It’s essential to address these issues to maintain a structurally sound roof.
Discussing Common Issues like Ice Dams, Snow Accumulation, and Water Infiltration
One of the most common problems during winter is the formation of ice dams. When snow accumulates on the roof, uneven heat distribution causes the melting snow to refreeze at the eaves, creating ice dams. These dams prevent proper drainage, leading to water pooling and potential leaks. Snow accumulation itself can also put excessive weight on the roof, potentially causing structural damage. Furthermore, winter brings an increased risk of water infiltration. As snow and ice melt, water can seep into the smallest cracks or gaps in the roof’s surface, leading to moisture penetration and subsequent damage to the underlying structure. This moisture intrusion can result in rot, mold growth, and compromised insulation, affecting both the roof’s integrity and the overall indoor environment.
Explaining How Early Spring Roof Replacement Helps Prevent Further Deterioration
Replacing your roof early in spring is a proactive approach to preventing further deterioration caused by winter damage. By promptly addressing issues such as ice dams, snow accumulation, and water infiltration, you can safeguard your home from potential long-term consequences. A new roof installed in early spring ensures that any existing problems are resolved, minimizing the risk of further damage as the seasons progress. It provides a fresh start and strengthens the roof’s ability to withstand the challenges of the upcoming year, including heavy rain, strong winds, and the heat of summer.
Preparing Your Roof for Summer Challenges
Upcoming Summer Season and Its Potential Challenges for Roofs
As spring transitions into summer, it’s essential to prepare your roof for the upcoming season’s challenges. Summer brings its own set of weather conditions that can impact the longevity and performance of your roof. By understanding these challenges, you can take proactive steps to ensure your roof remains in optimal condition.
How a Newly Replaced Roof Can Better Withstand Intense Heat, UV Radiation, and Heavy Rainstorms
A newly replaced roof provides enhanced protection against the intense heat, UV radiation, and heavy rainstorms commonly experienced during summer. By choosing the right roofing materials and installing them during spring, you create a strong defense against these challenges. The materials used in a roof replacement, such as heat-reflective shingles or metal roofing, can help mitigate the effects of intense heat. These materials reflect a significant portion of the sun’s rays, reducing the amount of heat absorbed by the roof and minimizing thermal expansion, which can lead to premature aging and deterioration.
Maximizing Energy Efficiency
Exploring How a New Roof in Spring Can Improve Energy Efficiency
Replacing your roof in spring provides an excellent opportunity to enhance the energy efficiency of your home. An old or damaged roof can compromise insulation, ventilation, and solar reflectance, leading to energy loss and increased utility bills. By investing in a new roof during the spring season, you can optimize energy efficiency and enjoy long-term cost savings.
Discussing the Benefits of Proper Insulation, Ventilation, and Solar Reflectance
Proper insulation is crucial for maintaining a comfortable indoor temperature and reducing the strain on your cooling system during the hot summer months. A new roof installation allows for the integration of modern insulation materials, such as spray foam or fiberglass batts, which effectively minimize heat transfer between the interior and exterior of your home. This insulation helps to keep your home cooler in the summer, reducing the need for excessive air conditioning and lowering energy consumption. In addition to insulation, proper ventilation plays a vital role in maximizing energy efficiency. Adequate airflow through the attic and roof space helps regulate temperature and prevent the buildup of heat and moisture. A well-ventilated roof allows hot air to escape, reducing the need for excessive air conditioning and improving overall energy efficiency.
How a Well-Insulated Roof Can Reduce Cooling Costs During Hot Summer Months
When your roof is properly insulated, it acts as a barrier against heat transfer, keeping your home cooler and reducing the need for excessive air conditioning. This directly translates into lower cooling costs during the hot summer months. By investing in a new roof in spring and ensuring proper insulation, you can enjoy a more energy-efficient home, reduce your carbon footprint, and save money on your utility bills.
Enhancing the Value of Your Home
Explaining How a Roof Replacement Can Increase Property Value
Replacing your roof in spring is not only a practical decision but also a smart investment that can significantly enhance the value of your home. A new roof is an attractive feature for potential buyers and can make your property stand out in the competitive real estate market. It gives the impression of a well-maintained and cared-for home, which can increase its overall market value. When potential buyers consider purchasing a home, they often prioritize the condition of the roof. By replacing your roof in spring, you ensure that your property has a fresh, sturdy, and visually appealing roof that can serve as a selling point. This investment not only offers peace of mind to potential buyers but also increases their confidence in the overall quality and condition of the property.
How a New Roof Improves Curb Appeal and Boosts Buyer Confidence
The roof is a prominent visual element of your home’s exterior, contributing significantly to its curb appeal. A worn-out, damaged, or outdated roof can detract from the overall aesthetic appeal of your property. On the other hand, a new roof instantly revitalizes the look of your home, making it more visually appealing and appealing to potential buyers. Aesthetics aside, a new roof also boosts buyer confidence. It provides assurance that the home is protected from the elements and that they won’t have to worry about costly roof repairs or replacements in the near future. A well-maintained roof indicates that the homeowner has taken care of the property, giving buyers the confidence to move forward with the purchase.
Highlighting the Potential Return on Investment and Long-Term Savings
While replacing your roof in spring requires an initial investment, it offers long-term financial benefits. A new roof can provide a high return on investment by increasing the value of your home. The money spent on the roof replacement can be recouped when selling the property, making it a worthwhile investment.
Free, No Obligation
Request Your Free Estimate & Inspection
Tell us about your roof and we’ll come take a look — no pressure,
no cost. Or call us right now on
(571) 269-8153.
Fix Leaky Roof | Preventive Measures, Identification, and Repairs
RNC Roofing and Construction GroupJuly 27, 2018
Fix Leaky Roof | Preventive Measures, Identification, and Repairs
When it comes to home maintenance, addressing a leaky roof promptly is of utmost importance. A leaky roof can lead to significant damage if left unattended. Not only can it compromise the structural integrity of your home, but it can also cause water damage to the interior, leading to mold growth, rotting wood, and potential health hazards. By addressing a leaky roof promptly, you can prevent further damage and ensure the safety and longevity of your home.
Common causes of roof leaks
Understanding the common causes of roof leaks can help you identify the underlying issues and take appropriate action. Some of the most common causes of roof leaks include:
Damaged or Missing Shingles:
Over time, shingles can become cracked, curl up, or go missing, allowing water to penetrate through the roof.
Improper Roof Flashing:
Poorly installed or damaged flashing around chimneys, vents, skylights, or roof valleys can create entry points for water.
Clogged Gutters:
When gutters are clogged with leaves, debris, or moss, they can overflow, causing water to seep under the roofing materials.
Age and Wear:
As a roof ages, it becomes more susceptible to leaks due to deterioration and wear of the roofing materials.
Identifying the Source of The Leak
Inspect the roof surface carefully, paying attention to areas around chimneys, vents, skylights, and any other roof penetrations. Look for gaps, deteriorated sealant, or loose flashing, as these can also contribute to leaks. Take note of any areas with moss, algae, or debris buildup, as they can hold moisture and accelerate roof deterioration.
Checking for signs of water damage inside the house
While a visual inspection is essential, it’s equally crucial to check for signs of water damage inside your house. Leaks may not always manifest directly below the damaged area on the roof. Look for water stains on ceilings, walls, or near windows. Examine the attic for dampness, mold growth, or rotting wood, as these are indicative of roof leaks. Keep in mind that water can travel along rafters or insulation before finding a visible entry point. By identifying the interior signs of water damage, you can narrow down the potential source of the leak and ensure a more accurate repair.
Utilizing tools and techniques to locate the precise leak location
Sometimes, identifying the precise location of a roof leak can be challenging, especially if the damage is not readily apparent. In such cases, additional tools and techniques can aid in pinpointing the source:
Hose Test: Enlist a helper to run water over specific sections of the roof while you observe the interior for signs of leakage. This method can help determine the exact area where water is entering.
Thermal Imaging: Infrared cameras can detect temperature differences, revealing areas of moisture intrusion or insulation gaps that may lead to leaks.
Moisture Meters: These handy tools measure moisture levels in materials, helping to identify areas of saturation or water accumulation.
Preparing for Repairs
Before beginning on the repair of a leaky roof, it is crucial to gather all the required tools and materials. This preparation ensures that you have everything on hand for a smooth and efficient repair process. Some essential tools and materials you may need include:
Safety Equipment:
Ensure you have safety goggles, work gloves, and non-slip shoes or boots to protect yourself during the repair.
Roofing Tools:
Collect a hammer, pry bar, roofing nails, utility knife, caulking gun, roofing cement, roofing adhesive, and roofing tape. These tools will assist you in removing damaged materials, applying new materials, and sealing any gaps or cracks.
Replacement Materials:
Procure shingles or tiles that match your existing roof. Additionally, gather roofing felt or underlayment, flashing (if required), and sealant or caulk for effective repairs.
Ensuring personal safety during the repair process
Your safety should be a top priority when fixing a leaky roof. Follow these precautions to minimize any risks:
Use Proper Safety Gear:
Wear safety goggles to protect your eyes from debris, work gloves to safeguard your hands, and non-slip shoes or boots to maintain stability while working at heights.
Secure a Stable Work Surface:
Ensure that your ladder is sturdy and properly positioned. Place it on a stable and level ground, and consider using ladder stabilizers or standoffs for added security.
Take Caution with Power Tools:
If power tools such as nail guns or drills are necessary, ensure you are familiar with their operation and use them according to the manufacturer’s guidelines. Exercise caution and follow proper safety protocols to prevent accidents.
Repairing Common Roof Leak Issues
Patching small holes and cracks
When dealing with small holes and cracks in your roof, it’s crucial to address them promptly to prevent further leaks. Follow these steps to effectively patch such areas:
Identifying suitable patching materials
Look for appropriate patching materials that are compatible with your roof’s material. This may include roofing cement, roofing tape, or sealant. Ensure the materials are designed to withstand weather conditions and provide a durable seal.
Applying patches to damaged areas
Clean the area around the hole or crack using a brush or broom to remove debris and loose particles. Apply the chosen patching material carefully, following the manufacturer’s instructions. Press the patch firmly into place and smooth it out to create a tight seal. Allow it to dry and cure properly before moving on to the next step.
Replacing damaged shingles or tiles
If your roof has damaged shingles or tiles, replacing them is necessary to prevent water infiltration. Here’s how you can accomplish this:
Assessing the extent of damage
Thoroughly inspect your roof to identify the damaged shingles or tiles. Look for signs of curling, cracking, or missing pieces. Assess the overall condition of the surrounding roofing materials to ensure they are in good shape.
Removing and replacing individual shingles or tiles
Carefully lift the damaged shingle or tile using a pry bar or similar tool. Remove any nails or adhesive securing it in place. Slide the new shingle or tile into position, ensuring it aligns properly with the adjacent ones. Secure it firmly using roofing nails or adhesive, following the manufacturer’s guidelines.
Fixing flashing issues
Flashing plays a vital role in preventing water penetration around roof openings and joints. If you encounter issues with the flashing, take the following steps to fix them:
Understanding the importance of proper flashing
Recognize the significance of intact and properly installed flashing. It helps redirect water away from vulnerable areas such as chimneys, skylights, or roof valleys. Damaged or improperly installed flashing can lead to leaks, so addressing any issues is essential.
Repairing or replacing damaged flashing
Inspect the flashing for signs of damage, such as rust, corrosion, or gaps. If possible, repair minor issues by applying new sealant or caulk. For more extensive damage, consider replacing the flashing entirely. Ensure the new flashing is correctly installed, properly sealed, and securely fastened to the roof.
Addressing Underlying Roofing Problems
Dealing with inadequate or damaged insulation
Insulation plays a crucial role in maintaining a comfortable indoor environment and preventing heat loss or gain through the roof. Here’s how you can address insulation issues:
Identifying insulation issues
Inspect your attic or crawl space to assess the condition of the insulation. Look for signs of damage, such as moisture, mold growth, or uneven coverage. Inadequate insulation can lead to energy inefficiency and potential roof problems, including ice dams or condensation issues.
Repairing or replacing insulation as necessary
If you identify damaged or insufficient insulation, take appropriate action. Repair minor issues by patching damaged sections or adding additional insulation to improve coverage. For more significant problems, consider replacing the insulation entirely. Choose insulation materials that are appropriate for your climate and follow the manufacturer’s instructions for installation.
Resolving ventilation problems
Proper ventilation is essential for maintaining a healthy roof and preventing a range of issues, including moisture buildup, mold growth, and premature deterioration. Address ventilation problems using the following steps:
Understanding the impact of poor ventilation on roof health
Improper ventilation can trap excess heat and moisture in the attic, leading to a variety of problems. These include roof deck deterioration, shingle damage, and increased energy costs. It’s important to recognize the signs of poor ventilation, such as musty odors, excessive humidity, or visible moisture.
Implementing appropriate ventilation solutions
Consult with a roofing professional to determine the best ventilation solution for your specific roof structure and climate. This may involve installing ridge vents, soffit vents, gable vents, or powered attic fans. Ensure that the ventilation system promotes proper airflow, allowing hot air to escape while drawing in fresh air from the outside.
Preventive Measures and Maintenance Tips
Regular roof inspections and maintenance
Regular roof inspections are essential for identifying and addressing potential issues before they escalate into costly repairs. Follow these preventive measures to maintain a leak-free roof:
Schedule routine inspections: Arrange for professional inspections at least once a year, preferably in spring or fall. A qualified roofer can assess the condition of your roof, identify any signs of damage or deterioration, and recommend appropriate actions.
Check for damaged or missing shingles: Inspect the roof surface for cracked, curled, or missing shingles. These can be entry points for water and lead to leaks. Promptly replace any damaged or compromised shingles to maintain a watertight seal.
Clearing debris from the roof and gutters
Debris accumulation on the roof and in the gutters can impede proper water drainage, leading to water pooling and potential leaks. Take the following steps to keep your roof free of debris:
Regularly clean the gutters: Remove leaves, twigs, and other debris from your gutters to prevent clogging. Blocked gutters can cause water to overflow, damaging the roof and siding. Consider installing gutter guards to minimize debris accumulation.
Trim overhanging branches: Trim back tree branches that hang over the roof. Falling branches and leaves can damage the roof surface and create a conducive environment for moss or algae growth, which can contribute to leaks.
Hiring professional roofers for complex repairs or ongoing maintenance
While some roof repairs and maintenance tasks can be done by homeowners, certain complex issues require the expertise of professional roofers. Consider the following scenarios:
Complex repairs: If your roof has extensive damage or requires structural repairs, it’s best to hire a professional roofer. They have the necessary knowledge, skills, and equipment to handle complex repairs safely and effectively.
Ongoing maintenance: Engaging a professional roofer for regular maintenance tasks can ensure comprehensive care for your roof. They can perform tasks such as resealing flashing, inspecting seals around vents or chimneys, and addressing any potential issues that may arise.
View More Articles
Free, No Obligation
Request Your Free Estimate & Inspection
Tell us about your roof and we’ll come take a look — no pressure,
no cost. Or call us right now on
(571) 269-8153.
A list of roofing problems would be incomplete without a leaky roof as one of the primary issues to be on the lookout for this summer. Especially with heavy precipitation dominating this time of year, no one wants to run to get the drip bucket every time it rains. Not only is a leaky roof annoying, one small drip could be indicative of a larger roofing issue—and we all know a larger roofing issue calls for a larger amount of money and time invested in its repair.
No matter your roof’s age, be sure to keep this list close by, as you never know when your roof’s problem could be solved with a quick repair, or if a major remodel is necessary.
Read on to learn the most common causes of a leaky roof and their solutions.
You Have Broken Shingles
Because shingles make up the exterior of your roof, it’s easy to tell when one is damaged or missing. You should be able to identify broken or missing shingles by the different colored patches on your roof.
The Solution: (Via This Old House): Slide a pry bar underneath the row of nails that connects the damaged shingle to the one below it. Lift up until the nail pops and then press down on the shingle while you remove the nail. Repeat for the remaining nails. Pull out the damaged shingle, replace it with a new one, and secure it with four new nails.
Your Flashing Has Cracked
Flashing are thin pieces of metal installed under shingles and between joints to create a waterproof barrier. Broken flashing can be identified by exposed areas on a roof.
The Solution: (Via The Family Handyman): Once you locate the source of the leak, pry up the nails used to secure the old flashing. Lift any shingles out of the way and remove the cracked segment. Gently put a new run of flashing in its place, fasten the new flashing in the same pattern as your old piece using roofing nails. Then, apply a coat of roofing sealant to the nail heads.
Your Gutters are Clogged
You may be able to see that your gutters are clogged without getting up on your roof, but if not, the sure way to tell is if you notice a lack of water pouring out of your gutters during a rainstorm. If your gutters are clogged, water can get backed up and pool over an area of your roof.
The Solution: (Via Freshome) Get up on a ladder and get in there with your hands. Many recommend placing a large tarp underneath the area where you are working. That way, you can drop any debris as you go and wrap it up for easy disposal later.
If you prefer a professional to take a look at your leaky roof, contact RNC today!
What separates The RNC Roofing Group from other residential roofing companies? With decades of experience installing, maintaining and repairing roofs we provide a knowledgeable, trustworthy and honest service to fulfill all your roofing needs. We are a Loudoun County, Virginia based residential roofing firm with an excellent reputation for quality and dependability. Whether it’s new construction, re-roofing or the challenge of leak repairs, no job is too large or too small.
Free, No Obligation
Request Your Free Estimate & Inspection
Tell us about your roof and we’ll come take a look — no pressure,
no cost. Or call us right now on
(571) 269-8153.
Blistering Roof Shingles | Guide to Repair and Prevention
RNC Roofing and Construction GroupJuly 16, 2018
Blistering Roof Shingles | Guide to Repair and Prevention
Blistering shingles are characterized by raised bubbles or blisters on the surface of the shingles. These blisters can be caused by various factors, such as excessive heat, poor ventilation, or moisture-related problems. When the shingles blister, they become vulnerable to damage and can compromise the overall functionality of the roof.
Identifying Blistering Shingles
When it comes to identifying blistering shingles, there are several common signs and symptoms to look out for. These indicators can help you determine whether your roof has been affected by blistering. Keep an eye out for the following:
Bubbles or raised areas on the surface of the shingles: Blistering shingles often exhibit visible bubbles or raised sections. These irregularities can be felt by running your hand over the surface of the shingles.
Discoloration or changes in the appearance of shingles: Blistered shingles may appear discolored or have a different texture compared to unaffected areas. Look for variations in color, texture, or overall integrity of the shingles.
Visual Inspection Techniques to Detect Blistering
Performing a thorough visual inspection is crucial in detecting blistering shingles. By employing the following techniques, you can effectively identify the presence of blistering:
Observe the roof from a safe vantage point: Start by inspecting your roof from the ground or a safe distance using binoculars. Look for any signs of blistering, such as raised areas or discoloration.
Conduct a close-up inspection: If possible, climb a ladder and conduct a closer examination. Pay attention to individual shingles, checking for bubbles, raised sections, or other abnormalities. Be cautious and ensure your safety when accessing the roof.
Differentiating Blistering from Other Roof Issues
While blistering shingles share similarities with other roofing problems, understanding the distinctions is vital for accurate diagnosis. Here’s how you can differentiate blistering shingles from other roof issues:
Blistering vs. curling shingles: Curling shingles typically exhibit edges that curl upward or downward. In contrast, blistering shingles have raised sections or bubbles on the surface.
Blistering vs. granule loss: Blistering may cause some granules to dislodge from the shingles, but the raised sections are the primary distinguishing factor. Granule loss, on the other hand, results in a visible absence of granules on the shingle surface.
Causes of Blistering Shingles
Excessive Heat and Sun Exposure as a Leading Cause
One of the primary factors that can lead to blistering shingles is excessive heat and prolonged exposure to the sun. When shingles are constantly exposed to high temperatures, the asphalt in the shingles can soften and become more susceptible to blistering. The heat causes the trapped moisture within the shingles to expand, resulting in the formation of bubbles or blisters on the surface.
Poor Attic Ventilation and Its Impact on Shingle Health
Inadequate attic ventilation can also contribute to the development of blistering shingles. When a roof lacks proper ventilation, heat can accumulate in the attic, causing the shingles to become excessively hot. This heat buildup accelerates the aging process of the shingles and increases the likelihood of blistering. It’s essential to ensure that your attic has proper ventilation to prevent the formation of blisters on the shingles.
Moisture-Related Factors and Their Contribution to Blistering
Moisture-related issues can significantly impact the health of your roof shingles and contribute to blistering. There are several moisture-related factors that can lead to blistering shingles:
Poor installation or damaged underlayment: If the underlayment beneath the shingles is not properly installed or has become damaged, it can allow moisture to seep into the shingle layers. Over time, this moisture can lead to blistering.
Trapped moisture within the shingle layers: In some cases, moisture can become trapped within the shingle layers during the manufacturing process. This trapped moisture can expand when exposed to heat, resulting in the formation of blisters.
Roof leaks and water damage:Roof leaks can introduce water into the shingle layers, leading to blistering. It is crucial to address any leaks promptly to prevent further damage.
Potential Consequences of Blistering Shingles
Risk of Leaks and Water Damage to the Roof Structure
Blistering shingles can pose a significant risk of leaks and water damage to the underlying roof structure. The raised bubbles or blisters on the shingle surface create vulnerable areas where water can penetrate. Over time, the trapped moisture can seep into the roof layers, compromising the integrity of the roof system. If left unaddressed, these leaks can lead to extensive water damage, rotting of the roof decking, and even structural issues within the home.
Effects on Energy Efficiency and Indoor Climate Control
Blistering shingles can also impact the energy efficiency of your home and indoor climate control. The raised areas on the shingle surface create pockets of trapped air, reducing the shingle’s ability to reflect sunlight and regulate heat. As a result, your home may experience increased heat absorption, leading to higher cooling costs during hot weather. Additionally, compromised shingles can allow air infiltration, affecting the insulation’s effectiveness and causing temperature fluctuations inside the house.
Structural Implications and the Potential for Long-Term Damage
Beyond the immediate risks of leaks and energy inefficiency, blistering shingles can have long-term structural implications. The presence of blisters indicates damage to the shingle’s protective layers and compromises its ability to withstand environmental stresses, such as wind and hail. Over time, these compromised shingles can deteriorate further, leading to more extensive damage and the potential for costly repairs or even a complete roof replacement.
Repairing and Preventing Blistering Shingles
When you notice blistering shingles on your roof, it’s essential to address the issue promptly to prevent further damage. Here are the steps to follow for immediate repair:
Inspect the affected area: Carefully examine the blistered shingles to assess the extent of the damage and determine if nearby shingles are also affected.
Gather necessary tools and materials: Prepare the tools required for the repair, such as a pry bar, roofing nails, hammer, roofing adhesive, and replacement shingles.
Safely remove damaged shingles: Use a pry bar to carefully lift the blistered shingles, ensuring not to damage surrounding shingles. Peel back the shingle to expose the underlying layers.
Replace shingles with proper techniques: Clean the exposed area and apply roofing adhesive to secure the replacement shingle. Press it down firmly and secure with roofing nails. Be sure to follow the manufacturer’s instructions for proper installation.
Seal the repaired area: Apply a small amount of roofing adhesive around the edges of the replacement shingle to ensure a watertight seal.
Strategies for Long-Term Prevention of Blistering
While immediate repairs are essential, implementing preventive measures can help avoid future instances of blistering shingles. Here are some strategies to consider:
Ensure proper attic ventilation: Proper attic ventilation plays a vital role in maintaining a healthy roof. It helps regulate temperature and moisture levels, reducing the likelihood of blistering. Consult a roofing professional to assess your attic ventilation and make necessary improvements.
Install reflective or heat-resistant shingles: Consider using shingles with reflective or heat-resistant properties. These shingles are designed to minimize heat absorption and reduce the risk of blistering. They can help keep your roof cooler, especially in hot climates.
Regular maintenance and inspections:Perform regular inspections of your roof to identify any potential issues, including blistering shingles. Schedule professional roof maintenance at least once a year to address minor problems before they escalate.
When to Seek Professional Help
While some blistering shingle repairs can be handled as a DIY project, it’s crucial to evaluate the complexity of the repair task before deciding to tackle it yourself. Factors to consider include:
Extent of damage: If the blistering is limited to a small area and doesn’t involve significant structural issues, it may be manageable for a skilled DIY enthusiast. However, if the blistering covers a large portion of the roof or is accompanied by other signs of severe damage, it’s advisable to seek professional help.
Roofing knowledge and experience: Assess your own expertise in roofing repairs. Repairing blistering shingles requires a good understanding of roofing techniques, including proper shingle installation and ensuring a watertight seal. If you lack the necessary knowledge and experience, it’s best to leave the job to professionals.
Recognizing Situations That Require Professional Intervention
Certain situations indicate the need for professional intervention when dealing with blistering shingles:
Widespread blistering: If the blistering is widespread and affects a significant portion of the roof, it indicates a more severe underlying issue. A professional roofer can assess the extent of the damage and provide comprehensive repairs or recommend a roof replacement if necessary.
Roof age and warranty considerations: If your roof is relatively new and still under warranty, attempting repairs yourself may void the warranty. It’s essential to consult the manufacturer’s guidelines and consider professional assistance to ensure warranty coverage.
Safety concerns: Working on a roof can be dangerous, especially for those without proper safety training and equipment. If you’re uncomfortable with heights or lack the necessary safety gear, it’s safer to hire a professional who is equipped to handle the job safely.
Benefits of Hiring an Experienced Roofing Contractor
Expertise and knowledge: Professional roofers have extensive knowledge of roof repair techniques and materials. They can accurately assess the condition of blistering shingles, identify underlying causes, and provide effective solutions.
Quality workmanship: Roofing contractors are equipped with the tools, equipment, and expertise to deliver high-quality repairs. They can ensure that the replacement shingles are properly installed, minimizing the risk of future issues.
Time and cost savings: Hiring professionals can save you time and effort by completing the repairs efficiently. Additionally, they have access to wholesale material prices, potentially reducing the overall cost of repairs compared to purchasing materials individually.
View More Articles
Free, No Obligation
Request Your Free Estimate & Inspection
Tell us about your roof and we’ll come take a look — no pressure,
no cost. Or call us right now on
(571) 269-8153.