Tag: Roof Inspection

  • Roof Only Leaks in Heavy Rain: Causes and Prevention
    Protecting your home, one shingle at a time VA (703) 964-6233| MD (703) 964-6233| Free Estimate & Inspection
    Home Improvement

    Roof Only Leaks in Heavy Rain: Causes and Prevention

    RNC Roofing and Construction Group September 13, 2023
    Roof Only Leaks in Heavy Rain: Causes and Prevention

    Roof Only Leaks in Heavy Rain: Causes and Prevention

    Roof leaks during heavy rain can be a homeowner’s nightmare, causing not only immediate damage but potential long-term issues like mold and structural damage. Understanding the reasons behind these leaks is essential for homeowners to protect their investment and ensure a safe living environment.

    Identifying the Signs of a Roof Leak

    Water Stains and Discoloration on Ceilings and Walls

    One of the primary indicators that your roof may be leaking during heavy rain is the appearance of water stains and discoloration on your ceilings and walls. These unsightly marks are often a result of water seeping through the roof and into your home’s interior. Keep an eye out for brown, yellow, or grayish stains, as they can signal an ongoing issue with your roof’s integrity. Addressing these stains promptly is crucial to prevent further damage.

    Dripping or Water Trickling Inside During Heavy Rainfall

    A more obvious sign of a roof leak during heavy rain is the presence of actual water inside your home. If you notice dripping or water trickling down from your ceiling, it’s a clear indication that your roof is compromised. Don’t ignore this warning; take immediate action to locate and address the source of the leak to prevent further water damage and potential structural issues.

    Mold and Mildew Growth

    Roof leaks that go unnoticed or untreated can create the perfect environment for mold and mildew growth. If you detect musty odors or see dark patches of mold on your ceilings or walls, it’s a sign that moisture from heavy rain is infiltrating your home through the roof. Mold not only damages your home but can also pose health risks, so it’s crucial to tackle the issue promptly.

    Sagging or Damaged Areas on the Ceiling

    In some cases, a roof leak during heavy rain can lead to the ceiling sagging or showing visible signs of damage. This occurs when water accumulates in the ceiling materials, causing them to weaken and deform. If you notice any sagging or visible damage on your ceiling, it’s essential to act swiftly to address the leak and prevent further deterioration of your home’s structure.
    evaluating roof damage

    Causes of Roof Leaks in Heavy Rain

    Roof Age and Wear and Tear

    The age of your roof plays a significant role in its susceptibility to leaks during heavy rain. Over time, exposure to the elements, temperature fluctuations, and UV radiation can cause roofing materials to deteriorate. This natural wear and tear can lead to cracks, holes, and weakened areas that allow water to penetrate during heavy downpours. Regular roof inspections, especially for older roofs, are crucial to identify and address these issues.

    Missing or Damaged Shingles and Tiles

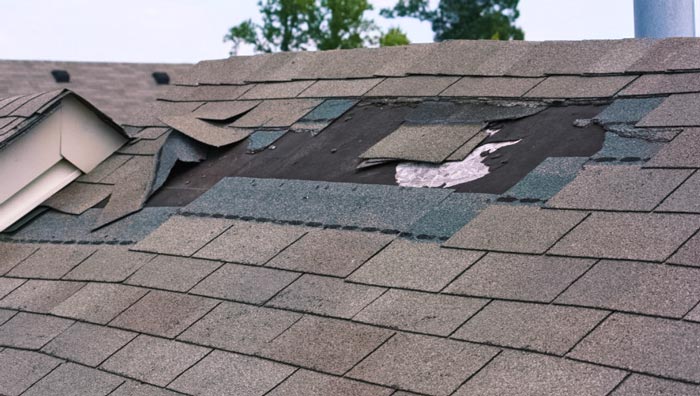
    One of the most common reasons for roof leaks in heavy rain is missing or damaged shingles and tiles. These roofing materials act as the first line of defense against rainwater. When they are cracked, broken, or entirely missing, water can easily find its way into your home. Regularly inspect your roof for any signs of damaged shingles or tiles and replace them promptly to maintain the integrity of your roof.

    Inadequate Flashing and Sealant

    Flashing and sealant are essential components that help waterproof vulnerable areas of your roof, such as the intersections between the roof and chimneys, vents, or skylights. When flashing becomes corroded or sealant deteriorates, it creates openings for water to seep through during heavy rain. Ensuring that flashing and sealant are in good condition is vital to prevent leaks in these vulnerable areas.

    Clogged Gutters and Downspouts

    Clogged gutters and downspouts can contribute to roof leaks during heavy rain in unexpected ways. When debris accumulates in your gutters, it can block the flow of water, causing it to overflow and potentially seep under your roofing materials. Regular gutter cleaning is a simple yet effective preventive measure to keep rainwater flowing away from your roof as it should.

    Poor Attic Ventilation and Insulation

    Inadequate attic ventilation and insulation can indirectly lead to roof leaks in heavy rain. When your attic lacks proper ventilation, it can trap moisture, creating a humid environment. Over time, this moisture can compromise your roof’s structural integrity and cause leaks. Well-maintained attic ventilation and insulation can help regulate moisture levels and prevent this issue.
    how old should a roof be before replaced

    The Role of Roof Pitch and Design

    How Roof Slope Affects Water Drainage

    The pitch or slope of your roof has a significant impact on its ability to handle heavy rain. Roofs with a steeper pitch tend to shed water more effectively, preventing it from pooling or seeping through roofing materials. When heavy rain falls on a roof with a shallow pitch, there is a higher risk of water accumulation, which can lead to leaks. Roof designs that incorporate a steeper pitch are generally better equipped to handle heavy rain, ensuring that water flows away efficiently.

    The Importance of a Well-Designed Drainage System

    A well-designed drainage system is crucial in preventing roof leaks during heavy rain. This system includes gutters, downspouts, and proper grading around your home. Gutters collect rainwater and direct it away from the roof’s edge, preventing it from seeping into the structure. Downspouts then channel the water safely to the ground, where it is directed away from your foundation. Additionally, the grading around your home should promote water runoff away from the structure, minimizing the risk of water infiltration.

    Choosing the Right Roofing Materials for Your Climate

    The choice of roofing materials also plays a pivotal role in preventing leaks during heavy rain. Some roofing materials are better suited for specific climates than others. For regions prone to heavy rainfall, it’s essential to select materials that offer superior water resistance and durability. Asphalt shingles, metal roofing, and clay tiles are common choices that can effectively protect your home against heavy rain. Consider consulting with a roofing professional to determine the best material for your climate and weather conditions.
    repairs roofing maintenance

    Preventing Roof Leaks in Heavy Rain

    Regular Roof Inspections and Maintenance

    Regular roof inspections and maintenance are your first line of defense against roof leaks during heavy rain. Scheduling annual or semi-annual inspections by a professional roofing contractor can help detect and address potential issues before they become major problems. During these inspections, the roofer will check for signs of damage, missing or loose shingles, deteriorating sealant, and other vulnerabilities. Timely repairs and maintenance can extend the lifespan of your roof and keep it resilient against heavy rain.

    Replacing Damaged or Missing Shingles and Tiles

    Damaged or missing shingles and tiles are common culprits behind roof leaks in heavy rain. When these components are compromised, they expose your roof to the elements, allowing water to seep in. Promptly replacing any damaged or missing roofing materials is essential to maintain the integrity of your roof. By addressing these issues as they arise, you can prevent leaks and further damage to your home.

    Cleaning Gutters and Downspouts

    Clean gutters and downspouts are essential for proper water drainage and prevention of roof leaks. Regularly remove debris, leaves, and dirt from your gutters to ensure rainwater can flow freely. Clogged gutters can lead to water overflow, which may find its way under your roofing materials, causing leaks. By keeping your gutters and downspouts clean and well-maintained, you can significantly reduce the risk of heavy rain-related roof leaks.

    Ensuring Proper Attic Ventilation and Insulation

    Proper attic ventilation and insulation are indirect but crucial factors in preventing roof leaks during heavy rain. Inadequate ventilation can lead to moisture buildup in the attic, potentially compromising your roof’s structural integrity. Proper insulation helps regulate temperature and humidity in the attic, preventing the formation of ice dams and reducing the risk of leaks. Ensuring your attic is well-ventilated and insulated can contribute to a leak-free roof.

    Professional Roof Waterproofing Options

    For homeowners in regions prone to heavy rainfall, professional roof waterproofing options can provide an added layer of protection. These options include applying waterproof coatings or sealants to your roof’s surface. While not always necessary, they can be particularly beneficial for older roofs or in areas with extreme weather conditions. Consulting with a roofing professional can help you determine whether roof waterproofing is a suitable preventive measure for your home.

    View More Articles

    Free, No Obligation

    Request Your Free Estimate & Inspection

    Tell us about your roof and we’ll come take a look — no pressure, no cost. Or call us right now on (703) 964-6233.

    (703) 964-6233
    Contact Form Demo (#3)
    Owens Corning Preferred Contractor GAF System Plus CertainTeed SureStart PLUS BBB A+ Accredited HomeAdvisor

    RNC Roofing

    RNC Roofing and Construction Group — The Roofing Contractor Specialists. Protecting your home, one shingle at a time.

    Virginia

    (703) 964-6233 Sterling · Leesburg · Ashburn
    Loudoun & Fairfax County

    Maryland

    (703) 964-6233 Beltsville · District Heights
    All of Maryland
    © 2026 RNC Roofing and Construction Group — The Roofing Contractor Specialists Northern Virginia & Maryland
  • Roof Leak Mold Remediation: Protecting Your Home and Health

    Protecting your home, one shingle at a time VA (703) 964-6233| MD (703) 964-6233| Free Estimate & Inspection
    Home Improvement

    Roof Leak Mold Remediation: Protecting Your Home and Health

    RNC Roofing and Construction Group September 13, 2023
    Roof Leak Mold Remediation: Protecting Your Home and Health

    Roof Leak Mold Remediation: Protecting Your Home and Health

    Roof leak mold remediation, often overlooked, is a critical aspect of maintaining a healthy living environment. When rainwater infiltrates your home through a compromised roof, it creates a fertile breeding ground for mold. This dual problem of roof leaks and mold growth can lead to structural damage and health concerns.

    Identifying Roof Leaks

    When it comes to roof leak mold remediation, the first step is recognizing the presence of a roof leak. Understanding the signs and taking proactive measures can save you from extensive damage and costly repairs down the line.

    Common Signs of Roof Leaks

    Water Stains: One of the most obvious indicators of a roof leak is water stains on your ceiling or walls. These stains often appear as discolored patches and can vary in size.

    • Peeling Paint or Wallpaper: When water infiltrates the structure of your home, it can cause paint or wallpaper to bubble or peel. Keep an eye out for any unusual changes in your interior wall coverings.
    • Damp or Moldy Odors: A musty, damp odor in your home can be a sign of hidden moisture, often caused by roof leaks. If you notice this smell, investigate further.

    The Importance of Regular Roof Inspections

    Regular roof inspections are key to preventing roof leak mold remediation issues. Even if you haven’t noticed any obvious signs of a leak, having your roof professionally inspected on a routine basis can help identify problems before they escalate. Professional roofing contractors have the expertise to spot subtle issues that may go unnoticed by the untrained eye.

    Using DIY Methods to Detect Leaks Before They Become Major Issues

    While professional inspections are essential, there are also some DIY methods you can use to detect roof leaks early:

    • Attic Inspection: During daylight hours, turn off the lights in your attic and look for any signs of outside light seeping through. This can indicate holes or gaps in your roof.
    • Check for Dripping: On a rainy day, inspect your attic for any signs of dripping or moisture. If you find any, it’s a clear indication of a roof leak.
    • Examine Shingles: From the ground, you can use binoculars to check for missing, damaged, or curling shingles. These are potential entry points for water.

    what are roof bubbles

    Understanding Mold Growth

    It’s essential to have a clear understanding of what mold is, how it thrives in moist environments, the health risks associated with mold exposure, and how mold growth can exacerbate roof leak issues.

    What Mold Is and its Affinity for Moist Environments

    Mold is a type of fungus that can be found both indoors and outdoors. It reproduces by creating tiny spores that are invisible to the naked eye, making it highly adaptable and resilient. Mold thrives in environments with high humidity and moisture, making it a common problem in areas affected by roof leaks.

    Health Risks Associated with Mold Exposure

    Exposure to mold can pose significant health risks, especially when it’s left unaddressed. Common health issues associated with mold exposure include:

    • Respiratory Problems: Mold spores can be inhaled, leading to coughing, sneezing, wheezing, and exacerbating conditions like asthma.
    • Allergic Reactions: Many people are allergic to mold, and exposure can lead to symptoms like itching, red eyes, and skin rashes.
    • Irritation: Mold exposure can irritate the eyes, nose, throat, and skin, causing discomfort and sometimes severe reactions.
    • Fungal Infections: In rare cases, individuals with compromised immune systems may develop fungal infections from mold exposure.

    Exacerbating Roof Leak Problems

    Roof leaks and mold growth often go hand in hand. When moisture from a roof leak interacts with building materials, it provides the ideal conditions for mold to flourish. This can lead to further deterioration of your home’s structure, including:

    • Weakened Roofing Materials: Continuous exposure to moisture can weaken the roof’s structure, causing more leaks and potential collapses.
    • Interior Damage: Mold growth on walls, ceilings, and insulation can result in costly interior damage that goes beyond the initial roof leak.
    • Health Concerns: As mold spreads, the health risks to occupants increase, creating a hazardous living environment.

    labor cost for roofing

    Roof Leak Repair

    You’ve identified a roof leak, taking immediate action is crucial to prevent further damage to your home and avoid exacerbating mold growth. In this section, we’ll discuss the steps you should take, temporary fixes to prevent additional damage, and the importance of enlisting a professional roofing contractor for a permanent solution.

    Steps to Take When You Identify a Roof Leak

    • Safety First: Ensure your safety by avoiding any electrical appliances or standing water in the affected area.
    • Contain the Leak: Place a bucket or container beneath the leak to catch dripping water. This prevents water from spreading to other parts of your home.
    • Identify the Source: Try to determine the source of the leak from inside your home. Look for wet spots or stains on the ceiling or walls, which can help pinpoint the location.
    • Temporary Measures: While waiting for professional assistance, consider using a tarp or plastic sheet to cover the affected area on the roof, preventing further water ingress.

    Temporary Fixes to Prevent Further Damage

    While temporary fixes can provide short-term relief, they are not a substitute for professional roof leak mold remediation. Some temporary measures include:

    • Applying Roof Sealant: Roof sealant can be used to cover small cracks or gaps temporarily. However, it’s not a permanent solution.
    • Patching Holes: If you can safely access the roof, you may patch small holes or damaged shingles with roofing cement or a patch kit.
    • Using Roofing Tape: Roofing tape can be applied as a temporary seal on damaged areas, but it’s important to remember that it won’t last long-term.

    Hiring a Professional Roofing Contractor for a Permanent Solution

    For a long-lasting and effective solution, it’s essential to enlist the services of a professional roofing contractor experienced in roof leak mold remediation. Here’s why:

    • Expertise: Roofing professionals have the knowledge and expertise to identify the root cause of the leak and recommend the appropriate repairs.
    • Quality Repairs: They use high-quality materials and techniques to ensure that the repairs stand the test of time.
    • Preventing Future Leaks: Professionals can identify potential trouble spots and address them to prevent future leaks.
    • Safety: Roof repairs can be dangerous, and professionals have the necessary safety equipment and training to work safely at heights.

    roof ventilation

    Mold Remediation

    Mold remediation is a crucial step in addressing the consequences of roof leak mold remediation. This process involves removing mold growth, ensuring safety, and implementing preventive measures to stop mold from returning.

    The Process of Mold Removal and Cleanup

    Mold removal and cleanup is a meticulous process that should be handled by professionals experienced in mold remediation. Here’s an overview of the steps involved:

    • Assessment: The first step is a thorough assessment of the affected areas to determine the extent of mold growth. This helps in planning the remediation process.
    • Containment: To prevent the spread of mold spores to unaffected areas, professionals will set up containment barriers, often using plastic sheeting and negative air pressure systems.
    • Mold Removal: Mold is carefully removed from surfaces and materials using specialized techniques and cleaning agents. This may involve scrubbing, sanding, or even removing and replacing affected materials.
    • HEPA Vacuuming: High-efficiency particulate air (HEPA) vacuuming is used to capture and remove mold spores and debris from surfaces and the air.
    • Cleaning and Disinfecting: Affected surfaces are thoroughly cleaned and disinfected to ensure the elimination of mold and prevent regrowth.
    • Drying: Proper drying of the area is crucial to prevent future mold growth. Dehumidifiers and fans may be used to achieve optimal moisture levels.

    Safety Precautions When Dealing with Mold

    Mold remediation should always prioritize safety. Professionals follow strict safety guidelines, including:

    • Personal Protective Equipment (PPE): Technicians wear PPE, such as masks, gloves, and suits, to protect themselves from mold exposure.
    • Containment: As mentioned earlier, containment barriers are set up to prevent the spread of mold spores.
    • Proper Ventilation: Adequate ventilation is maintained to remove airborne mold spores from the work area.

    Tips for Preventing Mold Re-Growth After Remediation

    Once mold remediation is complete, it’s essential to take preventive measures to avoid future mold issues:

    • Address the Root Cause: Identify and address the root cause of the moisture problem, such as roof leaks, to prevent mold from returning.
    • Regular Inspections: Conduct regular inspections to catch any potential leaks or moisture issues early.
    • Maintain Proper Ventilation: Ensure your home has proper ventilation in areas prone to moisture, such as bathrooms and kitchens.
    • Control Humidity: Use dehumidifiers to maintain optimal indoor humidity levels, typically between 30% and 50%.

    tpo roofing improvement

    Preventing Future Roof Leaks and Mold Issues

    After addressing roof leak mold remediation, it’s crucial to take proactive steps to prevent these problems from recurring. Here are some practical tips to safeguard your home:

    Roof Maintenance Tips to Reduce the Risk of Leaks

    Regular roof maintenance can significantly reduce the risk of future leaks. Here’s what you can do:

    • Clear Debris: Remove leaves, branches, and debris from your roof and gutters regularly. Accumulated debris can block water drainage and lead to leaks.
    • Inspect Shingles: Check your roof’s shingles for signs of wear and damage. Replace any missing or damaged shingles promptly to maintain the integrity of your roof.
    • Seal Gaps and Cracks: Inspect the flashing around vents, chimneys, and skylights. Seal any gaps or cracks with roof sealant to prevent water infiltration.
    • Trim Overhanging Branches: Trim tree branches that hang over your roof to prevent them from scratching or damaging the shingles during storms.

    The Importance of Proper Ventilation and Insulation

    Proper attic ventilation and insulation play a significant role in preventing roof leaks and mold growth:

    • Ventilation: Adequate attic ventilation helps regulate temperature and moisture levels, reducing the risk of condensation that can lead to mold growth.
    • Insulation: Proper insulation can prevent heat from escaping and causing ice dams on the roof, which can lead to leaks. Ensure your attic is well-insulated.

    Regular Inspections and Proactive Measures to Safeguard Your Home

    • Schedule Professional Inspections: Arrange for annual or bi-annual professional roof inspections. Experienced contractors can spot potential issues before they become major problems.
    • Act on Early Warning Signs: If you notice any signs of roof damage or leaks, such as water stains or peeling paint, address them promptly. Don’t wait for the problem to escalate.
    • Gutter Maintenance: Keep your gutters clean and in good condition. Clogged or damaged gutters can lead to water pooling on your roof, increasing the risk of leaks.
    • Monitor Indoor Humidity: Keep an eye on indoor humidity levels, especially in areas prone to moisture, like bathrooms and basements. Use dehumidifiers if necessary to maintain optimal levels.

    View More Articles

    Free, No Obligation

    Request Your Free Estimate & Inspection

    Tell us about your roof and we’ll come take a look — no pressure, no cost. Or call us right now on (703) 964-6233.

    (703) 964-6233
    Contact Form Demo (#3)
    Owens Corning Preferred Contractor GAF System Plus CertainTeed SureStart PLUS BBB A+ Accredited HomeAdvisor

    RNC Roofing

    RNC Roofing and Construction Group — The Roofing Contractor Specialists. Protecting your home, one shingle at a time.

    Virginia

    (703) 964-6233 Sterling · Leesburg · Ashburn
    Loudoun & Fairfax County

    Maryland

    (703) 964-6233 Beltsville · District Heights
    All of Maryland
    © 2026 RNC Roofing and Construction Group — The Roofing Contractor Specialists Northern Virginia & Maryland
  • Roof Bubbling Up: Understanding, Prevention, and Repair

    Protecting your home, one shingle at a time VA (703) 964-6233| MD (703) 964-6233| Free Estimate & Inspection
    Home Improvement

    Roof Bubbling Up: Understanding, Prevention, and Repair

    RNC Roofing and Construction Group September 12, 2023
    Roof Bubbling Up: Understanding, Prevention, and Repair

    Roof Bubbling Up: Understanding, Prevention, and Repair

    Roof bubbling up may seem innocuous at first glance, but it’s a sign that something isn’t quite right with your roof. Those seemingly harmless bubbles or blisters on your roof’s surface can lead to more significant problems if left unattended. Water damage, structural issues, and increased energy bills are just a few of the potential consequences.

    What are Roof Bubbles?

    Defining Roof Bubbles

    Roof bubbles, also known as roof blisters, are irregularities that can develop on the surface of your roofing materials. They often resemble small, raised areas or blisters, which can vary in size and appearance. These bubbles typically form when moisture becomes trapped beneath the roofing materials, causing them to separate or create a raised portion on your roof’s surface.

    Variability in Size and Severity

    Roof bubbles are not a one-size-fits-all issue. They can range from tiny, barely noticeable blisters to larger, more prominent bulges. The severity of roof bubbles can also differ, with some being purely cosmetic and others indicating potentially more significant underlying problems.

    In some cases, roof bubbles may only affect a small section of your roof, while in others, they can spread across a larger area. The size and severity of these bubbles can vary based on several factors, including the type of roofing material, installation quality, and environmental conditions.

    Visualizing Roof Bubbles

    To help you visualize roof bubbles, imagine small, raised pockets on the surface of your roof that can resemble the appearance of bubbles or blisters on the skin. These irregularities can be particularly noticeable when sunlight casts shadows on your roof’s surface. When left unaddressed, they can not only compromise your roof’s aesthetics but also lead to more significant issues like leaks and water damage.

    what is roofing insulation

    Causes of Roof Bubbling Up

    Heat and Temperature Fluctuations

    Roof bubbling up can often be traced back to the relentless dance of heat and temperature fluctuations that your roof experiences. During hot sunny days, your roof heats up significantly, causing the roofing materials to expand. Conversely, as the temperature drops, the materials contract. This constant expansion and contraction can create stress on your roof, making it more vulnerable to developing bubbles or blisters.

    Imagine your roof as a surface that swells and shrinks with the changing weather. Over time, this repetitive stress can weaken the roofing materials, leading to the formation of those telltale bubbles.

    Poor Installation Practices

    Another key culprit behind roof bubbling is poor installation practices. When roofing materials are not properly installed, they may not adhere securely to the underlying structure. This lack of proper adhesion can allow air and moisture to become trapped beneath the roofing materials.

    • Consider this scenario: during installation, if a section of roofing is not sealed correctly or if air pockets are left behind, it can create the ideal conditions for roof bubbles to develop. Inadequate installation practices can turn a seemingly well-constructed roof into a bubble-prone surface.

    Moisture Accumulation

    Moisture is the third player in the roof bubbling saga. It can infiltrate your roofing system through various means, such as leaks, damaged shingles, or improper ventilation. Once moisture finds its way beneath the roofing materials, it becomes trapped and can create pockets of dampness.

    Think of moisture as the fuel for roof bubbles. When it accumulates beneath your roof’s surface, it can weaken the adhesive bonds, causing the roofing materials to separate or blister. Over time, these pockets of moisture can expand, exacerbating the issue and potentially leading to more significant damage.

    Real-Life Examples

    To illustrate these causes, consider the following scenarios:

    • The Hot Summer Bake: In the scorching summer heat, your roof expands, but if it was poorly installed or already had some moisture issues, bubbles can start forming as the roofing materials struggle to accommodate the temperature-induced changes.
    • The Sneaky Leak: A small roof leak, often unnoticed, allows moisture to creep beneath your roofing materials. As the seasons change and temperatures fluctuate, this moisture can lead to the emergence of roof bubbles.

    signs of blistering roof , signs to replace your roof

    Signs and Dangers

    When it comes to your roof’s health, early detection is key. Here are some common signs that you might have roof bubbles:

    • Visible Bubbles or Blisters: The most obvious sign is the presence of raised areas or blisters on your roof’s surface. These may appear as irregularities, bumps, or pockets of air beneath the roofing materials.
    • Cracked or Peeling Paint: If your roof has bubbles, it can affect the paint or coating on the surface. You might notice paint that is cracking, peeling, or blistering, mirroring the condition of your roof beneath.
    • Interior Water Damage: While roof bubbles are exterior issues, their consequences can seep inside. Water may find its way through the compromised roofing materials, causing stains, dampness, or even visible leaks on your ceilings or walls.

    The Potential Dangers

    Ignoring these warning signs can lead to more significant problems down the road. Roof bubbles might seem harmless, but they can be indicators of underlying issues that, if left unaddressed, can escalate:

    • Leaks: Roof bubbles can allow water to infiltrate your roofing system, leading to leaks during heavy rainfall. These leaks can damage your home’s interior, including your insulation, drywall, and even your belongings.
    • Structural Damage: Over time, the trapped moisture beneath the roofing materials can weaken the structural integrity of your roof. This can result in sagging or even the need for costly repairs or replacements.
    • Energy Inefficiency: Roof bubbles can affect your home’s energy efficiency. The compromised roofing materials may reduce your roof’s insulation properties, causing fluctuations in indoor temperatures and increasing your energy bills.

    preventing mold , preventing roof algae

    Prevention and Maintenance

    Preventing Roof Bubbling Up

    Preventing roof bubbling up is not only cost-effective but also crucial for the longevity of your roof. Here are some practical tips to keep those bubbles at bay:

    Proper Ventilation and Insulation:

    Ensuring your attic and roof have adequate ventilation and insulation can go a long way in preventing roof bubbles. Proper ventilation helps regulate temperature and humidity, reducing the chances of moisture buildup that can lead to bubbles. Adequate insulation also helps maintain a consistent temperature on your roof’s surface, minimizing the expansion and contraction that can cause bubbles.

    Regular Roof Inspections:

    Regular roof inspections are your first line of defense against roof bubbles. Consider scheduling professional roof inspections at least once a year, preferably in the spring or fall. Inspectors can identify early signs of damage, including potential bubbles, and address them before they worsen. DIY inspections can also be beneficial, but be cautious when walking on your roof to avoid causing further damage.

    Quality Roofing Materials and Installation:

    Investing in high-quality roofing materials and professional installation can significantly reduce the risk of roof bubbling. Choose roofing materials known for their durability and resistance to moisture. When it comes to installation, hiring experienced roofing contractors who follow industry best practices is essential. Properly installed roofing materials are less likely to develop bubbles over time.

    Maintaining Your Roof’s Lifespan

    Routine maintenance is the key to extending your roof’s lifespan and preventing issues like roof bubbling. Regularly clear debris from your roof, such as leaves and branches, to prevent water accumulation. Check and clean your gutters to ensure proper drainage. Promptly address any leaks or damaged shingles to prevent moisture from seeping beneath the roofing materials.

    labor cost for roofing

    Repairing Roof Bubbles

    Preventing Roof Bubbling Up

    Preventing roof bubbling up is not only cost-effective but also crucial for the longevity of your roof. Here are some practical tips to keep those bubbles at bay:

    Proper Ventilation and Insulation:

    Ensuring your attic and roof have adequate ventilation and insulation can go a long way in preventing roof bubbles. Proper ventilation helps regulate temperature and humidity, reducing the chances of moisture buildup that can lead to bubbles. Adequate insulation also helps maintain a consistent temperature on your roof’s surface, minimizing the expansion and contraction that can cause bubbles.

    Regular Roof Inspections:

    Regular roof inspections are your first line of defense against roof bubbles. Consider scheduling professional roof inspections at least once a year, preferably in the spring or fall. Inspectors can identify early signs of damage, including potential bubbles, and address them before they worsen. DIY inspections can also be beneficial, but be cautious when walking on your roof to avoid causing further damage.

    Quality Roofing Materials and Installation:

    Investing in high-quality roofing materials and professional installation can significantly reduce the risk of roof bubbling. Choose roofing materials known for their durability and resistance to moisture. When it comes to installation, hiring experienced roofing contractors who follow industry best practices is essential. Properly installed roofing materials are less likely to develop bubbles over time.

    Maintaining Your Roof’s Lifespan

    Routine maintenance is the key to extending your roof’s lifespan and preventing issues like roof bubbling. Regularly clear debris from your roof, such as leaves and branches, to prevent water accumulation. Check and clean your gutters to ensure proper drainage. Promptly address any leaks or damaged shingles to prevent moisture from seeping beneath the roofing materials.

    Free, No Obligation

    Request Your Free Estimate & Inspection

    Tell us about your roof and we’ll come take a look — no pressure, no cost. Or call us right now on (703) 964-6233.

    (703) 964-6233
    Contact Form Demo (#3)
    Owens Corning Preferred Contractor GAF System Plus CertainTeed SureStart PLUS BBB A+ Accredited HomeAdvisor

    RNC Roofing

    RNC Roofing and Construction Group — The Roofing Contractor Specialists. Protecting your home, one shingle at a time.

    Virginia

    (703) 964-6233 Sterling · Leesburg · Ashburn
    Loudoun & Fairfax County

    Maryland

    (703) 964-6233 Beltsville · District Heights
    All of Maryland
    © 2026 RNC Roofing and Construction Group — The Roofing Contractor Specialists Northern Virginia & Maryland
  • How to Clean TPO Roof: Maintenance and Cleaning Tips

    Protecting your home, one shingle at a time VA (703) 964-6233| MD (703) 964-6233| Free Estimate & Inspection
    Home Improvement

    How to Clean TPO Roof: Maintenance and Cleaning Tips

    RNC Roofing and Construction Group September 7, 2023
    How to Clean TPO Roof: Maintenance and Cleaning Tips

    How to Clean TPO Roof: Maintenance and Cleaning Tips

    When it comes to roofing materials, property owners often seek guidance on how to clean TPO (Thermoplastic Olefin). This material has emerged as a popular and reliable option for residential and commercial buildings alike due to its cost-effectiveness, durability, and energy efficiency.

    Understanding TPO Roofing

    Defining TPO Roofing: A Durable Solution

    TPO, or Thermoplastic Olefin, roofing is a modern and highly efficient roofing material that has gained widespread popularity in recent years. TPO roofs are known for their durability, versatility, and cost-effectiveness. They are composed of a single-ply membrane made from a blend of rubber and plastic materials, offering a strong yet flexible roofing solution.

    Advantages of TPO Roofing

    One of the key reasons behind the popularity of TPO roofing is its numerous advantages. TPO roofs are reflective, helping to reduce energy consumption by reflecting sunlight and heat away from the building. This reflective property not only makes them energy-efficient but also contributes to a more comfortable indoor environment. Additionally, TPO roofing is resistant to UV rays and chemical exposure, ensuring long-lasting performance.

    Understanding TPO Roofing Lifespan and Maintenance Needs

    While TPO roofing offers remarkable durability, it is not immune to the accumulation of dirt, debris, and environmental contaminants. Over time, these elements can take a toll on the appearance and functionality of your TPO roof. TPO roofing typically has a lifespan of 15 to 30 years, depending on factors such as climate, maintenance, and quality of installation.

    TPO roofs are particularly susceptible to dirt and debris due to their reflective surface, which can make even minor stains and discoloration noticeable. Regular cleaning and maintenance are essential to preserving the roof’s aesthetic appeal and performance.

    cleaning roof maintenance

    Preparing for TPO Roof Cleaning

    Safety First: The Importance of Protective Gear

    Before you embark on the journey to clean your TPO roof, it’s crucial to prioritize safety. Safety gear, including non-slip shoes, gloves, and safety goggles, should be your first consideration. TPO roofs can be slippery, especially when wet, and accidents can easily be prevented with the right attire.

    Tools of the Trade: What You’ll Need

    To ensure an effective TPO roof cleaning process, it’s essential to have the right tools and equipment at your disposal. A soft-bristle brush or a mop with a long handle is ideal for scrubbing away dirt and grime without causing damage to the TPO membrane. Additionally, a garden hose with a spray nozzle attachment will help you control the flow of water for rinsing.

    Inspect Before You Act: Roof Inspection

    Before you begin cleaning, take a few moments to inspect your TPO roof carefully. Look for any signs of damage, including punctures, tears, or loose seams. Identifying these issues before cleaning can prevent further damage and help you plan for necessary repairs.

    labor cost for roofing

    Cleaning TPO Roof Step by Step

    The Gentle Approach: Starting Right

    When it comes to cleaning your TPO roof, it’s crucial to begin with a gentle method. Harsh cleaning techniques can damage the TPO membrane, compromising its integrity and lifespan. Instead, opt for a soft and patient approach to maintain your roof’s quality.

    Mild Detergents and Specialized TPO Roof Cleaners

    To effectively remove dirt, stains, and debris from your TPO roof, consider using mild detergents or specialized TPO roof cleaners. These products are designed to break down and remove contaminants without causing harm to the roofing material. When using detergents, always follow the manufacturer’s instructions for the best results.

    A Soft Touch: Scrubbing with Care

    As you clean your TPO roof, use a soft-bristle brush or a mop with a gentle touch. The goal is to dislodge and lift away the accumulated grime without scratching or damaging the TPO membrane. Begin at one end of the roof and work your way methodically, taking your time to ensure thorough cleaning.

    Avoiding Harsh Chemicals

    While it might be tempting to use strong chemicals to tackle tough stains, it’s important to avoid them when cleaning your TPO roof. Harsh chemicals can cause irreparable damage to the TPO material, leading to costly repairs or replacements. Stick to mild detergents and TPO-specific cleaners for safe and effective results.

    how to remove roof moss

    Dealing with Stubborn Stains and Mold

    Common Challenges: Mold, Algae, and Stubborn Stains

    TPO roofs, like any outdoor surface, are susceptible to common issues such as m, and stubborn stains. These not only affect the appearance but can also compromise the roof’s performance. Let’s explore how to tackle these challenges effectively.

    Eco-Friendly Solutions: Mold and Algae Removal

    When faced with mold and algae on your TPO roof, it’s essential to opt for eco-friendly solutions. Harsh chemicals can harm the environment and, in some cases, the roofing material itself. Consider using a mixture of water and mild soap or a vinegar-water solution to gently remove mold and algae. Be sure to scrub gently to avoid damaging the TPO membrane.

    Avoid Abrasive Materials: Protecting Your Roof

    In the quest to eliminate stubborn stains, it’s important to avoid abrasive materials like wire brushes or abrasive pads. These can scratch and weaken the TPO membrane, leading to potential leaks or damage. Instead, stick to soft-bristle brushes, mops, or non-abrasive cleaning tools to protect your roof while effectively removing stains.

    how to clean algae from roof

    Rinsing and Drying

    Thorough Rinsing: A Critical Step

    After the cleaning process, the next crucial step is to ensure thorough rinsing of your TPO roof with clean water. This step is essential to remove any remaining cleaning solution, dirt, and debris. Rinsing will leave your roof looking pristine and ready to face the elements.

    Proper Drainage: Preventing Water Pooling

    As you rinse your TPO roof, pay close attention to proper drainage. Ensure that water flows smoothly off the roof, preventing any pooling. Pooling water can lead to water damage and even compromise the structural integrity of your roof over time.

    Natural Air Drying: Let It Breathe

    Once you’ve completed the rinsing process, allow your TPO roof to air dry naturally. Avoid using any external heat sources or fans, as excessive heat can damage the TPO membrane. Natural air drying ensures that your roof dries evenly and retains its integrity.

    repairs roofing maintenance

    Maintenance Tips and Final Thoughts

    Keeping Your TPO Roof Pristine: Maintenance Tips

    Maintaining a clean and long-lasting TPO roof extends beyond a single cleaning session. To ensure your TPO roof stays in top shape, consider these maintenance tips:

    • Regular Cleaning: Don’t wait until your roof is visibly dirty. Plan for regular cleaning sessions, ideally at least twice a year, to prevent dirt buildup and staining. Consistent cleaning helps maintain your roof’s aesthetics.
    • Clear Debris Promptly: Remove debris like leaves, branches, and dirt as soon as you notice them. Accumulated debris can trap moisture, leading to potential issues like mold or algae growth.
    • Gentle Cleaning: When it’s time to clean, always employ gentle cleaning methods using mild detergents or specialized TPO roof cleaners. Remember to scrub softly with a soft brush or mop to prevent damage.
    • Periodic Inspections: Conduct routine roof inspections to catch potential problems early. Look for signs of damage, loose seams, or punctures. Addressing these issues promptly can prevent more extensive damage.
    • Professional Help: For complex TPO roof issues or if you’re unsure about repairs, it’s advisable to consult professionals. They have the expertise to assess and address roof problems effectively.

    Free, No Obligation

    Request Your Free Estimate & Inspection

    Tell us about your roof and we’ll come take a look — no pressure, no cost. Or call us right now on (703) 964-6233.

    (703) 964-6233
    Contact Form Demo (#3)
    Owens Corning Preferred Contractor GAF System Plus CertainTeed SureStart PLUS BBB A+ Accredited HomeAdvisor

    RNC Roofing

    RNC Roofing and Construction Group — The Roofing Contractor Specialists. Protecting your home, one shingle at a time.

    Virginia

    (703) 964-6233 Sterling · Leesburg · Ashburn
    Loudoun & Fairfax County

    Maryland

    (703) 964-6233 Beltsville · District Heights
    All of Maryland
    © 2026 RNC Roofing and Construction Group — The Roofing Contractor Specialists Northern Virginia & Maryland
  • Steps to Replace a Roof | Guide to Successful Roof Replacement

    Protecting your home, one shingle at a time VA (703) 964-6233| MD (703) 964-6233| Free Estimate & Inspection
    Home Improvement

    Steps to Replace a Roof | Guide to Successful Roof Replacement

    RNC Roofing and Construction Group August 22, 2023
    Steps to Replace a Roof | Guide to Successful Roof Replacement

    Steps to Replace a Roof | Guide to Successful Roof Replacement

    Approaching a roof replacement with the right techniques is key to ensuring the longevity and reliability of your new roof. From selecting the appropriate roofing material to following precise installation methods, every aspect counts. Proper roofing techniques involve thorough inspection, meticulous planning, and adherence to local regulations and permits. Moreover, choosing quality materials and employing skilled professionals can greatly impact the durability of your roof and the steps to replace a roof.

    Roof Inspection and Assessment

    Before embarking on a roof replacement journey, a thorough roof inspection and assessment is paramount to ensure a successful outcome. This crucial step sets the foundation for making informed decisions and outlining the necessary actions moving forward.

    Assessing the Current Roof Condition

    Begin by closely examining the existing roof’s condition. Look for telltale signs of wear and tear, such as cracked or missing shingles, water stains, and moss growth. Pay special attention to any areas where the roof might be sagging or showing signs of structural compromise. This initial assessment provides a clear picture of the extent of damage and guides subsequent actions.

    Identifying Common Roofing Problems

    In this phase, identify common roofing problems that could potentially undermine the new roof’s integrity. Issues like inadequate ventilation, improper flashing, or poor drainage can lead to long-term complications. Addressing these problems during the replacement process contributes to the overall health of your new roof and extends its lifespan.

    Determining Whether a Replacement is Necessary

    Based on the assessment, evaluate whether a full replacement is needed. Sometimes, repairs or minor fixes might suffice. However, if the roof’s fundamental structure is compromised or multiple issues are present, opting for a replacement becomes a prudent choice. Balancing repair costs against the benefits of a fresh start is essential.

    Considering Roofing Materials and Options

    Once the decision for replacement is made, it’s time to explore various roofing materials and options available. From traditional asphalt shingles to metal or slate, each material offers distinct advantages in terms of durability, aesthetics, and cost. Consider your home’s architectural style, climate conditions, and personal preferences when making this choice.

    metal roofing

    Roof Preparation

    Proper roof preparation is the cornerstone of a successful roof replacement project. This phase involves obtaining necessary permits, setting up a safe work environment, and gathering the tools and materials essential for a smooth and efficient process.

    Obtaining Necessary Permits and Regulations

    Before you begin, check with local authorities to ensure you have all the required permits and adhere to regulations. These permits ensure that your roof replacement follows safety and zoning guidelines. Being compliant from the start helps you avoid potential setbacks and legal issues down the road.

    Clearing the Work Area and Ensuring Safety

    Creating a safe and clutter-free work area is crucial to avoid accidents and facilitate smooth operations. Remove any obstacles that could hinder the work process, and clearly mark off the area to alert residents and visitors. Safety measures like using proper signage, barriers, and personal protective equipment (PPE) contribute to a secure work environment.

    Gathering Essential Tools and Materials

    To carry out a successful roof replacement, gather all the essential tools and materials you’ll need. This includes roofing materials, shingles, underlayment, nails, tools like hammers, roofing nail guns, and safety equipment. Having everything organized and ready before starting reduces downtime and ensures a seamless workflow.

    Protecting Your Property During the Roof Replacement

    During the roof replacement, it’s crucial to take steps to protect your property from potential damage. Cover windows, landscaping, and other vulnerable areas to prevent debris or falling materials from causing harm. Additionally, communicate with your roofing team about strategies to minimize any disruption to your daily life.

    labor cost for roofing

    Removing the Old Roofing Material

    Roof Stripping Techniques

    In this crucial phase of replacing a roof, the existing roofing material needs to be carefully stripped away to make room for the new. Depending on the material used, various roof stripping techniques can be employed. For asphalt shingles, a shingle scraper or pitchfork can be utilized to gently lift and remove the old shingles. Metal roofs might require a different approach, often involving removing screws or clips to detach panels. Prioritize precision and caution to avoid causing any unintentional damage to the roof deck.

    Proper Disposal of Old Roofing Materials

    As you strip the old roofing material, it’s essential to focus on proper disposal. Responsible disposal not only contributes to environmental conservation but also ensures a clean and organized work area. Local regulations might dictate specific disposal methods, such as recycling or designated waste centers. Consider renting a dumpster or arranging for a waste removal service to efficiently handle the debris.

    Inspecting the Roof Deck for Damage

    With the old roofing material removed, it’s an opportune time to inspect the roof deck for damage. Carefully examine the deck for signs of rot, water damage, or structural issues. Addressing these problems early prevents the new roof from being compromised by underlying issues. It’s advisable to consult with a professional roofing contractor to accurately assess any damage and determine the necessary repairs before proceeding.


    wood shingles

    Roof Installation

    Choosing the Right Roofing Material

    Selecting the ideal roofing material is a pivotal decision in the roof replacement process. Each material has its own unique qualities, offering different levels of durability, aesthetics, and cost-effectiveness. Whether you opt for traditional asphalt shingles, energy-efficient metal roofing, or the classic charm of slate, consider your climate, architectural style, and budget. This choice sets the stage for the overall look and performance of your new roof.

    Roof Underlayment and Ventilation Considerations

    Before laying down the primary roofing material, pay attention to the roof underlayment and ventilation. The underlayment acts as an additional barrier against moisture and enhances the roof’s overall integrity. Adequate ventilation is also critical, as it prevents excessive heat and moisture buildup that can lead to damage. Proper ventilation contributes to the longevity of your roof and the comfort of your living spaces.

    Shingle Installation or Roofing Material Application

    Whether you’re installing shingles, metal panels, or another roofing material, proper installation techniques are paramount. During this phase, meticulous attention to detail ensures a water-tight and resilient roof. Ensure uniformity, proper alignment, and secure fastening to prevent future leaks or damage. Following the manufacturer’s guidelines and industry best practices guarantees a high-quality outcome.

    Flashing and Sealing Critical Roof Areas

    Flashing and sealing play a crucial role in maintaining a weather-resistant roof. Flashing is used around roof openings such as chimneys, vents, and skylights to prevent water infiltration. Sealing these critical areas with durable materials like caulk or sealant adds an extra layer of protection against potential leaks. Ensuring that these points are watertight contributes to the overall effectiveness of your new roof.

    Ridge Cap and Edge Detailing

    The ridge cap and edges of your roof demand special attention to ensure a complete and polished finish. The ridge cap covers the peak of the roof, preventing water from entering through this vulnerable area. Properly sealing and securing the ridge cap guarantees its longevity. Edge detailing involves carefully sealing and securing the edges of the roof to prevent wind uplift and water penetration.

    Final Inspections and Clean-Up

    As you approach the culmination of the roof replacement journey, the importance of thorough final inspections and meticulous clean-up cannot be overstated. This phase ensures that your new roof not only looks impeccable but also performs reliably for years to come.

    Post-Installation Roof Inspection

    Conducting a comprehensive post-installation roof inspection is a pivotal step to confirm that the replacement process has been executed flawlessly. Carefully examine the entire roofing system, from the newly installed materials to the critical joints and connections. Look for any signs of irregularities, misalignments, or potential issues that might compromise the roof’s functionality.

    Quality Assurance and Addressing Any Issues

    During the post-installation inspection, if any discrepancies or issues are identified, address them promptly. Whether it’s a loose shingle, a minor gap, or any other imperfection, ensuring these concerns are rectified immediately contributes to the overall quality and longevity of your new roof. A proactive approach at this stage eliminates future headaches and ensures a job well done.

    Cleaning Up the Worksite

    Once the roofing work is complete, it’s time to prioritize a thorough clean-up of the worksite. Removing debris, leftover materials, and discarded tools not only tidies up the area but also contributes to safety. A clean worksite signifies a professional approach and leaves a positive impression on your property.

    Providing Roof Maintenance Guidelines for Longevity

    As your new roof takes its place, it’s essential to equip yourself with knowledge about roof maintenance guidelines that enhance its lifespan. Regular maintenance, such as cleaning gutters, inspecting for damage, and addressing minor repairs, ensures that your investment continues to provide reliable protection. These practices promote the roof’s long-term performance and minimize potential issues down the road.

    Free, No Obligation

    Request Your Free Estimate & Inspection

    Tell us about your roof and we’ll come take a look — no pressure, no cost. Or call us right now on (703) 964-6233.

    (703) 964-6233
    Contact Form Demo (#3)
    Owens Corning Preferred Contractor GAF System Plus CertainTeed SureStart PLUS BBB A+ Accredited HomeAdvisor

    RNC Roofing

    RNC Roofing and Construction Group — The Roofing Contractor Specialists. Protecting your home, one shingle at a time.

    Virginia

    (703) 964-6233 Sterling · Leesburg · Ashburn
    Loudoun & Fairfax County

    Maryland

    (703) 964-6233 Beltsville · District Heights
    All of Maryland
    © 2026 RNC Roofing and Construction Group — The Roofing Contractor Specialists Northern Virginia & Maryland
  • What To Do If Roof is Leaking During Storm: Expert Tips

    Protecting your home, one shingle at a time VA (703) 964-6233| MD (703) 964-6233| Free Estimate & Inspection
    Home Improvement

    What To Do If Roof is Leaking During Storm: Expert Tips

    RNC Roofing and Construction Group August 15, 2023
    What To Do If Roof is Leaking During Storm: Expert Tips

    What To Do If Roof is Leaking During Storm: Expert Tips

    During a storm, your roof is subjected to intense rain, wind, and sometimes hail. A compromised roof can quickly lead to extensive damage within your home. Recognizing signs of a leak becomes your first line of defense against potential structural issues, water damage, and mold growth.

    Immediate Precautions to Take

    Prioritizing Safety First

    In the event of a roof leak during a storm, safety should be your top concern. First and foremost, ensure you’re not exposed to electrical hazards. Avoid using any electrical appliances or touching switches in areas where water might have seeped through. Additionally, be cautious of slippery surfaces, both indoors and outdoors.

    Protecting Your Belongings

    Act swiftly to safeguard your belongings from potential water damage. Move valuable items, furniture, electronics, and other possessions away from the leak and any paths where water might flow. By taking this step, you’ll prevent costly damage to your belongings and minimize the extent of water-related losses.

    Temporary Water Containment

    When faced with a leaking roof, quick containment of the water is crucial. Place buckets, containers, or even large towels strategically to catch and control the dripping water. These makeshift measures can help mitigate the immediate impact of the leak, reducing the potential for further damage to your property.

    fix leaky roof

    Temporarily Mitigating the Leak

    Using Protective Coverings

    In the midst of a storm, utilizing protective coverings can help minimize the water’s impact on your home’s interior. Employ tarps, plastic sheets, or even repurposed blankets to create a barrier between the leaking roof and your living space. These coverings act as a shield, directing water away from the leak and preventing it from spreading further within your home.

    Creating an Effective Funnel System

    To efficiently manage the flow of water from the leaking area, consider crafting a funnel system. Arrange the coverings in a way that directs the water toward containers strategically placed to catch and contain the leakage. This systematic approach ensures that the water is channeled away from your home’s interior, mitigating the potential for widespread damage.

    Prioritizing Safety During Storms

    While it might be tempting to investigate or address the leak from the roof, it’s strongly advised against during a storm. Climbing onto a slippery, wet roof poses significant safety risks. Instead, opt for indoor solutions that do not jeopardize your well-being. By focusing on interior mitigation strategies, you’ll safeguard yourself and your property from potential harm.

    contact professionals

    Contacting Professionals for Immediate Assistance

    Prioritizing Expert Help

    In the event of a roof leak during a storm, seeking professional assistance is paramount. Whether the storm is ongoing or has passed, getting in touch with roofing experts is crucial for a swift resolution. Their specialized knowledge and experience can make a significant difference in addressing the issue effectively.

    The Role of Experienced Roofing Contractors

    Experienced roofing contractors play a pivotal role in managing leaks during storms. They possess the expertise to assess the extent of the damage caused by the leak. Their insights enable them to provide expert advice on the necessary steps to rectify the issue and prevent further deterioration.

    Selecting Reputable Roofing Companies

    When seeking professional help, it’s important to choose reputable roofing companies. Look for businesses with a proven track record of excellence in roofing services. To ensure reliability, check online reviews, ask for recommendations from friends and family, and verify the company’s credentials.

    Communicating Urgency

    When reaching out to roofing professionals, emphasize the urgency of the situation. Clearly convey that you’re dealing with a leak caused by a storm and require immediate assistance. Providing accurate details about the leak’s location, size, and any visible damage can help professionals better understand the scope of the issue.

    budgeting tips financing roof

    Documenting the Damage for Insurance Claims

    Capturing Evidence Through Documentation

    In the aftermath of a storm-induced roof leak, meticulous documentation of the damage is crucial. Use your smartphone or camera to take clear photographs and videos of the affected areas. Accompany these visuals with written descriptions that detail the extent of the leak, the areas impacted, and any visible structural damage.

    Preserving Maintenance and Repair Records

    To bolster your insurance claim, it’s valuable to maintain a record of past maintenance and repairs on your roof. This history provides context and demonstrates your commitment to keeping your home in good condition. It also helps paint a clearer picture of the pre-existing state of your roof before the storm-related leak occurred.

    Aiding the Insurance Claim Process

    Comprehensive documentation serves as compelling evidence when you file an insurance claim for the storm-related roof leak. The combination of photographs, written descriptions, and maintenance records provides a comprehensive view of the damage. This documentation enables your insurance provider to assess the situation accurately and expedites the claims process.

    budgeting tips financing roof

    Long-Term Solutions to Prevent Future Leaks

    Embracing Regular Roof Inspections and Maintenance

    Safeguarding your home against future storm-related leaks begins with a commitment to routine roof inspections and maintenance. Regular checks allow you to identify and address minor issues before they escalate into significant leaks. Partner with roofing professionals who specialize in comprehensive assessments, ensuring your roof’s longevity and resilience.

    Storms Unveil Vulnerabilities: The Need for Proactive Measures

    Storms have a knack for revealing the weak points in your roof’s structure. By exposing pre-existing vulnerabilities, storms underscore the importance of taking proactive steps to fortify your roof’s defenses. Addressing these weaknesses through timely repairs and upgrades can significantly reduce the likelihood of leaks during future storms.

    Exploring Potential Solutions

    Reinforcing critical elements of your roof can serve as a robust defense against leaks. Strengthening flashing, shingles, and sealant is essential to creating a watertight barrier. Collaborate with roofing experts to assess the most vulnerable areas and implement effective solutions that enhance your roof’s resilience.

    The Benefits of a Well-Maintained Roof

    A well-maintained roof not only protects your home from leaks but also offers an array of benefits. It improves energy efficiency, enhances curb appeal, and maintains the structural integrity of your property. Regular maintenance investments today can save you from the stress and costs of extensive repairs down the line.

    View More Articles

    Free, No Obligation

    Request Your Free Estimate & Inspection

    Tell us about your roof and we’ll come take a look — no pressure, no cost. Or call us right now on (703) 964-6233.

    (703) 964-6233
    Contact Form Demo (#3)
    Owens Corning Preferred Contractor GAF System Plus CertainTeed SureStart PLUS BBB A+ Accredited HomeAdvisor

    RNC Roofing

    RNC Roofing and Construction Group — The Roofing Contractor Specialists. Protecting your home, one shingle at a time.

    Virginia

    (703) 964-6233 Sterling · Leesburg · Ashburn
    Loudoun & Fairfax County

    Maryland

    (703) 964-6233 Beltsville · District Heights
    All of Maryland
    © 2026 RNC Roofing and Construction Group — The Roofing Contractor Specialists Northern Virginia & Maryland
  • Rain Leakage in House: Prevention, Detection, and Repair

    Protecting your home, one shingle at a time VA (703) 964-6233| MD (703) 964-6233| Free Estimate & Inspection
    Home Improvement

    Rain Leakage in House: Prevention, Detection, and Repair

    RNC Roofing and Construction Group August 15, 2023
    Rain Leakage in House: Prevention, Detection, and Repair

    Rain Leakage in House: Prevention, Detection, and Repair

    Rain Leakage occurs when rainwater seeps through vulnerable points in a house’s exterior, such as roofs, walls, windows, and foundations. This moisture intrusion can gradually weaken the structural integrity of the building materials, leading to rot, decay, and eventual failure. Moreover, damp conditions provide an ideal breeding ground for mold and mildew, posing health risks to the occupants.

    Understanding the Causes of Rain Leakage

    Rain leakage in houses can stem from various factors, each playing a pivotal role in compromising the integrity of your home’s structure. By identifying these causes, you can take proactive measures to mitigate the risk of water infiltration.

    Roof Vulnerabilities

    One of the primary culprits behind rain leakage is roof damage. Whether it’s missing shingles, cracked tiles, or deteriorating flashing, any breach in the roof’s protective layer can allow rainwater to seep into your home. These vulnerabilities can be exacerbated by heavy rainfall, snow accumulation, and strong winds.

    Drainage System Inadequacies

    Poorly designed or clogged drainage systems can lead to rainwater pooling on your roof or around your foundation. This excess water increases the likelihood of rain leakage through compromised areas. Gutters that are improperly sloped or filled with debris can impede water flow, causing backups that put additional stress on your home’s exterior.

    Sealant and Caulking Breakdown

    Sealants and caulking around windows, doors, vents, and other openings can deteriorate over time due to exposure to the elements. This breakdown leaves gaps that rainwater can infiltrate. Regular inspections and maintenance of these seals are essential to prevent water from finding its way indoors.

    Weather Extremes

    Extreme weather conditions, such as heavy downpours and strong winds, can intensify rain leakage problems. In regions prone to frequent storms, the impact of rain and wind on vulnerable areas can result in accelerated water infiltration. These weather extremes highlight the necessity of fortified roofing and effective drainage systems.

    Real-Life Examples

    To underscore the importance of addressing rain leakage, let’s consider a real-life scenario. In a coastal town, a house with compromised roofing and inadequate gutter systems experienced repeated rainwater infiltration during monsoon season. The resulting interior damage necessitated costly repairs and mold remediation. This example emphasizes the significance of proactive maintenance and timely repairs to avoid such situations.

    identifying roof algae

    Detecting Rain Leakage Early

    Detecting rain leakage in its early stages is essential to prevent extensive damage and costly repairs. Here’s a comprehensive guide to help homeowners identify signs of water infiltration and take prompt action.

    Recognizing Warning Signs

    Water Stains: Keep an eye out for discolored patches on walls and ceilings, often accompanied by a yellow or brownish tint. These stains are indicative of water seeping through cracks or gaps.

    • Peeling Paint or Wallpaper: If you notice paint or wallpaper peeling off, it might be due to the underlying moisture weakening the adhesive. This is a clear indicator of rain leakage.
    • Damp Odors: Musty, damp odors in specific areas of your home can signal the presence of moisture intrusion. Investigate these areas promptly.

    Regular Visual Inspections

    Regularly inspect your home’s interior and exterior for any signs of rain leakage. Pay close attention to vulnerable areas, such as the attic, around windows and doors, and beneath sinks. These proactive checks can help you catch leaks before they escalate.

    Prompt Addressing

    Addressing rain leakage promptly is crucial. Ignoring the issue can lead to more significant damage over time, including structural deterioration, mold growth, and compromised insulation. Consult a professional to assess the extent of the leakage and recommend appropriate solutions.

    labor cost for roofing

    DIY Fixes and Temporary Solutions

    In the event of rain leakage, homeowners can take immediate steps to manage the situation before seeking professional assistance. While these measures offer temporary relief, it’s essential to keep in mind their limitations and the need for long-term solutions.

    Waterproof Sealants Application

    Applying waterproof sealants to the affected areas can help create a barrier against rainwater infiltration. Clean the area thoroughly, ensuring it’s dry and free from debris. Follow the manufacturer’s instructions to apply the sealant, and allow it to dry completely before testing its effectiveness.

    Temporary Patches and Barriers

    For minor leaks, using temporary patches can prevent further water entry. Use materials like plastic sheeting, waterproof tape, or even plastic bags to cover the leak temporarily. While this can help during emergencies, remember that it’s not a permanent fix and professional intervention is still necessary.

    Clearing Clogged Gutters and Drains

    Rainwater leakage can be exacerbated by clogged gutters and drains. Clear out leaves, twigs, and debris that may obstruct the flow of water. Proper drainage helps prevent water from pooling and reduces the risk of infiltration.

    The Importance of Expert Consultation

    While DIY fixes and temporary solutions can provide immediate relief, it’s crucial to recognize their limitations. These measures might not address underlying issues and can only serve as a stopgap until a permanent solution is implemented. Consulting roofing professionals is imperative to accurately diagnose the root cause of rain leakage and recommend appropriate repairs.

    contact professionals

    Professional Solutions and Repairs

    When rain leakage becomes a persistent issue, seeking professional assistance from roofing contractors is essential to ensure a thorough and lasting solution. These experts utilize a range of techniques and materials to address rain leakage effectively and prevent further damage to your house.

    Expert Techniques and Materials

    Roofing contractors employ specialized techniques to pinpoint the source of rain leakage accurately. They utilize advanced tools such as moisture detectors and thermal imaging to identify hidden vulnerabilities. By analyzing the data, they can determine the most appropriate repair methods.

    Comprehensive Roof Inspection

    Before initiating repairs, roofing professionals conduct a comprehensive inspection of your roof and its components. This step is crucial in identifying not only the visible signs of leakage but also underlying issues that might be contributing to the problem. From damaged shingles to compromised flashing, a thorough assessment guides the repair process.

    Tailored Repair Solutions

    Based on the inspection results, roofing experts propose tailored repair solutions. These may include replacing damaged roof shingles, reinforcing sealing around penetrations, and addressing any structural weaknesses. The goal is not only to fix the immediate issue but also to fortify your roof against future rain leakage.

    Importance of Professional Help

    While temporary fixes can provide short-term relief, engaging professionals is crucial for a permanent resolution. Roofing contractors possess the expertise, experience, and resources to address rain leakage comprehensively, ensuring that the underlying causes are eradicated.

    tpo roofing improvement

    Preventing Rain Leakage in the Future

    Preventing rain leakage is an essential aspect of maintaining the integrity of your home and ensuring its longevity. By adopting proactive measures and investing in quality, you can minimize the risk of water infiltration and its associated damages.

    Proactive Homeowner Practices

    Homeowners can take proactive steps to minimize the chances of rain leakage. Regularly inspect your roof for signs of wear and tear, focusing on shingles, flashing, and sealing. Address any minor issues promptly to prevent them from escalating into larger problems.

    Routine Roof Maintenance

    Regular roof maintenance is paramount in preventing rain leakage. Schedule annual inspections by professionals to identify and rectify potential vulnerabilities. Prompt repairs and upkeep extend the lifespan of your roof, reducing the likelihood of water infiltration.

    Proper Gutter Care

    Gutters play a crucial role in directing rainwater away from your house. Clean your gutters regularly to prevent clogs that can cause water to overflow and pool on your roof. Ensure proper drainage and consider gutter guards to minimize debris accumulation.

    Investing in Quality

    When it comes to roofing materials, insulation, and ventilation, quality matters. Invest in high-quality roofing materials designed to withstand weather extremes. Proper insulation and ventilation reduce the risk of condensation and moisture buildup within your home’s structure.

    Long-Term Protection

    By implementing these expert-recommended practices, homeowners can establish a strong defense against rain leakage. Proactive measures, routine maintenance, and investing in quality materials collectively contribute to a robust shield against the potential risks of water infiltration. Taking these steps not only preserves the value of your home but also ensures the comfort and safety of your living environment for years to come.

    Free, No Obligation

    Request Your Free Estimate & Inspection

    Tell us about your roof and we’ll come take a look — no pressure, no cost. Or call us right now on (703) 964-6233.

    (703) 964-6233
    Contact Form Demo (#3)
    Owens Corning Preferred Contractor GAF System Plus CertainTeed SureStart PLUS BBB A+ Accredited HomeAdvisor

    RNC Roofing

    RNC Roofing and Construction Group — The Roofing Contractor Specialists. Protecting your home, one shingle at a time.

    Virginia

    (703) 964-6233 Sterling · Leesburg · Ashburn
    Loudoun & Fairfax County

    Maryland

    (703) 964-6233 Beltsville · District Heights
    All of Maryland
    © 2026 RNC Roofing and Construction Group — The Roofing Contractor Specialists Northern Virginia & Maryland
  • Blistering Roof: What Causes It and How to Prevent and Repair

    Protecting your home, one shingle at a time VA (703) 964-6233| MD (703) 964-6233| Free Estimate & Inspection
    Roof Maintenance

    Blistering Roof: What Causes It and How to Prevent and Repair

    RNC Roofing and Construction Group April 6, 2023
    Blistering Roof: What Causes It and How to Prevent and Repair

    Blistering Roof: What Causes it And How To Prevent And Repair

    Your roof is a crucial component of your home’s protection against the weather. It shields your living space from the elements, ensuring comfort and safety. Nevertheless, roofs are susceptible to damage and wear over time. One prevalent problem that homeowners encounter is a blistering roof. Blistering occurs due to various reasons, and if not addressed, it can lead to more severe issues. In this blog post, we will explain the causes and prevention measures of blistering roofs, along with effective repair methods.

    What is a Blistering Roof?

    A blistering roof is when bubbles or bumps form on the surface of the roof. These blisters can be small or large, and they can form in clusters or spread out across the entire roof. While blistering may seem like a minor issue, it can lead to bigger problems if left unchecked. Water can seep into the blisters and cause the roofing material to deteriorate, which can lead to leaks and other issues.

    picture of shingles blistering

    What Causes Blistering?

    Blistering can be caused by a variety of factors, including:

    Poor Ventilation

    Poor ventilation in the attic can cause heat to build up, which can lead to blistering. The heat causes the roofing material to expand and contract, which can lead to blisters forming.

    ventilation fan

    Moisture

    Excessive moisture can also cause blistering. Water can seep into the roofing material and cause it to expand, which can lead to blisters forming.

    heavy rain fall

    Low-Quality Materials

    Low-quality roofing materials can also cause blistering. If the roofing material is not designed to withstand the elements, it can deteriorate and blister over time.

    material shingle how much does roof cost in Maryland

    Age

    As a roof ages, it becomes more susceptible to damage. Over time, the roofing material can deteriorate and lead to blistering.

    damaged building in Maryland

    Signs of a Blistering Roof

    The most obvious sign of a blistering roof is the presence of bubbles or bumps on the surface of the roof. However, there are other signs to look out for, including:

    signs of blistering roof , signs to replace your roof

    Cracking

    As the blisters grow and spread, they can cause the roofing material to crack. This can lead to leaks and other issues.

    cracked damaged shingles , roofing, blistering roof

    Peeling Paint

    If the blisters are large enough, they can cause the paint on the roof to peel.

    peeling paint , blistering roof

    Water Stains

    If the blisters have caused leaks, you may notice water stains on the ceiling or walls inside your home.

    dark areas on roofing from roof lean in heavy rain , peeling paint blistering roof

    Preventing Blistering on Your Roof

    The best way to prevent blistering on your roof is to ensure that it is properly ventilated. Good ventilation allows heat to escape and prevents moisture from building up in the attic. Other ways to prevent blistering include choosing high-quality roofing materials and hiring a professional roofing contractor to install or repair your roof.Another way to prevent blistering is to apply a reflective roof coating. This type of coating reflects sunlight and heat away from the roof, which can help to prevent overheating and blistering. Additionally, keeping your roof clean and free of debris can help to prevent moisture buildup, which is a common cause of blistering.Regular roof inspections and maintenance are also important for preventing blistering. By catching and addressing any issues early on, you can avoid costly repairs down the line.

    prevent blistering shingles , preventing storm damage roof
    contact rnc roofing and construction

    Contact a Professional Today

    cracked damaged shingles , roofing, blistering roof

    Blistering on your roof can be a frustrating and costly issue to deal with. It can compromise the integrity of your roof and lead to more serious problems if left untreated. By identifying the cause, removing damaged material, and repairing the affected area, you can effectively address blistering on your roof. Taking preventative measures such as proper ventilation, using high-quality materials, and regular maintenance can also help to prevent blistering from occurring in the first place.Remember, addressing blistering on your roof should be done promptly and by a professional to ensure that the job is done correctly and effectively. With proper care and attention, you can keep your roof in good condition and avoid issues like blistering.Read More About Roof Replacement Here

    More Informative Post

    Free, No Obligation

    Request Your Free Estimate & Inspection

    Tell us about your roof and we’ll come take a look — no pressure, no cost. Or call us right now on (703) 964-6233.

    (703) 964-6233
    Contact Form Demo (#3)
    Owens Corning Preferred Contractor GAF System Plus CertainTeed SureStart PLUS BBB A+ Accredited HomeAdvisor

    RNC Roofing

    RNC Roofing and Construction Group — The Roofing Contractor Specialists. Protecting your home, one shingle at a time.

    Virginia

    (703) 964-6233 Sterling · Leesburg · Ashburn
    Loudoun & Fairfax County

    Maryland

    (703) 964-6233 Beltsville · District Heights
    All of Maryland
    © 2026 RNC Roofing and Construction Group — The Roofing Contractor Specialists Northern Virginia & Maryland
  • Drone Roof Inspections: After the Job is Done

    Protecting your home, one shingle at a time VA (703) 964-6233| MD (703) 964-6233| Free Estimate & Inspection
    Homeowner Help

    Drone Roof Inspections: After the Job is Done

    RNC Roofing and Construction Group May 3, 2018
    Drone Roof Inspections: After the Job is Done

    At RNC, we constantly emphasize the importance of roof inspections, as getting your roof inspected will ensure that any weak areas or potential leaks can be addressed and repaired before they become a problem. While many take this on the traditional way, recent technology has allowed for a safer and faster roof inspection.

    This technology has come in the form of drones. Drones, usually used for entertainment or professional photography, are fundamentally changing the way roof inspections are performed. Drones can offer an accurate, safe, relatively low-cost, and quick inspection.

    However, not just any drone can be used for this application. There are camera-drones specifically suited for roof inspection purposes. The drones listed below are $500 or less, and although this amount seems expensive, after the initial investment, the money you will save in manual roof inspections will be monumental.

    DJI Phantom 3 Standard ($491.98)

    This drone is relatively low-cost, with fair camera quality. The DJI Phantom 3 Standard drone has 2.7K camera quality, and while 4K is preferable, 2.7K is high-quality enough for inspection purposes. Also, the video can stream real-time to your tablet or smartphone.

    Parrot Bebop 2 ($399.99)

    This drone is also low-cost, with a 14mpx camera and FPV capabilities. Parrot also offers a bundle with a VR headset, for an even better drone experience.

    Yuneec Q500 4K Typhoon Quadcopter Drone ($369.99)

    This drone is affordable, with 4K camera-quality, 1080p video recording at up to 120 fps, and it takes photos at 12-megapixels. The video streams live directly to the controller screen.

    To view more drones recommended for roof inspections click here.

    As you can see, the advancement of drone technology allows for a safe, fast, and high-quality roof inspection. If you find any damage or leaks during the course of your drone roof inspection, or you prefer to do things the traditional way, give us a call or click here for a quote!

    What separates The RNC Roofing Group from other residential roofing companies? With decades of experience installing, maintaining and repairing roofs we provide a knowledgeable, trustworthy and honest service to fulfill all your roofing needs. We are a Loudoun County, Virginia based residential roofing firm with an excellent reputation for quality and dependability. Whether it’s new construction, re-roofing or the challenge of leak repairs, no job is too large or too small.

    This post first published on The RNC Group, your Virginia residential roofing company.

    Free, No Obligation

    Request Your Free Estimate & Inspection

    Tell us about your roof and we’ll come take a look — no pressure, no cost. Or call us right now on (703) 964-6233.

    (703) 964-6233
    Contact Form Demo (#3)
    Owens Corning Preferred Contractor GAF System Plus CertainTeed SureStart PLUS BBB A+ Accredited HomeAdvisor

    RNC Roofing

    RNC Roofing and Construction Group — The Roofing Contractor Specialists. Protecting your home, one shingle at a time.

    Virginia

    (703) 964-6233 Sterling · Leesburg · Ashburn
    Loudoun & Fairfax County

    Maryland

    (703) 964-6233 Beltsville · District Heights
    All of Maryland
    © 2026 RNC Roofing and Construction Group — The Roofing Contractor Specialists Northern Virginia & Maryland
  • Schedule Your Roof Inspection With RNC Today!

    Protecting your home, one shingle at a time VA (703) 964-6233| MD (703) 964-6233| Free Estimate & Inspection
    Home Improvement

    Schedule Your Roof Inspection With RNC Today!

    RNC Roofing and Construction Group April 17, 2018
    Schedule Your Roof Inspection With RNC Today!

    Once the snow and ice have melted and spring approaches, it becomes the time for homeowners to start checking items off their spring home maintenance list. First, one of the most important areas to tackle: your roof. The excessive rain showers brought on by spring and the general erratic weather pattern of 2018 could prove to be causes of concern for homeowners. The constant cycle of rain, snow, and heat may have had a significant impact on your roof.

    Getting your roof inspected will ensure that any weak areas or potential leaks can be addressed and repaired before they become a problem. While this may seem too precautionary, unfortunately, roof leaks can happen right under your nose, as the extensive damage caused by a leak can occur before water is even visibly detected inside the building. Be sure to have your roof inspected at least twice annually.

    Be sure to watch for the following telltale signs of significant roof damage:

    • Rusted roof panels
    • Stained ceiling tiles
    • Shifted insulation
    • Loose flashing
    • Lost or damaged shingles

    If you decide to perform an initial inspection of your roof in search of major damage by yourself, keep these safety tips in mind:

    • Do not place any weight (including yourself!) on skylights
    • Stay at least six feet away from the edge of the roof
    • Face the roof’s edges, and avoid turning your back to the edge
    • If using a roof hatch, be sure to close it completely to avoid tripping into it

    By following a roof inspection and maintenance schedule, you will be able to increase your roof’s longevity, strength, and durability. Prolonging your roof’s life allows you to save money on repairs, and budget accordingly for your next roof replacement. As always, if you detect any roof damage, be sure to give us a call! Contact RNC Construction Group for a quote today!

    What separates The RNC Roofing Group from other residential roofing companies? With decades of experience installing, maintaining and repairing roofs we provide a knowledgeable, trustworthy and honest service to fulfill all your roofing needs. We are a Loudoun County, Virginia based residential roofing firm with an excellent reputation for quality and dependability. Whether it’s new construction, re-roofing or the challenge of leak repairs, no job is too large or too small.

    This post first published on The RNC Group, your Virginia residential roofing company.

    Free, No Obligation

    Request Your Free Estimate & Inspection

    Tell us about your roof and we’ll come take a look — no pressure, no cost. Or call us right now on (703) 964-6233.

    (703) 964-6233
    Contact Form Demo (#3)
    Owens Corning Preferred Contractor GAF System Plus CertainTeed SureStart PLUS BBB A+ Accredited HomeAdvisor

    RNC Roofing

    RNC Roofing and Construction Group — The Roofing Contractor Specialists. Protecting your home, one shingle at a time.

    Virginia

    (703) 964-6233 Sterling · Leesburg · Ashburn
    Loudoun & Fairfax County

    Maryland

    (703) 964-6233 Beltsville · District Heights
    All of Maryland
    © 2026 RNC Roofing and Construction Group — The Roofing Contractor Specialists Northern Virginia & Maryland