Tag: structural integrity

  • Interlocking Asphalt Shingles | Roofing Solutions for Durability
    Protecting your home, one shingle at a time VA (703) 964-6233| MD (703) 964-6233| Free Estimate & Inspection
    Homeowner Help

    Interlocking Asphalt Shingles | Roofing Solutions for Durability

    RNC Roofing and Construction Group August 22, 2023
    Interlocking Asphalt Shingles | Roofing Solutions for Durability

    Interlocking Asphalt Shingles | Roofing Solutions for Durability

    When it comes to safeguarding your home, the choice of roofing materials becomes crucial. Interlocking asphalt shingles, often referred to as interlocking asphalt tiles, are a notable choice due to their exceptional durability and inherent weather resistance. These shingles are engineered to withstand the challenges posed by changing weather conditions, including rain, wind, UV rays, and temperature fluctuations.

    Understanding Interlocking Asphalt Shingles

    Composition of Interlocking Asphalt Shingles

    Interlocking asphalt shingles, also known as connectable asphalt roofing tiles, are engineered from a combination of essential materials. The primary components include asphalt, a fiberglass mat, mineral granules, and layers of adhesive. This strategic composition contributes to the shingles’ remarkable durability and resilience against external forces.

    The Advantages of Asphalt Shingles

    Among the various roofing materials available, asphalt shingles stand out for their array of benefits. These shingles offer an optimal balance of qualities that make them a preferred choice for homeowners. Notably, they provide cost-effectiveness, making them a budget-friendly option without compromising on quality. The versatility of asphalt shingles allows them to complement a wide range of architectural styles while offering dependable protection.

    Ease of Installation for Effortless Roofs

    When considering roofing solutions, the installation process matters significantly. Interlocking asphalt shingles come with the advantage of easy installation. Roofing professionals appreciate their straightforward fitting process, which not only saves time but also minimizes installation-related expenses. Homeowners can trust that these shingles, along with their synonymous counterparts, will be efficiently installed to create a secure and visually appealing roof.

    advantages of roofing maintenance

    Advantages of Interlocking Design

    The Strength of Interlocking Mechanism

    The design of interlocking asphalt shingles is ingeniously engineered to reinforce the overall roof structure. The interlocking mechanism, sometimes referred to as connectable design, ensures a secure and snug fit between adjacent shingles. This interconnection creates a unified surface that enhances the roof’s integrity, effectively withstanding external pressures.

    A Barrier Against the Elements

    When it comes to safeguarding your home against the elements, the interlocking design plays a pivotal role. These shingles, and their synonymous alternatives, establish a formidable defense against adverse weather conditions. The snug interlocking not only prevents water infiltration through the seams but also guards against wind uplift, which is especially crucial in areas prone to storms and heavy winds.

    Comprehensive Protection for Your Home

    The significance of the interlocking design extends beyond its structural benefits. The prevention of water penetration and wind-driven damage translates to prolonged durability and longevity for your roofing system. This innovation, coupled with the inherent qualities of asphalt, ensures that your home remains protected from potential water leaks and structural compromise, ultimately contributing to a secure and comfortable living environment.

    what is roofing insulation

    Benefits of Asphalt Material

    Durability and Longevity in Challenging Conditions

    When it comes to roofing materials, interlocking asphalt shingles are a clear standout. Their robust composition and inherent properties grant them impressive durability and longevity. Thanks to their resistance to elements such as UV rays, heat, and impacts, these shingles maintain their structural integrity even in the face of challenging conditions. This reliability ensures that your roof remains steadfast over time, requiring minimal maintenance.

    Reflective Asphalt Shingles: Enhancing Energy Efficiency

    An often overlooked but vital aspect of asphalt shingles is their potential to enhance energy efficiency in your home. Reflective asphalt shingles, sometimes known as energy-efficient asphalt shingles, boast a reflective surface that minimizes the absorption of solar heat. By reflecting a significant portion of the sun’s rays, these shingles contribute to a cooler indoor environment, reducing the strain on your cooling systems during hot weather. This translates to potential savings on energy bills and a smaller carbon footprint.
    labor cost for roofing

    Installation Process of Interlocking Asphalt Shingles

    Step-by-Step Installation Guide

    Installing interlocking asphalt shingles is a systematic process that ensures a sturdy and aesthetically pleasing roofing outcome. Here’s a breakdown of the installation procedure, from initial preparation to achieving a seamless finish:

    Preparation

    Begin by preparing the roof surface. Ensure it is clean, dry, and free from any debris. This step forms the foundation for a successful installation.

    Underlayment

    Lay down an appropriate underlayment, such as roofing felt, to provide an additional barrier against moisture and create a smooth surface for the shingles.

    Starter Shingle Placement

    Position starter shingles along the eaves to create a secure base for the interlocking asphalt shingles. These starter shingles help prevent wind uplift and water infiltration.

    Interlocking Rows

    Start laying the interlocking asphalt shingles in rows, carefully aligning them to maintain a consistent appearance. The interlocking design facilitates a snug fit between shingles, enhancing the roof’s integrity.

    Precision in Installation Techniques

    The proper installation of interlocking asphalt shingles requires attention to detail and adherence to specific techniques:

    • Nailing Techniques

    Ensure each shingle is securely fastened with nails in the designated nailing area. Avoid overdriving or underdriving the nails to prevent damaging the shingles or compromising their integrity.

    • Alignment

    Maintain precise alignment throughout the installation process. This not only enhances the visual appeal but also contributes to a watertight roofing system.

    • Consistent Exposure

    Maintain a consistent exposure measurement between shingle rows. This uniformity creates a professional appearance while optimizing the shingles’ protective capabilities.

    A meticulous installation, guided by these steps and techniques, results in a roof that stands resilient against the elements and adds to the curb appeal of your home.

    repairs roofing maintenance

    Maintenance and Longevity

    Extending the Lifespan

    To ensure the lasting performance of interlocking asphalt shingles, regular maintenance practices are essential. By following these guidelines, you can extend the lifespan of your roofing investment:

    • Routine Inspections

    Conduct visual inspections at least twice a year, ideally in the spring and fall. Look for signs of wear, damage, or debris accumulation on the shingles and in the gutters.

    • Addressing Algae Growth

    Algae growth, often seen as dark streaks or discoloration, can mar the appearance of your roof. Use a mixture of water and mild detergent to gently clean affected areas, being cautious not to damage the shingles.

    Prompt Repairs for Optimal Protection

    Timely addressing potential issues is key to maintaining the integrity of your roof:

    • Tackling Damaged Shingles

    If you notice cracked, curled, or missing shingles, replace them promptly to prevent water infiltration and further damage.

    • Importance of Immediate Repairs

    Don’t delay repairs. Promptly address any issues to prevent minor problems from escalating into major structural concerns.

    • Expert Assistance

    While routine maintenance can be done by homeowners, engaging professional roofing contractors for comprehensive inspections is recommended. These experts can identify hidden issues and provide expert solutions to ensure the longevity of your interlocking asphalt shingles.

    View More Articles

    Free, No Obligation

    Request Your Free Estimate & Inspection

    Tell us about your roof and we’ll come take a look — no pressure, no cost. Or call us right now on (703) 964-6233.

    (703) 964-6233
    Contact Form Demo (#3)
    Owens Corning Preferred Contractor GAF System Plus CertainTeed SureStart PLUS BBB A+ Accredited HomeAdvisor

    RNC Roofing

    RNC Roofing and Construction Group — The Roofing Contractor Specialists. Protecting your home, one shingle at a time.

    Virginia

    (703) 964-6233 Sterling · Leesburg · Ashburn
    Loudoun & Fairfax County

    Maryland

    (703) 964-6233 Beltsville · District Heights
    All of Maryland
    © 2026 RNC Roofing and Construction Group — The Roofing Contractor Specialists Northern Virginia & Maryland
  • Roof Replacement Steps:Guide to a Sturdy and Protected Home

    Protecting your home, one shingle at a time VA (703) 964-6233| MD (703) 964-6233| Free Estimate & Inspection
    Home Improvement

    Roof Replacement Steps:Guide to a Sturdy and Protected Home

    RNC Roofing and Construction Group June 27, 2023
    Roof Replacement Steps:Guide to a Sturdy and Protected Home

    Roof Replacement Steps:Guide to a Sturdy and Protected Home

    Roof replacement is a crucial undertaking for homeowners that ensures the integrity and protection of their property. When considering a roof replacement, it’s important to understand the significance it holds for the overall well-being of your home. A sturdy and well-maintained roof provides a solid defense against external elements, including rain, snow, wind, and extreme temperatures.

    Assessing Roof Conditions

    Visual Inspection and Identifying Common Roofing Issues

    Before proceeding with a roof replacement, it’s essential to conduct a thorough visual inspection of your roof to identify any existing problems. Look for the following common roofing issues:

    • Leaks and Water Damage: Inspect your attic and ceilings for signs of water stains or mold growth. Check for any water penetration around skylights, vents, or chimneys.
    • Missing or Damaged Shingles: Look for shingles that are cracked, curled, blistered, or completely missing. These indicate potential vulnerabilities and may require replacement.
    • Aging and Wear: Assess the overall condition of your roof. Determine if it shows signs of aging, such as granule loss, significant fading, or deterioration.
    • Sagging or Uneven Roof: Check if your roof displays any noticeable sagging or unevenness, as it could indicate underlying structural issues that need immediate attention.

    Consulting with Roofing Professionals for a Thorough Assessment

    While a visual inspection provides a good starting point, it’s advisable to consult with roofing professionals for a comprehensive assessment. Experienced contractors can identify hidden problems and offer expert insights. They possess the necessary knowledge to evaluate the condition of your roof accurately.

    During the consultation, the roofing professional will likely perform the following:

    • Roof Measurement: Accurately measure the roof area to determine the scope of the replacement project and calculate the required materials.
    • Detailed Roof Analysis: Conduct a close examination of the roof’s components, including the underlayment, flashing, vents, and gutters. They will assess their condition and identify areas that need attention.

    Assessment of Structural Integrity: Evaluate the roof’s structural integrity to ensure it can support the weight of new materials and any additional layers, if applicable.

    Determining the Need for Roof Replacement

    Based on the visual inspection and professional assessment, it’s important to determine whether a roof replacement is necessary. Consider the following factors:

    • Extensive Damage: If the roof exhibits widespread damage, such as multiple leaks, severe shingle deterioration, or structural issues, a replacement may be the most practical solution.
    • Age of the Roof: Consider the age of your roof. Most asphalt shingle roofs have a lifespan of around 20 to 25 years. If your roof is approaching or exceeding this age, replacement is often recommended.
    • Cost of Repairs: Evaluate the cost of repairs compared to the cost of a replacement. If the repair expenses are significant or if the roof requires frequent repairs, a replacement may be a more cost-effective long-term solution.

    spring roof maintenance

    Planning and Preparation

    Selecting the Right Roofing Materials and Styles

    Choosing the appropriate roofing materials and styles is a crucial step in the roof replacement process. Consider the following factors when making your selection:

    • Material Durability: Assess the durability and longevity of different roofing materials, such as asphalt shingles, metal, tiles, or slate. Ensure the chosen material can withstand your local climate conditions and provide long-term protection.
    • Aesthetic Appeal: Explore various roofing styles and colors that complement your home’s architecture and enhance its curb appeal. Opt for a design that blends seamlessly with the overall aesthetic of your neighborhood.
    • Maintenance Requirements: Consider the maintenance needs of different roofing materials. Some may require more frequent inspections and repairs, while others offer low-maintenance options.

    Obtaining Necessary Permits and Approvals

    Before commencing any roof replacement project, it’s essential to obtain the required permits and approvals from local authorities. Follow these steps:

    • Research Local Regulations: Familiarize yourself with the specific building codes and regulations related to roof replacements in your area. Each locality may have its own set of requirements.
    • Submit Permit Applications: Complete the necessary permit applications and provide the required documentation, such as project details, contractor information, and material specifications. Pay any associated fees.
    • Await Approval: Wait for the permits to be approved before starting the roof replacement project. This ensures compliance with local regulations and prevents potential legal issues.

    Securing Proper Financing or Budgeting for the Project

    Roof replacements can be a significant financial investment. To ensure a smooth process, consider the following financing options and budgeting strategies:

    • Research Financing Options: Explore various financing avenues, such as personal loans, home equity loans, or contractor financing programs. Compare interest rates, repayment terms, and eligibility criteria.
    • Set a Realistic Budget: Assess your financial capabilities and set a budget for the roof replacement project. Consider the cost of materials, labor, permits, and potential unexpected expenses.
    • Obtain Multiple Quotes: Request quotes from reputable roofing contractors to compare prices and services offered. This allows you to make an informed decision based on your budget and desired quality.

    Scheduling and Logistics for a Smooth Roof Replacement Process

    Proper scheduling and logistical planning are essential to ensure a smooth roof replacement process. Consider the following aspects:

    • Contractor Availability: Coordinate with your chosen roofing contractor to determine their availability and schedule the project accordingly.
    • Weather Considerations: Check local weather forecasts and select a time of year with favorable weather conditions for the roof replacement. Avoid periods of heavy rainfall, extreme temperatures, or high winds.
    • Material Delivery and Waste Removal: Coordinate the delivery of roofing materials to ensure they arrive on time. Plan for proper waste removal and disposal throughout the project.

    labor cost for roofing

    Roof Removal and Preparation

    Safe Removal of Existing Roofing Materials

    The first step in a roof replacement project is safely removing the existing roofing materials. This process involves:

    • Taking Safety Precautions: Prioritize safety by wearing protective gear, such as gloves, goggles, and sturdy footwear. Use caution when working at heights and ensure proper ladder placement.
    • Removing Shingles: Begin by removing the shingles carefully using a roofing shovel or pry bar. Work systematically, starting from the top and moving downward. Dispose of the old shingles responsibly.
    • Inspecting for Damage: While removing the old roofing materials, inspect the underlying structure for any signs of damage, such as rot, decay, or weakened areas. Note these concerns for later assessment and repair.

    Assessing and Addressing Structural Concerns

    During the roof removal process, it’s essential to assess the structural integrity of the underlying roof components. Address any concerns to ensure a stable foundation for the new roof. Consider the following steps:

    • Inspecting the Decking: Thoroughly examine the roof decking for any signs of damage, such as rot or water penetration. Replace any compromised sections to ensure a solid base for the new roof.
    • Reinforcing Weakened Areas: If structural weaknesses are identified, reinforce them with additional support or framing to ensure the roof’s stability and longevity.
    • Consulting a Structural Engineer: In cases of significant structural concerns, it may be advisable to consult a structural engineer for a professional evaluation and guidance.

    Evaluating and Enhancing Roof Ventilation

    Proper roof ventilation is crucial for maintaining a healthy and efficient roofing system. During the roof replacement process, consider the following aspects of ventilation:

    • Inspecting Existing Ventilation: Evaluate the current ventilation system, including ridge vents, soffit vents, and exhaust fans. Ensure they are functioning correctly and free from blockages.
    • Assessing Ventilation Needs: Determine if the existing ventilation system is adequate for your specific roof design and local climate. Consider consulting with a roofing professional for expert advice.
    • Enhancing Ventilation: If necessary, install additional ventilation components to improve airflow and prevent moisture buildup, which can lead to damage and decreased energy efficiency.

    Preparing the Substrate for the New Roof Installation

    To ensure a proper installation and long-lasting roof, the substrate must be properly prepared. Follow these steps:

    • Clearing Debris: Remove any remaining debris, nails, or protruding objects from the roof surface. Thoroughly clean the substrate to create a smooth and even base.
    • Repairing Damaged Areas: Address any identified structural concerns or damaged sections of the roof substrate. Replace or repair them as necessary to provide a solid foundation.
    • Installing Underlayment: Apply an appropriate underlayment material, such as roofing felt or synthetic underlayment, to provide an additional layer of protection against moisture and improve overall performance.

    tpo roofing maintenance

    Roof Installation Techniques

    Installation of Roofing Underlayment and Moisture Barriers

    Proper installation of roofing underlayment and moisture barriers is essential for protecting your roof from water damage and ensuring its longevity. Follow these steps:

    • Selecting the Underlayment: Choose an appropriate underlayment material based on your climate, such as asphalt-saturated felt or synthetic underlayment. Ensure it meets industry standards for quality and durability.
    • Starting at the Eaves: Begin by installing the underlayment at the eaves of the roof, overlapping each row as per the manufacturer’s instructions. Use nails or staples to secure the underlayment, keeping it taut and free from wrinkles.
    • Installing Ice and Water Shield: In areas prone to ice dams or heavy rainfall, apply an ice and water shield along the roof’s eaves, valleys, and around roof penetrations. This provides an additional layer of protection against water infiltration.

    Selecting and Installing Roofing Shingles or Tiles

    Choosing the right roofing shingles or tiles and installing them correctly is vital for the aesthetics and functionality of your roof. Follow these guidelines:

    • Material Selection: Select roofing shingles or tiles that suit your climate, budget, and desired aesthetic. Consider factors such as durability, color options, and manufacturer warranties.
    • Starting with a Starter Course: Install a starter course of shingles or tiles along the eaves of the roof. This provides a secure base for the subsequent rows and ensures proper water shedding.
    • Nailing and Alignment: Follow the manufacturer’s guidelines for nailing patterns and placement. Ensure each shingle or tile is aligned properly and securely fastened to the roof deck.

    Properly Flashing Roof Penetrations and Chimneys

    Flashing is crucial for preventing water penetration around roof penetrations, such as vents, skylights, and chimneys. Follow these steps:

    • Evaluating Flashing Requirements: Assess the type and condition of existing flashing or determine the need for new flashing. Consider using corrosion-resistant materials for enhanced durability.
    • Proper Installation: Install flashing around roof penetrations, ensuring it is securely sealed and integrated with the roofing materials. Use appropriate flashing techniques for each specific penetration type.
    • Sealing and Caulking: Apply high-quality sealants and caulking to create watertight seals around flashing intersections and penetrations. Regularly inspect and maintain these areas to prevent water leaks.

    Implementing Effective Roofing Insulation

    Proper insulation contributes to energy efficiency and comfort within your home. Follow these guidelines:

    • Assessing Insulation Needs: Evaluate the current insulation levels and consider local building codes and recommended R-values. Determine if additional insulation is required for optimum energy efficiency.
    • Selecting Insulation Materials: Choose insulation materials that are suitable for your climate, such as fiberglass batts, spray foam, or rigid foam boards. Consider their thermal resistance properties and environmental impact.
    • Proper Installation: Install insulation in the attic and other areas as per the manufacturer’s guidelines. Ensure proper ventilation is maintained to prevent moisture buildup and maintain roof performance.

    repairs roofing maintenance

    Final Steps and Post-Installation Considerations

    Conducting a Thorough Quality Inspection

    Once the roof replacement is complete, it is crucial to conduct a thorough quality inspection to ensure that everything has been installed correctly and meets the desired standards. Here are the key steps:

    • Visual Inspection: Carefully examine the newly installed roof, checking for any visible defects, misaligned shingles or tiles, or areas that may require further attention.
    • Leak Testing: Perform a water test to verify that the roof is watertight. This involves directing a controlled amount of water onto specific areas of the roof and checking for any signs of leakage inside the building.

    Cleaning Up and Disposing of Construction Debris

    After the roof replacement project, it is essential to clean up and dispose of any construction debris properly. Follow these steps:

    • Debris Removal: Clear the work area of all leftover materials, such as old shingles, packaging, nails, and other debris. Use caution to prevent any damage or injury during the cleanup process.
    • Recycling and Disposal: Separate recyclable materials from non-recyclable waste. Dispose of the non-recyclable waste according to local regulations and guidelines. Consider recycling options for materials like asphalt shingles.

    Addressing Warranties, Maintenance, and Longevity

    To protect your investment and ensure the longevity of your new roof, address the following considerations:

    • Manufacturer Warranty: Review the warranty provided by the roofing materials manufacturer. Understand the terms and conditions, including any required maintenance or specific actions that may affect the warranty’s validity.
    • Regular Maintenance: Develop a maintenance plan for your new roof, including periodic inspections, gutter cleaning, and addressing any potential issues promptly. Regular maintenance can extend the lifespan of your roof and prevent costly repairs.

    Ensuring Proper Roof Care and Regular Inspections

    To maintain the integrity and performance of your roof over time, follow these recommendations:

    • Maintain Good Roofing Practices: Keep the roof clean from debris, trim overhanging branches, and prevent the accumulation of leaves or other materials that could trap moisture and lead to roof deterioration.
    • Regular Inspections: Schedule regular roof inspections by a qualified professional to identify any potential issues early on. Inspections help catch problems like leaks, damaged shingles, or flashing issues before they escalate.

    View More Articles

    Free, No Obligation

    Request Your Free Estimate & Inspection

    Tell us about your roof and we’ll come take a look — no pressure, no cost. Or call us right now on (703) 964-6233.

    (703) 964-6233
    Contact Form Demo (#3)
    Owens Corning Preferred Contractor GAF System Plus CertainTeed SureStart PLUS BBB A+ Accredited HomeAdvisor

    RNC Roofing

    RNC Roofing and Construction Group — The Roofing Contractor Specialists. Protecting your home, one shingle at a time.

    Virginia

    (703) 964-6233 Sterling · Leesburg · Ashburn
    Loudoun & Fairfax County

    Maryland

    (703) 964-6233 Beltsville · District Heights
    All of Maryland
    © 2026 RNC Roofing and Construction Group — The Roofing Contractor Specialists Northern Virginia & Maryland
  • Best Questions to Ask During a Roof Inspection

    Protecting your home, one shingle at a time VA (703) 964-6233| MD (703) 964-6233| Free Estimate & Inspection
    Homeowner Help

    Best Questions to Ask During a Roof Inspection

    RNC Roofing and Construction Group May 15, 2018
    Best Questions to Ask During a Roof Inspection

    Best Questions to Ask During a Roof Inspection

    When it comes to roof inspections, asking the right questions is crucial for making informed decisions about repairs or replacements. Conducting thorough roof inspections prior to any work is of utmost importance. By asking the right questions, homeowners and contractors can gather valuable information that will guide them in determining the best course of action. This article will delve into the significance of asking pertinent questions during roof inspections and how it contributes to a successful outcome.

    Why Conduct Thorough Roof Inspections?

    Roof inspections serve as a crucial step in maintaining the structural integrity of a building. By thoroughly assessing the roof’s condition, potential issues can be identified and addressed promptly, preventing further damage and costly repairs. Moreover, inspections are essential before undertaking any roof-related project, such as repairs or replacements, as they provide a comprehensive understanding of the current state of the roof.

    evaluating roof damage

    What is the Current Condition of the Roof?

    Before proceeding with a roof inspection, it is essential to inquire about the current condition of the roof. This question allows homeowners to gather initial information about any known issues or concerns. By asking this question, individuals can begin their assessment with a baseline understanding of what to look for and what to address during the inspection.

    Understanding the Roof’s Condition

    The condition of a roof involves considering various factors, such as its age, wear and tear, and potential damage. Age indicates the general lifespan of the roof, while wear and tear highlight the impact of weather conditions and time. Assessing potential damage helps identify any underlying issues that may worsen over time if left unattended.

    Visually Inspecting the Roof for Signs of Deterioration

    A visual inspection is an important part of assessing a roof’s condition. Homeowners should look for specific signs of deterioration, including missing or damaged shingles, sagging areas, or visible leaks. Missing or damaged shingles can expose the underlying layers to moisture, potentially leading to rot or structural damage. Sagging areas might indicate structural issues, while leaks can cause water damage to the interior of the property.

    How Condition Assessment Guides the Appropriate Course of Action

    By evaluating the condition of the roof, homeowners can determine the appropriate course of action. If the roof is in good condition with only minor issues, regular maintenance and repairs might be sufficient. However, if significant damage or extensive wear is present, a full replacement or major repairs may be necessary. Understanding the roof’s condition helps homeowners make informed decisions and allocate resources effectively.

    ceiling leak roof

    Are There Any Signs of Water Damage or Leaks?

    One crucial question to ask during a roof inspection is whether there are any signs of water damage or leaks. Water infiltration can cause significant damage to a roof and its underlying structure. By asking this question, homeowners can direct their attention to areas where leaks or water-related issues may be present.

    Importance of Checking for Signs of Water Infiltration

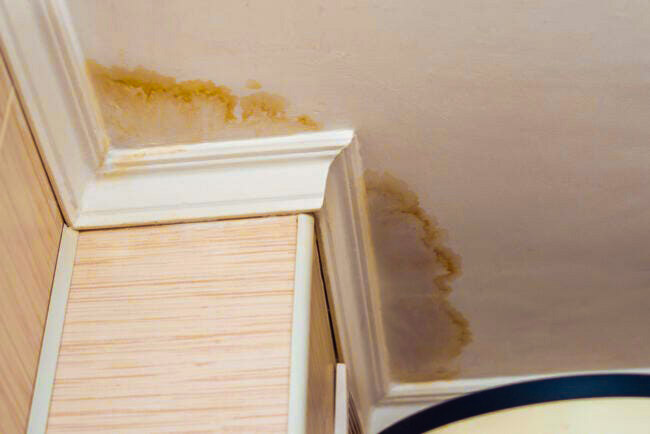
    Checking for signs of water damage is vital during a roof inspection. Stains, dampness, or mold growth are clear indicators of water infiltration. Detecting these signs early on can help prevent further damage to the roof and the interior of the property.

    Potential Consequences of Undetected Water Damage

    Undetected water damage can lead to serious consequences if left unaddressed. Structural issues may arise, compromising the stability of the roof and the entire building. Additionally, water damage can create an environment conducive to mold growth, posing health hazards to occupants. Identifying and resolving water-related issues promptly is essential for maintaining a safe and structurally sound property.

    Common Areas Prone to Leaks and Signs of Water Damage

    Certain areas of a roof are more prone to leaks and water damage. Homeowners should pay close attention to the following:

    • Roof valleys: These areas where two roof planes intersect are susceptible to water accumulation.
    • Around chimneys and skylights: Flashing and seals around these structures should be inspected for potential leaks.
    • Gutters and downspouts: Clogged or damaged gutters can cause water to back up and seep into the roof.
    • Roof vents: Damaged or improperly sealed vents can be entry points for water.

    roof shingle designs

    What Type of Roofing Material is Currently Installed?

    There are several common roofing materials homeowners may encounter. Each material has its unique advantages and considerations:

    • Asphalt shingles: Widely used due to their affordability, versatility, and ease of installation. However, they may have a shorter lifespan compared to other materials.
    • Metal: Provides durability, energy efficiency, and a long lifespan. However, it can be more expensive and may require professional installation.
    • Tile: Offers an aesthetic appeal, durability, and excellent resistance to fire. However, it is heavy and may require additional structural support.
    • Slate: Known for its beauty, longevity, and resistance to fire and rot. However, it is expensive and requires professional installation due to its weight.

    Impact of Current Roofing Material on Inspection Process, Repair Options, and Longevity

    The current roofing material significantly influences the inspection process, available repair options, and the roof’s potential longevity. For instance:

    • Asphalt shingles: Inspection focuses on issues like curling, cracking, or missing shingles. Repairs often involve replacing damaged shingles or addressing issues with the underlayment.
    • Metal roofs: Inspection includes checking for loose or damaged panels, corrosion, or faulty flashing. Repairs may involve resealing seams or replacing damaged sections.
    • Tile roofs: Inspection assesses cracked or broken tiles, loose or damaged flashing, or issues with the underlayment. Repairs often involve replacing individual tiles or addressing underlying issues with the support structure.
    • Slate roofs: Inspection examines for cracked or missing tiles, damaged flashing, or issues with the roof’s integrity. Repairs typically involve replacing damaged tiles or addressing any underlying structural concerns.

    roof ventilation

    Is the Roof Properly Ventilated and Insulated?

    Assessing the roof’s ventilation and insulation is an important question to ask during a roof inspection. This helps determine if the property has sufficient measures in place to promote a well-ventilated and properly insulated roofing system.

    Significance of Ventilation in Preventing Moisture Buildup and Premature Deterioration

    Proper ventilation plays a vital role in maintaining a healthy roof. It helps prevent moisture buildup by allowing air circulation and expelling excess humidity. Without adequate ventilation, trapped moisture can lead to the growth of mold, rot, and premature deterioration of the roof’s structure and materials. Assessing the ventilation system ensures that it is functioning optimally to safeguard against these issues.

    Importance of Insulation in Maintaining Energy Efficiency

    Insulation is essential for maintaining energy efficiency in a home. It acts as a barrier, preventing heat transfer between the interior and exterior of the property. Inadequate insulation can result in excessive heat loss during colder months and unwanted heat gain during hotter months. Assessing the insulation levels and quality ensures that the roof retains the desired temperature, reducing energy consumption and associated costs.

    Guidance on Assessing Ventilation and Insulation

    During a roof inspection, it is crucial to assess the ventilation and insulation systems. Consider the following steps:

    Ventilation assessment:

    • Look for signs of inadequate ventilation, such as excessive condensation, musty odors, or visible mold growth.
    • Check for the presence of vents, ensuring they are unobstructed and properly installed.
    • Evaluate the balance between intake and exhaust vents to ensure proper airflow.

    Insulation evaluation:

    • Inspect the insulation materials for any damage, compression, or gaps.
    • Assess the thickness and coverage of insulation, ensuring it meets the recommended standards for the climate zone.
    • Look for areas where insulation may be lacking, such as around attic access points or within roof cavities.

    repairs roofing maintenance

    Are There Any Signs of Structural Issues?

    Several indicators may point to structural issues with a roof. Homeowners and inspectors should be vigilant for the following signs:

    • Sagging: Any noticeable sagging or dipping in the roof’s surface can indicate structural problems, such as weakened support beams or excessive weight load.
    • Unevenness: An uneven roofline or areas that appear to be lower or higher than others may suggest issues with the underlying structure.
    • Damaged support components: Look for signs of damaged or deteriorated support components, such as cracked or rotted beams, trusses, or rafters.
    • Risks Associated with Compromised Roof Structures

    A compromised roof structure poses significant risks to the safety and integrity of the entire property. Ignoring or neglecting structural issues can lead to:

    • Collapses: Weakened structures may eventually collapse, resulting in property damage, injuries, or even fatalities.
    • Increased damage: Structural issues can worsen over time, potentially causing additional damage to the roof, walls, and other parts of the house.
    • Financial implications: Delaying repairs can lead to more extensive and costly repairs in the future, affecting the homeowner’s budget.

    Assessing and Addressing Structural Concerns

    To evaluate and address structural concerns, it is recommended to:

    Engage a professional: Consult with a qualified roofing contractor or structural engineer to assess the severity of the issue and provide expert guidance.

    Visual inspection: Conduct a visual examination of the roof’s structure, paying attention to signs of sagging, unevenness, or damaged support components.

    Documentation: Take photos or notes to record the observed structural problems as evidence for discussions with professionals.

    Timely repairs: Once structural issues are identified, promptly address them by following the recommendations of the professional. This may involve repairs, reinforcements, or even roof replacement in severe cases.

    roofing maintenance

    What Maintenance or Repairs Are Required?

    Regular maintenance and timely repairs are vital for several reasons:

    • Prolonged lifespan: Regular maintenance, including inspections, cleaning, and minor repairs, can significantly extend the lifespan of the roof.
    • Prevention of major issues: Addressing small maintenance needs and promptly repairing minor damages can prevent them from escalating into larger and more costly problems.
    • Energy efficiency: Properly maintained roofs with intact insulation and well-sealed components contribute to better energy efficiency, reducing heating and cooling costs.
    • Protecting property: Timely repairs help safeguard the overall property by preventing water leaks, mold growth, and other potential damage.

    Identifying Common Maintenance Needs

    • Cleaning: Assess if the roof has accumulated debris, leaves, or moss that can hinder drainage and cause water pooling.
    • Resealing: Check the condition of sealants around penetrations, such as vents and chimneys, to ensure they are intact and preventing water infiltration.
    • Clearing gutters and downspouts: Examine gutters and downspouts for clogs or blockages that can impede proper water drainage.
    • Checking flashings: Inspect flashings around roof penetrations and edges to ensure they are secure and not deteriorated.

    Potential Repair Requirements and Effective Solutions

    Based on the inspection findings, there may be repair requirements that need to be addressed. Potential repair needs can include:

    • Fixing damaged or missing shingles
    • Repairing leaks or addressing water infiltration issues
    • Replacing cracked or deteriorated flashing
    • Fixing loose or damaged roof components

    View More Articles

    Free, No Obligation

    Request Your Free Estimate & Inspection

    Tell us about your roof and we’ll come take a look — no pressure, no cost. Or call us right now on (703) 964-6233.

    (703) 964-6233
    Contact Form Demo (#3)
    Owens Corning Preferred Contractor GAF System Plus CertainTeed SureStart PLUS BBB A+ Accredited HomeAdvisor

    RNC Roofing

    RNC Roofing and Construction Group — The Roofing Contractor Specialists. Protecting your home, one shingle at a time.

    Virginia

    (703) 964-6233 Sterling · Leesburg · Ashburn
    Loudoun & Fairfax County

    Maryland

    (703) 964-6233 Beltsville · District Heights
    All of Maryland
    © 2026 RNC Roofing and Construction Group — The Roofing Contractor Specialists Northern Virginia & Maryland