Tag: roof damage

  • Roof Leak Mold Remediation: Protecting Your Home and Health
    Protecting your home, one shingle at a time VA (703) 964-6233| MD (703) 964-6233| Free Estimate & Inspection
    Home Improvement

    Roof Leak Mold Remediation: Protecting Your Home and Health

    RNC Roofing and Construction Group September 13, 2023
    Roof Leak Mold Remediation: Protecting Your Home and Health

    Roof Leak Mold Remediation: Protecting Your Home and Health

    Roof leak mold remediation, often overlooked, is a critical aspect of maintaining a healthy living environment. When rainwater infiltrates your home through a compromised roof, it creates a fertile breeding ground for mold. This dual problem of roof leaks and mold growth can lead to structural damage and health concerns.

    Identifying Roof Leaks

    When it comes to roof leak mold remediation, the first step is recognizing the presence of a roof leak. Understanding the signs and taking proactive measures can save you from extensive damage and costly repairs down the line.

    Common Signs of Roof Leaks

    Water Stains: One of the most obvious indicators of a roof leak is water stains on your ceiling or walls. These stains often appear as discolored patches and can vary in size.

    • Peeling Paint or Wallpaper: When water infiltrates the structure of your home, it can cause paint or wallpaper to bubble or peel. Keep an eye out for any unusual changes in your interior wall coverings.
    • Damp or Moldy Odors: A musty, damp odor in your home can be a sign of hidden moisture, often caused by roof leaks. If you notice this smell, investigate further.

    The Importance of Regular Roof Inspections

    Regular roof inspections are key to preventing roof leak mold remediation issues. Even if you haven’t noticed any obvious signs of a leak, having your roof professionally inspected on a routine basis can help identify problems before they escalate. Professional roofing contractors have the expertise to spot subtle issues that may go unnoticed by the untrained eye.

    Using DIY Methods to Detect Leaks Before They Become Major Issues

    While professional inspections are essential, there are also some DIY methods you can use to detect roof leaks early:

    • Attic Inspection: During daylight hours, turn off the lights in your attic and look for any signs of outside light seeping through. This can indicate holes or gaps in your roof.
    • Check for Dripping: On a rainy day, inspect your attic for any signs of dripping or moisture. If you find any, it’s a clear indication of a roof leak.
    • Examine Shingles: From the ground, you can use binoculars to check for missing, damaged, or curling shingles. These are potential entry points for water.

    what are roof bubbles

    Understanding Mold Growth

    It’s essential to have a clear understanding of what mold is, how it thrives in moist environments, the health risks associated with mold exposure, and how mold growth can exacerbate roof leak issues.

    What Mold Is and its Affinity for Moist Environments

    Mold is a type of fungus that can be found both indoors and outdoors. It reproduces by creating tiny spores that are invisible to the naked eye, making it highly adaptable and resilient. Mold thrives in environments with high humidity and moisture, making it a common problem in areas affected by roof leaks.

    Health Risks Associated with Mold Exposure

    Exposure to mold can pose significant health risks, especially when it’s left unaddressed. Common health issues associated with mold exposure include:

    • Respiratory Problems: Mold spores can be inhaled, leading to coughing, sneezing, wheezing, and exacerbating conditions like asthma.
    • Allergic Reactions: Many people are allergic to mold, and exposure can lead to symptoms like itching, red eyes, and skin rashes.
    • Irritation: Mold exposure can irritate the eyes, nose, throat, and skin, causing discomfort and sometimes severe reactions.
    • Fungal Infections: In rare cases, individuals with compromised immune systems may develop fungal infections from mold exposure.

    Exacerbating Roof Leak Problems

    Roof leaks and mold growth often go hand in hand. When moisture from a roof leak interacts with building materials, it provides the ideal conditions for mold to flourish. This can lead to further deterioration of your home’s structure, including:

    • Weakened Roofing Materials: Continuous exposure to moisture can weaken the roof’s structure, causing more leaks and potential collapses.
    • Interior Damage: Mold growth on walls, ceilings, and insulation can result in costly interior damage that goes beyond the initial roof leak.
    • Health Concerns: As mold spreads, the health risks to occupants increase, creating a hazardous living environment.
    labor cost for roofing

    Roof Leak Repair

    You’ve identified a roof leak, taking immediate action is crucial to prevent further damage to your home and avoid exacerbating mold growth. In this section, we’ll discuss the steps you should take, temporary fixes to prevent additional damage, and the importance of enlisting a professional roofing contractor for a permanent solution.

    Steps to Take When You Identify a Roof Leak

    • Safety First: Ensure your safety by avoiding any electrical appliances or standing water in the affected area.
    • Contain the Leak: Place a bucket or container beneath the leak to catch dripping water. This prevents water from spreading to other parts of your home.
    • Identify the Source: Try to determine the source of the leak from inside your home. Look for wet spots or stains on the ceiling or walls, which can help pinpoint the location.
    • Temporary Measures: While waiting for professional assistance, consider using a tarp or plastic sheet to cover the affected area on the roof, preventing further water ingress.

    Temporary Fixes to Prevent Further Damage

    While temporary fixes can provide short-term relief, they are not a substitute for professional roof leak mold remediation. Some temporary measures include:

    • Applying Roof Sealant: Roof sealant can be used to cover small cracks or gaps temporarily. However, it’s not a permanent solution.
    • Patching Holes: If you can safely access the roof, you may patch small holes or damaged shingles with roofing cement or a patch kit.
    • Using Roofing Tape: Roofing tape can be applied as a temporary seal on damaged areas, but it’s important to remember that it won’t last long-term.

    Hiring a Professional Roofing Contractor for a Permanent Solution

    For a long-lasting and effective solution, it’s essential to enlist the services of a professional roofing contractor experienced in roof leak mold remediation. Here’s why:

    • Expertise: Roofing professionals have the knowledge and expertise to identify the root cause of the leak and recommend the appropriate repairs.
    • Quality Repairs: They use high-quality materials and techniques to ensure that the repairs stand the test of time.
    • Preventing Future Leaks: Professionals can identify potential trouble spots and address them to prevent future leaks.
    • Safety: Roof repairs can be dangerous, and professionals have the necessary safety equipment and training to work safely at heights.

    roof ventilation

    Mold Remediation

    Mold remediation is a crucial step in addressing the consequences of roof leak mold remediation. This process involves removing mold growth, ensuring safety, and implementing preventive measures to stop mold from returning.

    The Process of Mold Removal and Cleanup

    Mold removal and cleanup is a meticulous process that should be handled by professionals experienced in mold remediation. Here’s an overview of the steps involved:

    • Assessment: The first step is a thorough assessment of the affected areas to determine the extent of mold growth. This helps in planning the remediation process.
    • Containment: To prevent the spread of mold spores to unaffected areas, professionals will set up containment barriers, often using plastic sheeting and negative air pressure systems.
    • Mold Removal: Mold is carefully removed from surfaces and materials using specialized techniques and cleaning agents. This may involve scrubbing, sanding, or even removing and replacing affected materials.
    • HEPA Vacuuming: High-efficiency particulate air (HEPA) vacuuming is used to capture and remove mold spores and debris from surfaces and the air.
    • Cleaning and Disinfecting: Affected surfaces are thoroughly cleaned and disinfected to ensure the elimination of mold and prevent regrowth.
    • Drying: Proper drying of the area is crucial to prevent future mold growth. Dehumidifiers and fans may be used to achieve optimal moisture levels.

    Safety Precautions When Dealing with Mold

    Mold remediation should always prioritize safety. Professionals follow strict safety guidelines, including:

    • Personal Protective Equipment (PPE): Technicians wear PPE, such as masks, gloves, and suits, to protect themselves from mold exposure.
    • Containment: As mentioned earlier, containment barriers are set up to prevent the spread of mold spores.
    • Proper Ventilation: Adequate ventilation is maintained to remove airborne mold spores from the work area.

    Tips for Preventing Mold Re-Growth After Remediation

    Once mold remediation is complete, it’s essential to take preventive measures to avoid future mold issues:

    • Address the Root Cause: Identify and address the root cause of the moisture problem, such as roof leaks, to prevent mold from returning.
    • Regular Inspections: Conduct regular inspections to catch any potential leaks or moisture issues early.
    • Maintain Proper Ventilation: Ensure your home has proper ventilation in areas prone to moisture, such as bathrooms and kitchens.
    • Control Humidity: Use dehumidifiers to maintain optimal indoor humidity levels, typically between 30% and 50%.
    tpo roofing improvement

    Preventing Future Roof Leaks and Mold Issues

    After addressing roof leak mold remediation, it’s crucial to take proactive steps to prevent these problems from recurring. Here are some practical tips to safeguard your home:

    Roof Maintenance Tips to Reduce the Risk of Leaks

    Regular roof maintenance can significantly reduce the risk of future leaks. Here’s what you can do:

    • Clear Debris: Remove leaves, branches, and debris from your roof and gutters regularly. Accumulated debris can block water drainage and lead to leaks.
    • Inspect Shingles: Check your roof’s shingles for signs of wear and damage. Replace any missing or damaged shingles promptly to maintain the integrity of your roof.
    • Seal Gaps and Cracks: Inspect the flashing around vents, chimneys, and skylights. Seal any gaps or cracks with roof sealant to prevent water infiltration.
    • Trim Overhanging Branches: Trim tree branches that hang over your roof to prevent them from scratching or damaging the shingles during storms.

    The Importance of Proper Ventilation and Insulation

    Proper attic ventilation and insulation play a significant role in preventing roof leaks and mold growth:

    • Ventilation: Adequate attic ventilation helps regulate temperature and moisture levels, reducing the risk of condensation that can lead to mold growth.
    • Insulation: Proper insulation can prevent heat from escaping and causing ice dams on the roof, which can lead to leaks. Ensure your attic is well-insulated.

    Regular Inspections and Proactive Measures to Safeguard Your Home

    • Schedule Professional Inspections: Arrange for annual or bi-annual professional roof inspections. Experienced contractors can spot potential issues before they become major problems.
    • Act on Early Warning Signs: If you notice any signs of roof damage or leaks, such as water stains or peeling paint, address them promptly. Don’t wait for the problem to escalate.
    • Gutter Maintenance: Keep your gutters clean and in good condition. Clogged or damaged gutters can lead to water pooling on your roof, increasing the risk of leaks.
    • Monitor Indoor Humidity: Keep an eye on indoor humidity levels, especially in areas prone to moisture, like bathrooms and basements. Use dehumidifiers if necessary to maintain optimal levels.

    View More Articles

    Free, No Obligation

    Request Your Free Estimate & Inspection

    Tell us about your roof and we’ll come take a look — no pressure, no cost. Or call us right now on (703) 964-6233.

    (703) 964-6233
    Contact Form Demo (#3)
    Owens Corning Preferred Contractor GAF System Plus CertainTeed SureStart PLUS BBB A+ Accredited HomeAdvisor

    RNC Roofing

    RNC Roofing and Construction Group — The Roofing Contractor Specialists. Protecting your home, one shingle at a time.

    Virginia

    (703) 964-6233 Sterling · Leesburg · Ashburn
    Loudoun & Fairfax County

    Maryland

    (703) 964-6233 Beltsville · District Heights
    All of Maryland
    © 2026 RNC Roofing and Construction Group — The Roofing Contractor Specialists Northern Virginia & Maryland
  • Roof Bubbling Up: Understanding, Prevention, and Repair

    Protecting your home, one shingle at a time VA (703) 964-6233| MD (703) 964-6233| Free Estimate & Inspection
    Home Improvement

    Roof Bubbling Up: Understanding, Prevention, and Repair

    RNC Roofing and Construction Group September 12, 2023
    Roof Bubbling Up: Understanding, Prevention, and Repair

    Roof Bubbling Up: Understanding, Prevention, and Repair

    Roof bubbling up may seem innocuous at first glance, but it’s a sign that something isn’t quite right with your roof. Those seemingly harmless bubbles or blisters on your roof’s surface can lead to more significant problems if left unattended. Water damage, structural issues, and increased energy bills are just a few of the potential consequences.

    What are Roof Bubbles?

    Defining Roof Bubbles

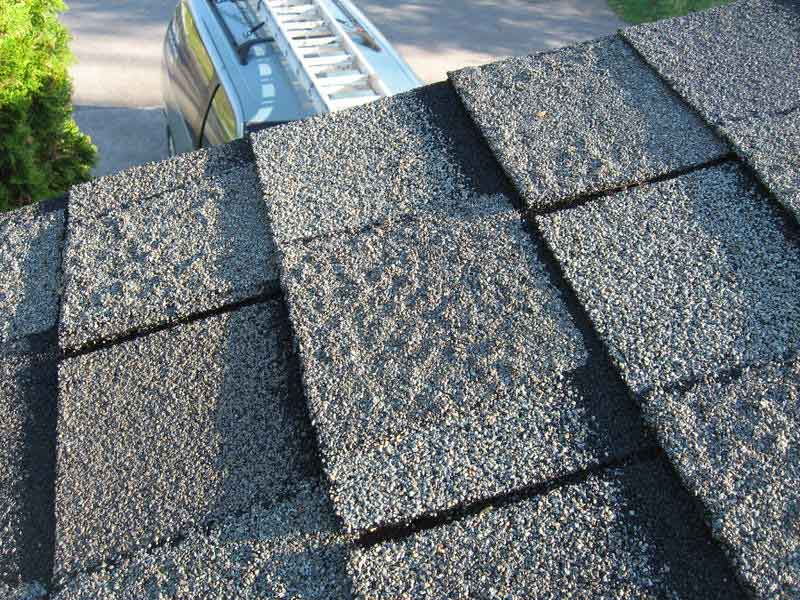
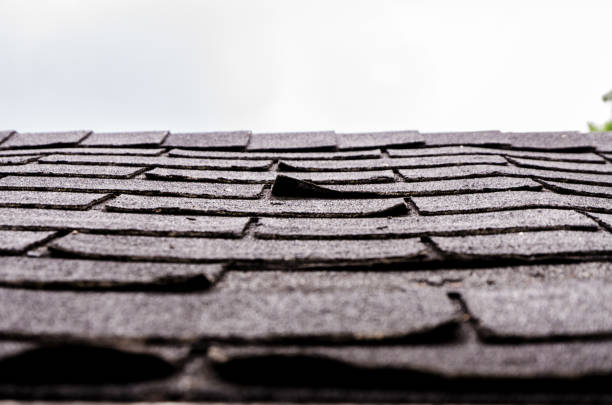
    Roof bubbles, also known as roof blisters, are irregularities that can develop on the surface of your roofing materials. They often resemble small, raised areas or blisters, which can vary in size and appearance. These bubbles typically form when moisture becomes trapped beneath the roofing materials, causing them to separate or create a raised portion on your roof’s surface.

    Variability in Size and Severity

    Roof bubbles are not a one-size-fits-all issue. They can range from tiny, barely noticeable blisters to larger, more prominent bulges. The severity of roof bubbles can also differ, with some being purely cosmetic and others indicating potentially more significant underlying problems.

    In some cases, roof bubbles may only affect a small section of your roof, while in others, they can spread across a larger area. The size and severity of these bubbles can vary based on several factors, including the type of roofing material, installation quality, and environmental conditions.

    Visualizing Roof Bubbles

    To help you visualize roof bubbles, imagine small, raised pockets on the surface of your roof that can resemble the appearance of bubbles or blisters on the skin. These irregularities can be particularly noticeable when sunlight casts shadows on your roof’s surface. When left unaddressed, they can not only compromise your roof’s aesthetics but also lead to more significant issues like leaks and water damage.

    what is roofing insulation

    Causes of Roof Bubbling Up

    Heat and Temperature Fluctuations

    Roof bubbling up can often be traced back to the relentless dance of heat and temperature fluctuations that your roof experiences. During hot sunny days, your roof heats up significantly, causing the roofing materials to expand. Conversely, as the temperature drops, the materials contract. This constant expansion and contraction can create stress on your roof, making it more vulnerable to developing bubbles or blisters.

    Imagine your roof as a surface that swells and shrinks with the changing weather. Over time, this repetitive stress can weaken the roofing materials, leading to the formation of those telltale bubbles.

    Poor Installation Practices

    Another key culprit behind roof bubbling is poor installation practices. When roofing materials are not properly installed, they may not adhere securely to the underlying structure. This lack of proper adhesion can allow air and moisture to become trapped beneath the roofing materials.

    • Consider this scenario: during installation, if a section of roofing is not sealed correctly or if air pockets are left behind, it can create the ideal conditions for roof bubbles to develop. Inadequate installation practices can turn a seemingly well-constructed roof into a bubble-prone surface.

    Moisture Accumulation

    Moisture is the third player in the roof bubbling saga. It can infiltrate your roofing system through various means, such as leaks, damaged shingles, or improper ventilation. Once moisture finds its way beneath the roofing materials, it becomes trapped and can create pockets of dampness.

    Think of moisture as the fuel for roof bubbles. When it accumulates beneath your roof’s surface, it can weaken the adhesive bonds, causing the roofing materials to separate or blister. Over time, these pockets of moisture can expand, exacerbating the issue and potentially leading to more significant damage.

    Real-Life Examples

    To illustrate these causes, consider the following scenarios:

    • The Hot Summer Bake: In the scorching summer heat, your roof expands, but if it was poorly installed or already had some moisture issues, bubbles can start forming as the roofing materials struggle to accommodate the temperature-induced changes.
    • The Sneaky Leak: A small roof leak, often unnoticed, allows moisture to creep beneath your roofing materials. As the seasons change and temperatures fluctuate, this moisture can lead to the emergence of roof bubbles.

    signs of blistering roof , signs to replace your roof

    Signs and Dangers

    When it comes to your roof’s health, early detection is key. Here are some common signs that you might have roof bubbles:

    • Visible Bubbles or Blisters: The most obvious sign is the presence of raised areas or blisters on your roof’s surface. These may appear as irregularities, bumps, or pockets of air beneath the roofing materials.
    • Cracked or Peeling Paint: If your roof has bubbles, it can affect the paint or coating on the surface. You might notice paint that is cracking, peeling, or blistering, mirroring the condition of your roof beneath.
    • Interior Water Damage: While roof bubbles are exterior issues, their consequences can seep inside. Water may find its way through the compromised roofing materials, causing stains, dampness, or even visible leaks on your ceilings or walls.

    The Potential Dangers

    Ignoring these warning signs can lead to more significant problems down the road. Roof bubbles might seem harmless, but they can be indicators of underlying issues that, if left unaddressed, can escalate:

    • Leaks: Roof bubbles can allow water to infiltrate your roofing system, leading to leaks during heavy rainfall. These leaks can damage your home’s interior, including your insulation, drywall, and even your belongings.
    • Structural Damage: Over time, the trapped moisture beneath the roofing materials can weaken the structural integrity of your roof. This can result in sagging or even the need for costly repairs or replacements.
    • Energy Inefficiency: Roof bubbles can affect your home’s energy efficiency. The compromised roofing materials may reduce your roof’s insulation properties, causing fluctuations in indoor temperatures and increasing your energy bills.

    preventing mold , preventing roof algae

    Prevention and Maintenance

    Preventing Roof Bubbling Up

    Preventing roof bubbling up is not only cost-effective but also crucial for the longevity of your roof. Here are some practical tips to keep those bubbles at bay:

    Proper Ventilation and Insulation:

    Ensuring your attic and roof have adequate ventilation and insulation can go a long way in preventing roof bubbles. Proper ventilation helps regulate temperature and humidity, reducing the chances of moisture buildup that can lead to bubbles. Adequate insulation also helps maintain a consistent temperature on your roof’s surface, minimizing the expansion and contraction that can cause bubbles.

    Regular Roof Inspections:

    Regular roof inspections are your first line of defense against roof bubbles. Consider scheduling professional roof inspections at least once a year, preferably in the spring or fall. Inspectors can identify early signs of damage, including potential bubbles, and address them before they worsen. DIY inspections can also be beneficial, but be cautious when walking on your roof to avoid causing further damage.

    Quality Roofing Materials and Installation:

    Investing in high-quality roofing materials and professional installation can significantly reduce the risk of roof bubbling. Choose roofing materials known for their durability and resistance to moisture. When it comes to installation, hiring experienced roofing contractors who follow industry best practices is essential. Properly installed roofing materials are less likely to develop bubbles over time.

    Maintaining Your Roof’s Lifespan

    Routine maintenance is the key to extending your roof’s lifespan and preventing issues like roof bubbling. Regularly clear debris from your roof, such as leaves and branches, to prevent water accumulation. Check and clean your gutters to ensure proper drainage. Promptly address any leaks or damaged shingles to prevent moisture from seeping beneath the roofing materials.

    labor cost for roofing

    Repairing Roof Bubbles

    Preventing Roof Bubbling Up

    Preventing roof bubbling up is not only cost-effective but also crucial for the longevity of your roof. Here are some practical tips to keep those bubbles at bay:

    Proper Ventilation and Insulation:

    Ensuring your attic and roof have adequate ventilation and insulation can go a long way in preventing roof bubbles. Proper ventilation helps regulate temperature and humidity, reducing the chances of moisture buildup that can lead to bubbles. Adequate insulation also helps maintain a consistent temperature on your roof’s surface, minimizing the expansion and contraction that can cause bubbles.

    Regular Roof Inspections:

    Regular roof inspections are your first line of defense against roof bubbles. Consider scheduling professional roof inspections at least once a year, preferably in the spring or fall. Inspectors can identify early signs of damage, including potential bubbles, and address them before they worsen. DIY inspections can also be beneficial, but be cautious when walking on your roof to avoid causing further damage.

    Quality Roofing Materials and Installation:

    Investing in high-quality roofing materials and professional installation can significantly reduce the risk of roof bubbling. Choose roofing materials known for their durability and resistance to moisture. When it comes to installation, hiring experienced roofing contractors who follow industry best practices is essential. Properly installed roofing materials are less likely to develop bubbles over time.

    Maintaining Your Roof’s Lifespan

    Routine maintenance is the key to extending your roof’s lifespan and preventing issues like roof bubbling. Regularly clear debris from your roof, such as leaves and branches, to prevent water accumulation. Check and clean your gutters to ensure proper drainage. Promptly address any leaks or damaged shingles to prevent moisture from seeping beneath the roofing materials.

    Free, No Obligation

    Request Your Free Estimate & Inspection

    Tell us about your roof and we’ll come take a look — no pressure, no cost. Or call us right now on (703) 964-6233.

    (703) 964-6233
    Contact Form Demo (#3)
    Owens Corning Preferred Contractor GAF System Plus CertainTeed SureStart PLUS BBB A+ Accredited HomeAdvisor

    RNC Roofing

    RNC Roofing and Construction Group — The Roofing Contractor Specialists. Protecting your home, one shingle at a time.

    Virginia

    (703) 964-6233 Sterling · Leesburg · Ashburn
    Loudoun & Fairfax County

    Maryland

    (703) 964-6233 Beltsville · District Heights
    All of Maryland
    © 2026 RNC Roofing and Construction Group — The Roofing Contractor Specialists Northern Virginia & Maryland
  • Dark Shingles vs Light Shingles: Stay Informed On Your Roof

    Protecting your home, one shingle at a time VA (703) 964-6233| MD (703) 964-6233| Free Estimate & Inspection
    Home Improvement

    Dark Shingles vs Light Shingles: Stay Informed On Your Roof

    RNC Roofing and Construction Group September 6, 2023
    Dark Shingles vs Light Shingles: Stay Informed On Your Roof

    Dark Shingles vs Light Shingles: Stay Informed On Your Roof

    In the world of roofing, choosing the right material can be a critical decision for homeowners. One of the key choices they face is between dark shingles and light shingles, each offering its own set of advantages and considerations. In this article, we will explore the factors that should guide your decision when it comes to selecting the ideal roofing material for your home.

    Understanding Dark Shingles

    When it comes to roofing, dark shingles are a popular choice that offers a distinct set of characteristics. Let’s delve into what defines dark shingles and explore the advantages and drawbacks associated with them.

    Defining Dark Shingles

    Dark shingles, as the name suggests, are roofing materials that come in deep, rich colors. These shingles are typically darker shades of brown, gray, black, or even deep red. They are known for their ability to absorb and retain heat.

    Advantages of Choosing Dark Shingles

    Energy Efficiency in Colder Climates: Dark shingles excel in colder regions. They absorb sunlight and heat, which can help melt snow and ice on the roof more effectively. This can prevent the formation of ice dams and potential roof damage caused by the weight of accumulated snow.

    Enhanced Curb Appeal on Certain Architectural Styles: Dark shingles often provide a striking contrast to light-colored siding or architectural elements. They can lend a sophisticated and classic look to homes with specific design aesthetics.

    Drawbacks of Dark Shingles

    Increased Heat Absorption in Hot Climates: While the heat-absorbing quality of dark shingles can be an advantage in cold climates, it can be a drawback in hotter regions. Dark shingles can make your home warmer in the summer, potentially increasing cooling costs.

    Potential for Quicker Fading and Wear: Dark shingles may be more prone to fading over time due to their exposure to the sun’s ultraviolet (UV) rays. This can affect their appearance and longevity, leading to the need for more frequent replacements or repairs.

    exploring pitched roofs

    Exploring Light Shingles

    Light shingles, are a distinct category of roofing materials that bring their own unique qualities to the table. In this section, we will define and describe light shingles and delve into their advantages and disadvantages.

    Defining Light Shingles

    Light shingles are roofing materials that come in softer and lighter colors. These shingles typically include shades of beige, light gray, or even white. They are known for their reflective properties and their ability to resist heat absorption.

    Benefits of Opting for Light Shingles

    Reflective Properties for Energy Savings in Warm Climates: Light shingles excel in warmer regions. Their reflective surfaces bounce back a significant amount of sunlight, reducing heat absorption. This can help keep your home cooler during hot summers, potentially leading to energy savings and increased comfort.

    Reduced Heat Absorption, Potentially Extending the Roof’s Lifespan: Light shingles are less likely to absorb excessive heat. This quality can contribute to a longer lifespan for your roof by reducing the wear and tear caused by temperature fluctuations.

    Drawbacks of Light Shingles

    May Not Complement All Architectural Styles: While light shingles offer several advantages, they may not be the ideal choice for all architectural styles. Some homeowners may find that light shingles do not harmonize as well with the overall aesthetics of their homes.

    Less Effective at Melting Ice and Snow in Cold Climates: In regions with heavy snowfall and cold winters, light shingles may not be as effective at melting ice and snow compared to their dark counterparts. This can lead to the formation of ice dams, which may require extra maintenance.

    factors influencing roof replacement

    Factors to Consider

    When it comes to choosing between dark shingles and light shingles, homeowners should weigh several key factors to make an informed decision that suits their unique needs and circumstances. Let’s explore these essential considerations:

    Climate and Local Weather Patterns

    One of the foremost factors to ponder is your local climate. The weather in your region plays a pivotal role in determining the ideal shingle color for your roof. In colder climates, where snow and ice are prevalent during winter months, dark shingles might be advantageous. They can help melt snow and ice more efficiently, potentially preventing ice dams and the associated roof damage. In contrast, light shingles are better suited for warmer climates, where their reflective properties can reduce heat absorption and contribute to energy savings.

    Architectural Style and Home Aesthetics

    Consider the architectural style and overall aesthetics of your home. The color of your shingles should harmonize with your home’s design. Dark shingles can provide a classic and bold appearance, complementing certain architectural styles. On the other hand, light shingles offer a softer and more contemporary look. It’s important to choose a shingle color that enhances your home’s curb appeal and fits seamlessly with its style.

    Energy Efficiency Goals

    If you have specific energy efficiency goals for your home, such as reducing heating or cooling costs, your choice of shingle color can impact your success. Dark shingles can aid in heating your home more effectively in cold climates but may increase cooling costs in hot regions. Light shingles, with their reflective properties, are better suited for reducing cooling costs in warm climates. It’s essential to align your energy efficiency goals with your shingle choice.

    Long-Term Maintenance and Cost Considerations

    Roofing is a long-term investment, and the choice of shingle color can influence maintenance and replacement costs over time. Dark shingles may require more frequent maintenance and replacement due to potential fading and wear. Light shingles, by contrast, may have a longer lifespan. Consider the long-term cost implications and maintenance requirements associated with your chosen shingle color.

    what is roof flashing

    Making an Informed Decision

    Conduct a Climate Analysis for Your Region

    Start by assessing the climate in your local area. The weather patterns and temperature extremes in your region should play a pivotal role in your decision-making process. If you live in a colder climate with heavy snowfall, dark shingles may be more advantageous for their heat-absorbing properties, which can help prevent ice dams. Conversely, if you reside in a warmer area, light shingles with their reflective qualities may be a better fit, potentially reducing cooling costs.

    Consult with a Roofing Professional for Expert Advice

    Don’t hesitate to seek the expertise of a professional roofing contractor. They have hands-on experience and can provide valuable insights tailored to your specific situation. A roofing professional can assess your home, consider your climate, and discuss your aesthetic preferences to recommend the most suitable shingle color for your needs. Their advice can be invaluable in making the right choice.

    Consider the Long-Term Cost Implications

    Roofing is a long-term investment, and your choice of shingle color can impact maintenance and replacement costs over the years. While dark shingles may excel in certain climates, they might require more frequent maintenance and replacements due to potential fading. On the other hand, light shingles may have a longer lifespan. Consider not only the upfront cost but also the long-term expenses associated with your chosen shingle color.

    Factor in Personal Aesthetic Preferences

    Your home is an expression of your personal style, and the color of your shingles should complement your aesthetic preferences. Consider how each shingle color option will blend with your home’s architecture and exterior design. Visualize the final look and feel of your home with both dark and light shingles to ensure your choice aligns with your vision.

    View More Articles

    Free, No Obligation

    Request Your Free Estimate & Inspection

    Tell us about your roof and we’ll come take a look — no pressure, no cost. Or call us right now on (703) 964-6233.

    (703) 964-6233
    Contact Form Demo (#3)
    Owens Corning Preferred Contractor GAF System Plus CertainTeed SureStart PLUS BBB A+ Accredited HomeAdvisor

    RNC Roofing

    RNC Roofing and Construction Group — The Roofing Contractor Specialists. Protecting your home, one shingle at a time.

    Virginia

    (703) 964-6233 Sterling · Leesburg · Ashburn
    Loudoun & Fairfax County

    Maryland

    (703) 964-6233 Beltsville · District Heights
    All of Maryland
    © 2026 RNC Roofing and Construction Group — The Roofing Contractor Specialists Northern Virginia & Maryland
  • Hidden Signs of a Roof Leak: Unveiling the Telltale Indicators

    Protecting your home, one shingle at a time VA (703) 964-6233| MD (703) 964-6233| Free Estimate & Inspection
    Home Improvement

    Hidden Signs of a Roof Leak: Unveiling the Telltale Indicators

    RNC Roofing and Construction Group July 13, 2023
    Hidden Signs of a Roof Leak: Unveiling the Telltale Indicators

    Hidden Signs of a Roof Leak: Unveiling the Telltale Indicators

    As a responsible homeowner, being aware of the hidden signs of a roof leak is crucial in maintaining the integrity of your home and preventing potential damages. By recognizing these signs early on, you can take prompt action to address the issue and avoid more extensive repairs down the line.

    Assessing Interior Clues

    Stains and Discoloration on Ceilings and Walls

    One of the most common signs of a roof leak is the presence of stains or discoloration on your ceilings or walls. These stains may appear as dark patches, yellowing, or watermarks. They often indicate that water has penetrated through the roof and seeped into your home’s interior. Keep an eye out for these stains, especially in areas directly below the roof or near chimneys and skylights.

    Peeling Paint and Wallpaper

    If you notice peeling paint or wallpaper in certain areas of your home, it could be a result of water damage caused by a hidden roof leak. The moisture from the leak can cause the paint to bubble or peel off, and wallpaper may begin to loosen or show signs of deterioration. Pay attention to any unusual changes in your walls’ appearance, as they could be linked to a roof leak.

    Musty Odors and Mold Growth

    Hidden roof leaks can create a damp environment that fosters the growth of mold and mildew. If you detect a musty odor in your home, particularly in areas close to the roof, it may indicate the presence of mold caused by a leak. Additionally, keep an eye out for visible mold growth on walls, ceilings, or in the corners of rooms. Mold can not only damage your home’s structure but also pose health risks to you and your family.

    evaluating roof damage

    Examining Exterior Indicators

    Damaged or Missing Shingles

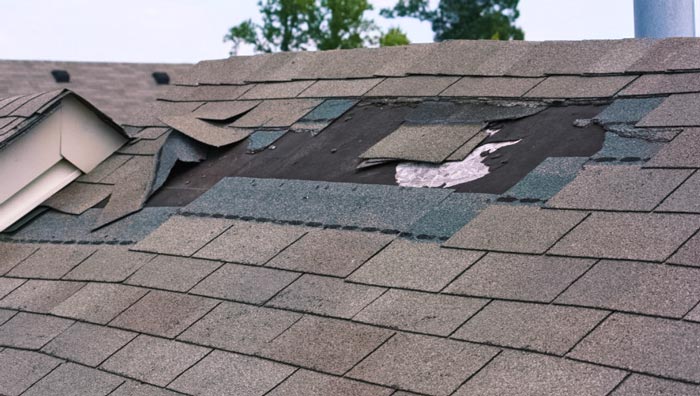
    One of the prominent signs of a roof leak is the presence of damaged or missing shingles. Inspect your roof regularly for any shingles that are cracked, broken, or completely absent. These damaged areas create vulnerable spots where water can penetrate the roof structure, leading to leaks. Keep an eye out for any shingles that appear dislodged, torn, or deteriorated, as they may indicate potential areas of concern.

    Curling, Buckling, or Warping Shingles

    Another exterior clue pointing to a hidden roof leak is the curling, buckling, or warping of shingles. Exposure to extreme weather conditions, age, and inadequate installation can cause shingles to lose their shape and integrity. These deformities compromise the effectiveness of your roof’s waterproofing capabilities, allowing water to seep through and infiltrate your home. Look for any noticeable curling or bulging of shingles, as well as sections that appear uneven or distorted.

    Accumulation of Granules in Gutters

    Inspecting your gutters can provide valuable insights into the condition of your roof. If you notice a significant accumulation of granules in the gutters, it may indicate deteriorating shingles. As shingles age, they tend to shed granules, which often end up in the gutter system. Excessive granule loss can weaken the shingles and compromise their ability to protect against water infiltration. Therefore, the presence of granules in the gutters can be an indication of potential roof leaks.

    how old should a roof be before replaced

    Inspecting Attic Leaks

    Water Stains or Dampness on Attic Rafters or Insulation

    Inspect the attic for any water stains or signs of dampness on the rafters or insulation. These stains can indicate a roof leak that has allowed water to seep through the roof structure. Look for discolored areas, dark patches, or areas that appear wet or damp to the touch. These signs suggest an ongoing or previous leak that may require immediate attention.

    Mold or Mildew Growth in the Attic

    The presence of mold or mildew in the attic is a strong indication of a hidden roof leak. Roof leaks create a moist environment, providing an ideal breeding ground for mold and mildew. Check for any visible signs of mold growth on the attic walls, ceilings, or in corners. If you detect a musty odor or see fuzzy patches of mold, it’s important to address the roof leak promptly to prevent further mold proliferation.

    Sunlight Penetration or Visible Holes

    During a daytime inspection, check for any signs of sunlight penetrating through the attic. Sunlight beams or visible holes in the roof indicate compromised areas where water can enter. Look for any gaps, cracks, or openings that allow light to pass through. Such openings should be repaired to prevent water infiltration and subsequent roof leaks.

    roof water damage

    Detecting Water In Other Areas

    Wet or Discolored Roof Decking

    Inspect the roof decking for any signs of wetness or discoloration. If you have access to your roof, carefully examine the surface. Wet spots or areas that appear darker than the surrounding decking can suggest the presence of a roof leak. By identifying these indications, you can narrow down the location of the leak and take appropriate action.

    Damaged Flashing around Chimneys, Skylights, or Vents

    Flashing plays a crucial role in preventing water penetration around chimneys, skylights, vents, and other roof penetrations. Check the condition of the flashing in these areas for any signs of damage, such as cracks, gaps, or missing sections. Faulty or deteriorated flashing can allow water to seep into your home, resulting in hidden roof leaks. Ensure the flashing is intact and properly sealed to maintain a watertight roof.

    Overflowing or Clogged Gutters

    While not directly related to the roof itself, overflowing or clogged gutters can contribute to roof leaks. When gutters are obstructed or unable to drain water effectively, it can lead to water backing up and seeping under the roof’s edge. Regularly inspect and clean your gutters to prevent water overflow, ensuring that they are functioning properly.

    fix leaky roof

    Steps to Address Roof Leaks

    Hiring a Professional Roofing Contractor

    Engaging the expertise of a professional roofing contractor is vital when dealing with roof leaks. A qualified contractor will have the knowledge and experience to identify the root cause of the leak and recommend appropriate solutions. They can conduct a thorough inspection of your roof, assess the extent of the damage, and provide expert advice on the necessary repairs. Hiring a professional ensures that the issue is addressed effectively and reduces the risk of recurring leaks.

    Conducting Regular Roof Inspections

    Regular roof inspections are essential to catch hidden signs of a roof leak before they escalate. Schedule professional roof inspections at least once a year, or after severe weather events, to detect any potential issues early on. During these inspections, the contractor can assess the condition of your roof, identify any signs of damage or leaks, and recommend preventive measures. Being proactive with regular inspections helps maintain the longevity and integrity of your roof.

    Importance of Timely Repairs to Prevent Further Damage

    Prompt repairs are crucial to prevent further damage caused by roof leaks. Ignoring or delaying repairs can result in more extensive and costly issues, such as structural damage, mold growth, and compromised insulation. As soon as signs of a roof leak are identified, take immediate action to address the problem. This may involve patching damaged areas, replacing broken shingles, or sealing gaps and cracks. Timely repairs help maintain the structural integrity of your roof and protect your home from potential water damage.

    View More Articles

    Free, No Obligation

    Request Your Free Estimate & Inspection

    Tell us about your roof and we’ll come take a look — no pressure, no cost. Or call us right now on (703) 964-6233.

    (703) 964-6233
    Contact Form Demo (#3)
    Owens Corning Preferred Contractor GAF System Plus CertainTeed SureStart PLUS BBB A+ Accredited HomeAdvisor

    RNC Roofing

    RNC Roofing and Construction Group — The Roofing Contractor Specialists. Protecting your home, one shingle at a time.

    Virginia

    (703) 964-6233 Sterling · Leesburg · Ashburn
    Loudoun & Fairfax County

    Maryland

    (703) 964-6233 Beltsville · District Heights
    All of Maryland
    © 2026 RNC Roofing and Construction Group — The Roofing Contractor Specialists Northern Virginia & Maryland
  • Ceiling Leaking When It Rains: Effective Repairs and Prevention

    Protecting your home, one shingle at a time VA (703) 964-6233| MD (703) 964-6233| Free Estimate & Inspection
    Roof Maintenance

    Ceiling Leaking When It Rains: Effective Repairs and Prevention

    RNC Roofing and Construction Group June 20, 2023
    Ceiling Leaking When It Rains: Effective Repairs and Prevention

    Ceiling Leaking When It Rains: Effective Repairs and Prevention

    Ceiling leaks when it rains can be a cause for concern and require immediate attention. Neglecting such leaks can lead to extensive damage to your property, compromising its structural integrity and potentially causing mold growth or electrical hazards. In this article, we will explore the causes behind ceiling leaks, effective preventive measures, and appropriate solutions to address this issue.

    Understanding Ceiling Leaks

    Impact of Rain on the Structural Integrity of Roofs

    When rainwater infiltrates the roofing system, it can have detrimental effects on its structural integrity. The constant exposure to moisture can weaken various components, leading to potential leaks. The weight of the accumulated water can strain the roof structure, causing sagging or even collapse in severe cases.

    Ceiling leaks when it rains are often a result of compromised roofing materials, such as deteriorated shingles or tiles. The prolonged exposure to rainwater can cause these materials to become brittle, crack, or develop gaps, allowing water to seep through. It is essential to address such issues promptly to prevent further damage and maintain a safe living or working environment.

    Common Signs and Symptoms of a Leaking Ceiling

    Identifying the signs and symptoms of a leaking ceiling is crucial for prompt detection and mitigation. Look out for water stains or discoloration on the ceiling surface, as well as dampness or moisture in the affected area. Water dripping or pooling is a clear indication of an active leak.

    Other observable signs may include peeling paint or wallpaper, blistering or bubbling surfaces, and a musty odor. It’s important to note that these signs may not always be directly below the source of the leak, as water can travel along roof trusses or beams before making its way into the ceiling.

    Importance of Identifying the Source of the Leak

    To effectively address ceiling leaks when it rains, it is crucial to identify the exact source of the leak. The visible signs on the ceiling may not necessarily pinpoint the location of the problem. Water can travel along rafters, roof decking, or insulation, making it challenging to trace its origin.

    evaluating roof damage

    Causes of Ceiling Leaks during Rainfall

    Age-related Deterioration and Wear

    Ceiling leaks when it rains can often be attributed to the aging and wear of roofing materials. Over time, exposure to weather elements and temperature fluctuations can cause materials to deteriorate. The constant cycle of wet and dry conditions weakens the protective layers of shingles or tiles, making them more susceptible to water infiltration. Consequently, water finds its way through cracks, gaps, or curling edges, resulting in leaks.

    Damaged or Missing Shingles/Tiles

    Another common cause of ceiling leaks is the presence of damaged or missing shingles or tiles. Harsh weather conditions, falling debris, or improper installation can cause shingles or tiles to crack, break, or become dislodged. This creates vulnerable entry points for rainwater to penetrate the roof. Even a small number of damaged or missing pieces can lead to significant water intrusion, causing leaks and potential interior damage.

    Roofing System Problems

    Inadequate Flashing or Sealant

    Flashing and sealant play a crucial role in preventing water penetration in vulnerable areas of the roof, such as joints, valleys, and intersections. If the flashing (metal strips) or sealant (caulk or adhesive) deteriorates or was improperly installed, it can fail to provide a watertight barrier. This allows rainwater to seep through gaps and into the interior of the building, resulting in ceiling leaks when it rains.

    Clogged or Damaged Gutters and Downspouts

    Proper water drainage is essential to prevent leaks. Clogged or damaged gutters and downspouts can impede the flow of rainwater, causing it to overflow and accumulate on the roof. Excessive water accumulation can penetrate the roof’s protective layers, saturating the underlying materials and leading to leaks. Regular gutter and downspout maintenance is crucial in preventing this issue.

    tpo roofing improvement

    Detecting the Source of Ceiling Leaks

    Conducting a Visual Inspection of the Roof

    To identify the source of ceiling leaks when it rains, a visual inspection of the roof is an important first step. Start by examining the roofing materials, including shingles, tiles, or metal panels, for any visible damage, such as cracks, gaps, or missing pieces. Pay close attention to areas where different roofing components meet, such as valleys and flashing.

    Inspect the condition of the sealant around vents, chimneys, skylights, and any other roof penetrations. Look for signs of wear, deterioration, or improper installation. These vulnerable areas are prone to developing leaks. By systematically inspecting the roof, you can narrow down potential problem areas and gather valuable information for further investigation.

    Utilizing Moisture Meters and Thermal Imaging Technology

    In some cases, the source of ceiling leaks may not be apparent through visual inspection alone. Moisture meters and thermal imaging technology can provide invaluable assistance in detecting hidden leaks and identifying areas of moisture accumulation within the roof structure.

    Moisture meters measure the level of moisture content in materials such as wood, insulation, or drywall. By utilizing this tool, roofing professionals can pinpoint areas with elevated moisture levels, indicating potential leaks. Thermal imaging technology, on the other hand, captures infrared images that highlight temperature differences. This can help identify areas where water infiltration is occurring, as moisture often alters the temperature of affected materials.

    Consulting Professional Roofing Contractors for Expertise

    When it comes to accurately detecting the source of ceiling leaks when it rains, consulting professional roofing contractors is highly recommended. These experienced experts possess the knowledge, skills, and specialized equipment necessary to identify the precise origin of the leak.

    repairs roofing maintenance

    Prevention and Maintenance

    Regular Roof Inspections and Maintenance Routines

    Regular roof inspections are crucial for preventing ceiling leaks when it rains. Schedule inspections at least once a year, preferably before the rainy season begins. During inspections, roofing professionals can assess the overall condition of the roof, identify potential issues, and address them promptly.

    Maintenance routines should include tasks such as clearing debris from the roof surface, ensuring proper drainage, and checking for any signs of damage or wear. Fixing minor problems, such as replacing damaged shingles or reapplying sealant, can prevent them from escalating into major leaks during heavy rainfall.

    Importance of Keeping Gutters and Downspouts Clear

    Properly functioning gutters and downspouts play a significant role in diverting rainwater away from the roof and foundation. Regularly clean out debris, such as leaves, twigs, and sediment, to prevent clogging. Clogged gutters can lead to water overflow, which can seep into the roof and cause leaks. Additionally, check for any damages or leaks in the gutters and downspouts and repair them promptly.

    Understanding the Role of Proper Attic Ventilation

    Proper attic ventilation is essential for maintaining a healthy roofing system. It helps regulate temperature and humidity levels, reducing the risk of moisture buildup and subsequent damage. Excessive heat and moisture can compromise the integrity of the roof, leading to leaks and deterioration.

    Ensure that your attic has sufficient ventilation through vents or fans. This promotes air circulation, preventing condensation and the growth of mold or mildew. Proper insulation also contributes to maintaining a balanced attic environment.

    Applying Roof Coatings and Sealants for Added Protection

    Roof coatings and sealants provide an extra layer of protection against the elements, including rainwater. They help enhance the waterproofing capabilities of the roof and extend its lifespan. Consult with a professional roofing contractor to determine the most suitable coating or sealant for your specific roof type and climate conditions.

    labor cost for roofing

    Repairing Ceiling Leaks

    Temporary Fixes to Minimize Immediate Damage

    In cases of minor ceiling leaks, you can employ temporary fixes to minimize immediate damage. Start by placing a bucket or container under the leak to collect the dripping water. This helps prevent water from spreading and causing additional problems in your living space.

    Next, locate the source of the leak on the ceiling. Use a flashlight to inspect the area and look for any visible signs of damage, such as cracks or gaps. If possible, temporarily patch the area using waterproof tape or sealant. This can provide a temporary barrier to prevent water from entering until professional repairs can be performed.

    Identifying When Professional Repair is Necessary

    While temporary fixes can provide temporary relief, it’s important to understand when professional repair is necessary. If the ceiling leak persists, worsens, or occurs during heavy rainfall, it indicates a more serious underlying issue that requires professional attention.

    Additionally, if you notice significant water damage, sagging or bulging ceilings, or mold growth, it’s crucial to seek professional assistance. These signs may indicate structural damage or extensive water infiltration that requires professional expertise to address effectively.

    Exploring Repair Options Based on the Severity of the Leak

    The severity of the ceiling leak will determine the appropriate repair options. For minor leaks, a professional roofing contractor may recommend repairing or replacing damaged roofing materials, such as shingles or tiles. They will identify the exact source of the leak and perform the necessary repairs to restore the integrity of the roof.

    Free, No Obligation

    Request Your Free Estimate & Inspection

    Tell us about your roof and we’ll come take a look — no pressure, no cost. Or call us right now on (703) 964-6233.

    (703) 964-6233
    Contact Form Demo (#3)
    Owens Corning Preferred Contractor GAF System Plus CertainTeed SureStart PLUS BBB A+ Accredited HomeAdvisor

    RNC Roofing

    RNC Roofing and Construction Group — The Roofing Contractor Specialists. Protecting your home, one shingle at a time.

    Virginia

    (703) 964-6233 Sterling · Leesburg · Ashburn
    Loudoun & Fairfax County

    Maryland

    (703) 964-6233 Beltsville · District Heights
    All of Maryland
    © 2026 RNC Roofing and Construction Group — The Roofing Contractor Specialists Northern Virginia & Maryland
  • Types of Roof Damage | Understanding and Addressing Issues

    Protecting your home, one shingle at a time VA (703) 964-6233| MD (703) 964-6233| Free Estimate & Inspection
    Homeowner Help

    Types of Roof Damage | Understanding and Addressing Issues

    RNC Roofing and Construction Group June 20, 2023
    Types of Roof Damage | Understanding and Addressing Issues

    Types of Roof Damage | Understanding and Addressing Issues

    Roofs can experience various types of damage due to weather conditions, aging, structural issues, and external factors. Some common types of roof damage include wind damage, hail damage, water-related damage such as leaks and ponding water, age-related wear and tear, and structural problems like roof sagging and punctures. Each type of damage requires specific attention and repair techniques to ensure the longevity and functionality of the roof.

    Weather-Related Roof Damage

    Wind and Storm Damage

    Wind and storm damage can wreak havoc on roofs, compromising their integrity and leading to potential leaks and other issues. Understanding the causes and signs of wind damage is essential for homeowners.

    Causes and signs of wind damage

    Strong winds can arise from severe storms, hurricanes, or even regular weather patterns in certain regions. They can cause various types of roof damage, such as:

    • Dislodged or missing shingles: High winds can loosen or tear off shingles, leaving the underlying roof structure exposed.
    • Lifted or damaged flashing: The flashing around chimneys, vents, and skylights can be lifted or damaged, allowing water to penetrate the roof.
    • Weakened or displaced fascia and soffits: Intense wind gusts can impact the fascia and soffits, leading to structural damage.

    Signs of wind damage may include visibly missing or damaged shingles, exposed areas of the roof, leaks, or water stains on interior ceilings or walls.

    Impact on roof components

    When wind damage occurs, it can affect various roof components:

    • Shingles: Damaged or missing shingles compromise the waterproofing and protective capabilities of the roof, making it susceptible to leaks and further damage.
    • Flashing: Lifted or damaged flashing allows water to infiltrate the roof, potentially leading to water-related damage and deterioration.
    • Gutters: Strong winds can cause debris and branches to impact gutters, leading to blockages and affecting proper drainage.

    Precautionary measures and repairs

    To mitigate wind damage, homeowners can take precautionary measures such as:

    • Ensuring proper installation: Roofing materials should be installed according to manufacturer guidelines and local building codes to withstand high winds.
    • Regular inspections: Periodic roof inspections by professionals can identify potential weaknesses and address them promptly.
    • Reinforcing vulnerable areas: Adding extra fasteners, using stronger adhesives, or reinforcing vulnerable components can enhance the roof’s resistance to wind damage.

    Hail Damage

    Hail can be a significant threat to roofs, causing various types of damage. Understanding how to identify hail damage, its common signs, and the necessary steps for assessing and restoring hail-damaged roofs is crucial for homeowners.

    Identifying hail damage on roofs

    Identifying hail damage requires a thorough inspection of the roof. Look for the following indicators:

    • Dented or cracked shingles: Hailstones can leave visible dents or cracks on shingles, compromising their integrity.
    • Bruised or punctured underlayment: The underlayment beneath the shingles may exhibit signs of bruising or punctures caused by the impact of hailstones.
    • Damaged flashing: Hail can also cause damage to flashing around roof penetrations such as chimneys, vents, and skylights.

    Common signs and consequences

    The consequences of hail damage can vary depending on the severity and size of the hailstones. Common signs include:

    • Granule loss: Hailstones can dislodge granules from the shingles, exposing the underlying material and reducing the roof’s protective capabilities.
    • Cracked or broken shingles: Hail impact can lead to shingles cracking or breaking, compromising their ability to shed water effectively.
    • Leaks and water infiltration: Hail damage can create vulnerabilities that allow water to penetrate the roof, leading to leaks and potential water damage within the structure.

    Assessing and restoring hail-damaged roofs

    If you suspect hail damage, it’s crucial to have a professional roofing contractor assess the extent of the damage. They will provide a comprehensive inspection and recommend appropriate restoration measures.

    • Insurance claims: In cases of significant hail damage, it may be necessary to file an insurance claim. Document the damage with photographs and consult with your insurance provider to understand the process and requirements.
    • Repairs and replacements: Depending on the severity of the hail damage, repairs or replacements may be necessary. This can involve replacing damaged shingles, addressing underlying issues, and restoring the roof’s integrity.

    fix leaky roof

    Water-Related Roof Damage

    Roof Leaks and Water Intrusion

    Roof leaks and water intrusion are common types of water-related roof damage that homeowners may encounter. Understanding the causes, detecting leaks, and knowing the consequences of water damage is essential to address these issues effectively.

    Causes and detection of leaks

    Roof leaks can be caused by various factors, including:

    • Damaged or missing shingles: Cracked or missing shingles create openings for water to penetrate the roof structure.
    • Damaged flashing: Improperly installed or deteriorated flashing around chimneys, vents, and skylights can allow water to infiltrate.
    • Clogged gutters: When gutters are clogged with debris, water can overflow and seep into the roof, causing damage over time.

    Detecting roof leaks requires a systematic approach:

    • Visual inspection: Look for water stains on ceilings or walls, peeling paint, or mold and mildew growth, which may indicate water intrusion.
    • Attic examination: Inspect the attic for signs of water damage, such as damp insulation, rotting wood, or water drips.

    Consequences of water damage

    Water damage can have severe consequences if left unaddressed:

    • Structural damage: Prolonged exposure to water can weaken the roof structure, leading to sagging, rot, or even collapse.
    • Mold and mildew growth: Excess moisture can create an ideal environment for mold and mildew to flourish, posing health risks and further damaging the property.
    • Electrical hazards: Water infiltration can compromise electrical systems, increasing the risk of electrical malfunctions or fires.

    Repair options for roof leaks

    Repairing roof leaks requires proper identification of the source and suitable repair techniques:

    • Patching: Small leaks caused by localized damage can often be repaired by applying sealants or patches to the affected areas.
    • Shingle replacement: If damaged shingles are the source of the leak, replacing the affected shingles can help prevent further water intrusion.
    • Flashing repair or replacement: Damaged flashing should be repaired or replaced to ensure proper water sealing around roof penetrations.

    repairs roofing maintenance

    Age-Related Roof Damage

    Signs of an Aging Roof

    Over time, roofs naturally deteriorate due to age-related factors. Recognizing the signs of an aging roof is crucial for homeowners to take proactive measures and address potential damage promptly.

    • Curling or buckling shingles: Shingles that have curled or buckled at the edges are indicative of an aging roof. This can occur due to prolonged exposure to the elements.
    • Cracked or missing shingles: As a roof ages, shingles may crack or become dislodged, leaving vulnerable areas that can lead to water intrusion and further damage.
    • Granule loss: Aging roofs often experience granule loss, which can be observed as a buildup of granules in gutters or downspouts. This indicates a decrease in the shingles’ protective capabilities.

    Effects of UV radiation and weathering

    UV radiation and weathering are two primary factors that contribute to the aging process of a roof. Understanding their effects can help homeowners grasp the importance of maintaining and protecting their roofs.

    • UV radiation: Prolonged exposure to the sun’s UV rays can cause shingles to become brittle, fade in color, and lose their structural integrity. This can lead to increased vulnerability to other types of roof damage.
    • Weathering: Extreme weather conditions such as rain, snow, hail, and fluctuating temperatures take a toll on the roof over time. They can cause the materials to expand, contract, and deteriorate, accelerating the aging process.

    Addressing age-related damage through maintenance

    Regular maintenance is key to extending the lifespan of an aging roof and minimizing potential damage. Homeowners should consider the following maintenance practices:

    • Inspections: Schedule periodic roof inspections by a professional to assess the condition of the roof, identify areas of concern, and address any potential issues promptly.
    • Repairs and replacements: Perform necessary repairs or replacements as soon as signs of age-related damage are identified. This includes replacing cracked or missing shingles and addressing areas of granule loss.
    • Cleaning and debris removal: Keep the roof clean and free from debris that can retain moisture and promote the growth of mold and algae, which can further deteriorate the roof.

    how to remove roof moss

    Vegetation-Related Roof Damage

    Moss and Algae Growth

    The presence of moss and algae on roofs is a common issue that can lead to various types of damage if left unaddressed. Understanding the impact of moss and algae, preventive measures, and the consequences of neglecting vegetation-related damage is crucial for maintaining a healthy roof.

    Impact on roof surfaces

    Moss and algae growth can have detrimental effects on roof surfaces:

    • Moisture retention: Moss and algae trap moisture, which can accelerate the deterioration of roofing materials, especially in humid environments. This can lead to the weakening of the roof structure over time.
    • Shingle damage: Moss and algae can penetrate beneath the shingles, causing them to lift, crack, or warp. This compromises the roof’s ability to shed water, leading to potential leaks and water damage.
    • Reduced lifespan: The presence of moss and algae can shorten the lifespan of roofing materials, resulting in the need for premature repairs or replacements.

    Preventing and removing moss and algae

    To prevent moss and algae growth on the roof, consider the following measures:

    • Regular roof maintenance: Keep the roof clean by removing debris, leaves, and twigs that can provide a favorable environment for moss and algae to thrive.
    • Trimming nearby trees: Ensure that tree branches are adequately trimmed to minimize shade and improve air circulation, reducing moisture buildup.
    • Zinc or copper strips: Installing strips of zinc or copper near the roof’s ridge can inhibit moss and algae growth by releasing small amounts of metal ions during rainfall.
    • Biocide treatments: Applying specialized biocide treatments can effectively eliminate existing moss and algae and inhibit their future growth.

    Consequences of neglecting vegetation-related damage

    Neglecting vegetation-related damage can lead to severe repercussions:

    • Structural degradation: Moss and algae can compromise the integrity of the roof, leading to leaks, water damage, and even structural issues if left unchecked.
    • Increased maintenance costs: Delaying the removal of moss and algae can result in more extensive damage, requiring costly repairs or even a complete roof replacement.
    • Aesthetics and curb appeal: Excessive moss and algae growth can make a roof appear unsightly, negatively impacting the overall aesthetics and value of a property.

    evaluating roof damage

    Structural Roof Damage

    Sagging Roofs

    Sagging roofs are a serious type of structural damage that can compromise the integrity and safety of a building. Understanding the causes, signs, and necessary actions to rectify this issue is essential for homeowners.

    Causes and signs of roof sagging

    Roof sagging can occur due to various factors, including:

    • Overload: Excessive weight on the roof, such as accumulated snow, heavy equipment, or multiple layers of roofing materials, can cause the roof structure to sag over time.
    • Poor construction or design: Inadequate construction techniques, improper use of materials, or insufficient support structures during the initial installation can lead to roof sagging.
    • Water damage: Prolonged water infiltration due to leaks or inadequate drainage can weaken the roof’s structural components, leading to sagging.

    Signs of roof sagging may include:

    • Visibly dipping or bowing sections of the roofline.
    • Cracked or distorted ceilings and walls inside the building.
    • Uneven or sagging areas on the roof surface.

    Structural implications and safety concerns

    A sagging roof indicates significant structural problems that should not be ignored. The implications of a sagging roof include:

    • Increased risk of roof collapse: The compromised structural integrity of a sagging roof poses a potential hazard to the occupants of the building, making it crucial to address the issue promptly.
    • Damage to other building components: Roof sagging can exert stress on the walls, windows, and foundation, potentially causing additional damage throughout the structure.

    Rectifying sagging roofs through reinforcements

    When dealing with a sagging roof, it is vital to consult a professional roofing contractor or structural engineer who can assess the severity of the damage and recommend appropriate measures. Reinforcements may include:

    • Installing additional support beams or trusses to strengthen the roof structure.
    • Removing excess weight, such as snow accumulation or unnecessary layers of roofing materials.
    • Repairing or replacing damaged structural components, such as rafters or joists.

    Free, No Obligation

    Request Your Free Estimate & Inspection

    Tell us about your roof and we’ll come take a look — no pressure, no cost. Or call us right now on (703) 964-6233.

    (703) 964-6233
    Contact Form Demo (#3)
    Owens Corning Preferred Contractor GAF System Plus CertainTeed SureStart PLUS BBB A+ Accredited HomeAdvisor

    RNC Roofing

    RNC Roofing and Construction Group — The Roofing Contractor Specialists. Protecting your home, one shingle at a time.

    Virginia

    (703) 964-6233 Sterling · Leesburg · Ashburn
    Loudoun & Fairfax County

    Maryland

    (703) 964-6233 Beltsville · District Heights
    All of Maryland
    © 2026 RNC Roofing and Construction Group — The Roofing Contractor Specialists Northern Virginia & Maryland
  • Blistering Roof: What Causes It and How to Prevent and Repair

    Protecting your home, one shingle at a time VA (703) 964-6233| MD (703) 964-6233| Free Estimate & Inspection
    Roof Maintenance

    Blistering Roof: What Causes It and How to Prevent and Repair

    RNC Roofing and Construction Group April 6, 2023
    Blistering Roof: What Causes It and How to Prevent and Repair

    Blistering Roof: What Causes it And How To Prevent And Repair

    Your roof is a crucial component of your home’s protection against the weather. It shields your living space from the elements, ensuring comfort and safety. Nevertheless, roofs are susceptible to damage and wear over time. One prevalent problem that homeowners encounter is a blistering roof. Blistering occurs due to various reasons, and if not addressed, it can lead to more severe issues. In this blog post, we will explain the causes and prevention measures of blistering roofs, along with effective repair methods.

    What is a Blistering Roof?

    A blistering roof is when bubbles or bumps form on the surface of the roof. These blisters can be small or large, and they can form in clusters or spread out across the entire roof. While blistering may seem like a minor issue, it can lead to bigger problems if left unchecked. Water can seep into the blisters and cause the roofing material to deteriorate, which can lead to leaks and other issues.

    picture of shingles blistering

    What Causes Blistering?

    Blistering can be caused by a variety of factors, including:

    Poor Ventilation

    Poor ventilation in the attic can cause heat to build up, which can lead to blistering. The heat causes the roofing material to expand and contract, which can lead to blisters forming.

    ventilation fan

    Moisture

    Excessive moisture can also cause blistering. Water can seep into the roofing material and cause it to expand, which can lead to blisters forming.

    heavy rain fall

    Low-Quality Materials

    Low-quality roofing materials can also cause blistering. If the roofing material is not designed to withstand the elements, it can deteriorate and blister over time.

    material shingle how much does roof cost in Maryland

    Age

    As a roof ages, it becomes more susceptible to damage. Over time, the roofing material can deteriorate and lead to blistering.

    damaged building in Maryland

    Signs of a Blistering Roof

    The most obvious sign of a blistering roof is the presence of bubbles or bumps on the surface of the roof. However, there are other signs to look out for, including:

    signs of blistering roof , signs to replace your roof

    Cracking

    As the blisters grow and spread, they can cause the roofing material to crack. This can lead to leaks and other issues.

    cracked damaged shingles , roofing, blistering roof

    Peeling Paint

    If the blisters are large enough, they can cause the paint on the roof to peel.

    peeling paint , blistering roof

    Water Stains

    If the blisters have caused leaks, you may notice water stains on the ceiling or walls inside your home.

    dark areas on roofing from roof lean in heavy rain , peeling paint blistering roof

    Preventing Blistering on Your Roof

    The best way to prevent blistering on your roof is to ensure that it is properly ventilated. Good ventilation allows heat to escape and prevents moisture from building up in the attic. Other ways to prevent blistering include choosing high-quality roofing materials and hiring a professional roofing contractor to install or repair your roof.Another way to prevent blistering is to apply a reflective roof coating. This type of coating reflects sunlight and heat away from the roof, which can help to prevent overheating and blistering. Additionally, keeping your roof clean and free of debris can help to prevent moisture buildup, which is a common cause of blistering.Regular roof inspections and maintenance are also important for preventing blistering. By catching and addressing any issues early on, you can avoid costly repairs down the line.

    prevent blistering shingles , preventing storm damage roof
    contact rnc roofing and construction

    Contact a Professional Today

    cracked damaged shingles , roofing, blistering roof

    Blistering on your roof can be a frustrating and costly issue to deal with. It can compromise the integrity of your roof and lead to more serious problems if left untreated. By identifying the cause, removing damaged material, and repairing the affected area, you can effectively address blistering on your roof. Taking preventative measures such as proper ventilation, using high-quality materials, and regular maintenance can also help to prevent blistering from occurring in the first place.Remember, addressing blistering on your roof should be done promptly and by a professional to ensure that the job is done correctly and effectively. With proper care and attention, you can keep your roof in good condition and avoid issues like blistering.Read More About Roof Replacement Here

    More Informative Post

    Free, No Obligation

    Request Your Free Estimate & Inspection

    Tell us about your roof and we’ll come take a look — no pressure, no cost. Or call us right now on (703) 964-6233.

    (703) 964-6233
    Contact Form Demo (#3)
    Owens Corning Preferred Contractor GAF System Plus CertainTeed SureStart PLUS BBB A+ Accredited HomeAdvisor

    RNC Roofing

    RNC Roofing and Construction Group — The Roofing Contractor Specialists. Protecting your home, one shingle at a time.

    Virginia

    (703) 964-6233 Sterling · Leesburg · Ashburn
    Loudoun & Fairfax County

    Maryland

    (703) 964-6233 Beltsville · District Heights
    All of Maryland
    © 2026 RNC Roofing and Construction Group — The Roofing Contractor Specialists Northern Virginia & Maryland
  • 5 Roofing Tips For New Homeowners | RNC Roofing

    Protecting your home, one shingle at a time VA (703) 964-6233| MD (703) 964-6233| Free Estimate & Inspection
    Home Improvement

    5 Roofing Tips For New Homeowners | RNC Roofing

    RNC Roofing and Construction Group January 5, 2017
    5 Roofing Tips For New Homeowners | RNC Roofing

    5 Roofing Tips For New Homeowners

    As a new homeowner, you may have many questions about how to take care of your home, and one of the most important aspects of home maintenance is roof care. Your roof is the first line of defense against the elements, and keeping it in good condition is essential for the safety and comfort of your family. In this article, we’ll share 5 roofing tips that every new homeowner should know to ensure their roof lasts for years to come.

    Tip #1:Get a Professional Roof inspection

    Before you move into your new home, it’s essential to have a professional roof inspection. A professional roofing contractor will assess the condition of your roof and identify any potential issues that may need to be addressed. This inspection is crucial to ensure that your roof is in good condition, and it will give you peace of mind knowing that you won’t be surprised by any unexpected repairs.

    Here are some reasons why a professional roof inspection is important:

    • Roofing experts can identify signs of wear and tear, leaks, and other issues that could affect the lifespan of your roof.
    • Early detection of problems can save you money in the long run by preventing expensive repairs.
    • You’ll have a better idea of how much life is left in your roof, which can help you plan for future repairs or replacement.

    clean gutters

    Tip #2:Keep Your Gutters Clean

    Your gutters play an essential role in keeping your roof in good condition. They channel water away from your home’s foundation, preventing water damage and mold growth. However, if your gutters are clogged with debris, they can’t do their job properly, and water can overflow onto your roof, causing leaks and other damage. That’s why it’s crucial to keep your gutters clean.

    Here are some tips for maintaining clean gutters:

    • Clean your gutters at least twice a year, or more often if you live in an area with a lot of trees or heavy rainfall.
    • Use a sturdy ladder and wear gloves to protect your hands.
    • Use a garden hose to flush out debris and ensure that water is flowing freely through your gutters.
    • Consider installing gutter guards to prevent debris from accumulating in your gutters.

    damaged blistering shingles

    Tip #3:Check Your Roof for Damage Regularly

    Roof damage can happen for many reasons, including severe weather, tree branches, and pests. Catching roof damage early is crucial to prevent expensive repairs down the road. Regular roof maintenance can help you catch problems before they become major issues.

    Here are some signs of roof damage to look out for:

    • Missing or broken shingles: These can be caused by wind, hail, or other severe weather conditions.
    • Leaks: Water stains on your ceiling or walls can indicate a leaky roof.
    • Cracks or holes: These can be caused by debris or foot traffic on your roof.
    • Sagging: A sagging roof may indicate that there is structural damage that needs to be addressed immediately.

    If you notice any of these signs, it’s important to have a roofing professional assess the damage and recommend repairs.

    tree branch hanging on roof. Overhanging tree branch

    Tip #4:Trim Trees Near Your Roof

    Trees provide shade and beauty to your home, but they can also be a hazard to your roof. Overhanging branches can scratch your roof, damage your shingles, and even fall on your roof during a storm causing significant damage. It’s essential to trim trees near your roof to prevent any of these problems from occurring. Here are some tips for tree trimming:

    • Trim branches that are within six feet of your roof.
    • Cut branches that hang over your roof.
    • Prune branches that touch or rub against your roof.
    • Remove any dead or diseased trees near your house.

    When trimming trees, make sure to use the proper equipment and techniques. If you are unsure how to do it yourself, consider hiring a professional tree service to do it for you. Not only will they have the necessary tools and experience, but they will also ensure that the job is done safely.

    roof inspection reston , roof maintenance tips , tpo roofing

    Tip #5:Regularly Inspect Your Roof

    Regular roof inspections are crucial to maintaining the health of your roof. As a new homeowner, you should inspect your roof at least twice a year, once in the spring and once in the fall. Here are some things to look for during a roof inspection:

    • Check for any missing or damaged shingles.
    • Look for any cracks or holes in your roof.
    • Check for any signs of water damage or leaks.
    • Inspect your gutters for debris or damage.
    • Look for any signs of animal or insect infestation.

    By regularly inspecting your roof, you can catch any potential problems early on and prevent them from turning into more significant issues. If you notice any issues during your inspection, be sure to address them promptly.

    house , roofing

    Look After Your Home

    Your roof is one of the most important parts of your home, and it’s essential to take care of it. As a new homeowner, following these five roofing tips can help you keep your roof in excellent condition and prevent any major issues from occurring. Remember to keep your gutters clean, address any leaks promptly, consider ventilation, trim trees near your roof, and regularly inspect your roof.

    Learn More Here

    Free, No Obligation

    Request Your Free Estimate & Inspection

    Tell us about your roof and we’ll come take a look — no pressure, no cost. Or call us right now on (703) 964-6233.

    (703) 964-6233
    Contact Form Demo (#3)
    Owens Corning Preferred Contractor GAF System Plus CertainTeed SureStart PLUS BBB A+ Accredited HomeAdvisor

    RNC Roofing

    RNC Roofing and Construction Group — The Roofing Contractor Specialists. Protecting your home, one shingle at a time.

    Virginia

    (703) 964-6233 Sterling · Leesburg · Ashburn
    Loudoun & Fairfax County

    Maryland

    (703) 964-6233 Beltsville · District Heights
    All of Maryland
    © 2026 RNC Roofing and Construction Group — The Roofing Contractor Specialists Northern Virginia & Maryland